Moving your WooCommerce store to a new domain, switching servers, or even redesigning it from the ground up can be really exciting! But let’s be honest, migrating your products can feel like a daunting task. Your product catalog is the lifeblood of your store, and getting it transferred correctly is essential to prevent issues like data loss, broken images, or missing variations.
Things get even trickier when you’re handling variable products, multiple attributes, custom fields, categories, and large inventories. Manually recreating products just isn’t feasible, especially if your store is packed with hundreds or even thousands of items.
That’s where the Product Import Export for WooCommerce by WebToffee makes a big difference. It lets you export products from your existing store and import them into a new one — quickly and accurately. With support for images, variations, custom fields, and flexible file formats, this plugin makes product migration genuinely hassle-free.
This guide walks you through the complete step-by-step process of migrating WooCommerce products using the free version of the plugin. You’ll install it on both stores, export from the old one, and import into the new one.
Export WooCommerce Products from the Old Store
To get your WooCommerce products migrated, the first step is to export them as a CSV file. With the Product Import Export for WooCommerce plugin, you can easily do this in just a few clicks, making your products ready for import in no time.
Step 1: Install the WebToffee Product Import Export Plugin
First, install the plugin on your old (source) store.
- Go to Plugins > Add New Plugin from your WordPress dashboard.
- Search for “Product Import Export for WooCommerce”.
- Click Install Now, then Activate.

Step 2: Select Product as Post Type
After activating the plugin,
- Go to WebToffee Import Export (Basic) > Export from your WordPress dashboard.
- Under Post Type, select Product.
- Click the Select an export method button to proceed to the next step.

Step 3: Select an Export Method
The plugin gives you two export options. Choose the one that fits your needs.
- Quick Export: Ideal for speed and simplicity. Exports all products with essential fields in one click. Best for straightforward migrations or full-catalog backups.
- Advanced Export: Built for greater control. Select specific products, choose which fields to export, and apply filters to include exactly the data you need.
For most store migrations, Quick Export is all you need.

Step 4: Filter Export Data (Advanced Export Only)
If you selected Advanced Export, this step lets you narrow down exactly which products get included.
- Set the total number of products to export to Unlimited to include your full catalog.
- Filter by Product categories, Product tags, or Product status if you only need a subset of products.
- Leave fields blank to export all products without restrictions.
- Click Step 4: Map and reorder export columns to continue.

Step 5: Map and Reorder Export Columns
In this step, you control which product fields appear in the exported CSV file and how they’re ordered.
- Select fields to export: All standard product fields are pre-selected. Uncheck only what you don’t need.
- Customize column headers: Rename columns to match your preferred naming convention — helpful when importing to a different environment.
- Reorder columns easily: Use the drag-and-drop interface to arrange columns in your preferred order for a clean, organized file.
Once everything looks good, click Step 5: Export to proceed.

Step 6: Export Your Products
This is the final step before generating your export file. Review these settings before clicking Export.
- Export file name: Give your file a clear, recognizable name (e.g., products-old-store-2024).
- Export in batches of: Choose how many products are processed per cycle. For large stores, smaller batch sizes help prevent server timeouts.
- Delimiter: Select the column separator for your CSV. Comma is the default and works for most import destinations.
Once everything is set, click Export. The plugin will generate and download the CSV file to your computer.

Once the export completes, a pop-up will appear with a Download File button. Click it to save the CSV to your computer. This file contains all the product data you’ll use to populate your new store.
Import WooCommerce Products to the New Store
Now switch to your destination (new) store. Install the same plugin here and follow the steps below to bring your product catalog in.
Note: Before starting, make sure your CSV file is saved in UTF-8 encoding. This ensures product names, special characters, and descriptions import correctly without errors.
Step 1: Select Product as Post Type for Import
- Go to WebToffee Import Export (Basic) > Import from your WordPress dashboard.
- Under Post Type, choose Product.
- Click Select Import Method to proceed.

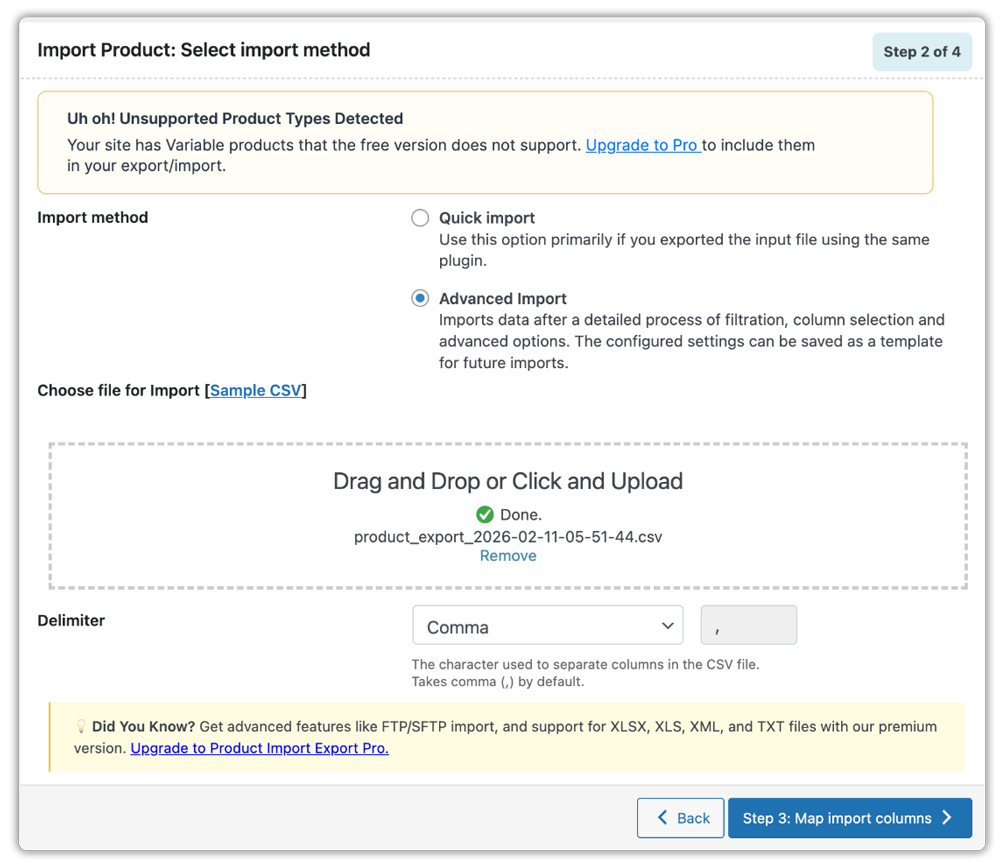
Step 2: Choose an Import Method
The plugin offers two ways to import your products. Here’s how to decide:
- Quick Import: Best when your CSV was exported using the same plugin. Simply upload the file and click Import — the plugin automatically detects the structure and maps all fields for you.
- Advanced Import: Use this when you need more control — for example, when your CSV has custom columns or a different structure that needs adjusting before importing.
For files exported directly from WebToffee’s plugin, Quick Import handles everything automatically.
After selecting your method:
- Upload your CSV file using the drag-and-drop area or click to browse.
- Set the Delimiter to match the one used during export (comma by default).
- Click Step 3: Map import columns to proceed (or click Import directly for Quick Import).
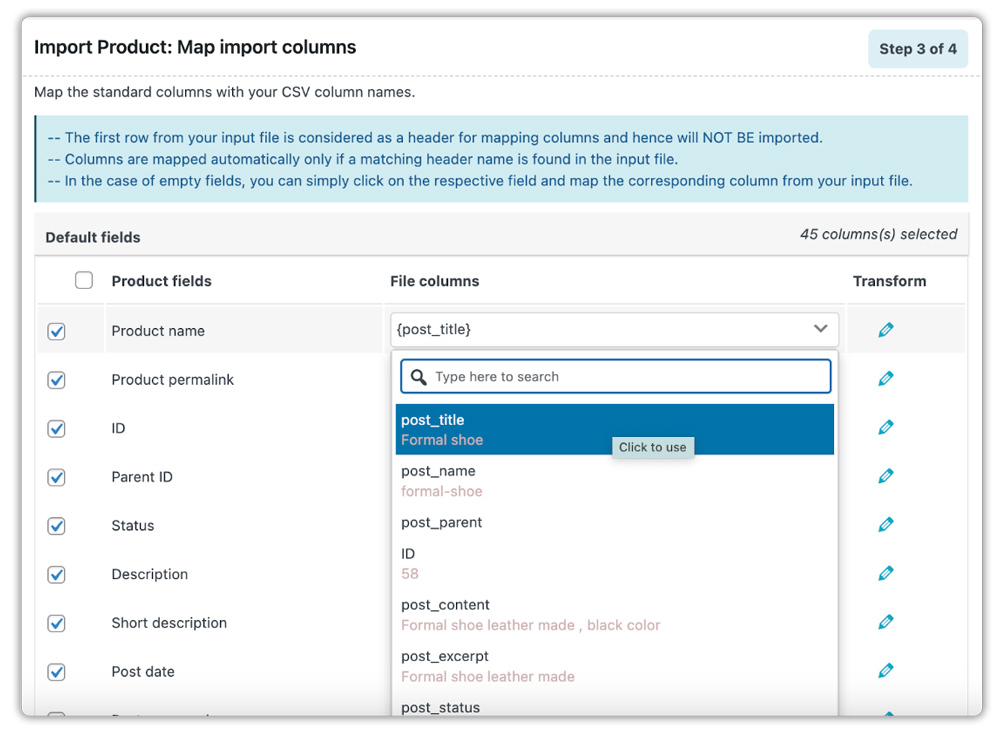
Step 3: Map Import Columns
This step connects the columns in your CSV to the correct WooCommerce product fields.
- The plugin automatically maps columns when your CSV header names match WooCommerce field names exactly — which is almost always the case when you export using the same plugin.
- For any unmatched columns, click the dropdown next to the field and select the correct CSV column.
- Skip fields you don’t want to import by leaving them unmapped.
- Save your mapping as a template for future use, so you don’t need to remap next time.
Once all columns are correctly mapped, click Advanced options/Batch import to continue.
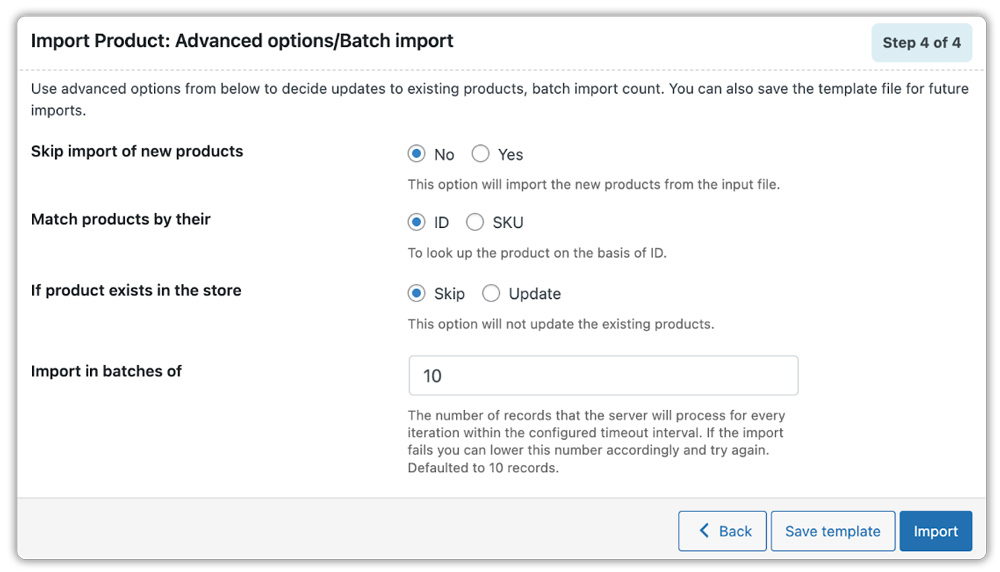
Step 4: Configure Advanced Import Options
Before running the import, review the advanced settings to control how product data is handled.
- Choose whether to import or skip new products (products not currently in the store).
- Select ID or SKU as the matching field to identify existing products.
- Decide whether to skip or update products that already exist in the new store.
- Set a batch size to process records in chunks, which helps prevent timeouts for large catalogs.
Once everything is configured, click Import. The plugin will process your CSV and import all products into the new store.
Step 5: Verify Imported Products
Once the import completes, the plugin shows a summary of what was processed. Take a moment to verify.
- Go to Products > All Products from your WordPress dashboard.
- Browse your product listings to confirm products, images, categories, and variations are all transferred correctly.
- Spot-check a few variable products to make sure attributes and pricing are intact.
That’s it! Your WooCommerce products are now live on the new store.
Wrapping Up
Migrating WooCommerce products doesn’t have to be complicated. With the Product Import Export Plugin for WooCommerce, you can move your entire catalog — including images, variations, attributes, categories, and custom fields — in just a few minutes. The export-then-import workflow keeps your data clean and consistent from the moment it lands on the new store.
For stores with large catalogs, complex product types, or that need recurring syncs between environments, consider upgrading to the Pro version. It adds support for XML and Excel formats, FTP/SFTP file transfer, scheduled imports and exports, and extended filtering options — all of which are useful for ongoing store management.
If you need to migrate more than just products, WebToffee offers a complete solution. The Import Export Suite for WooCommerce allows you to handle products, users, orders, coupons, and subscriptions from a single plugin. If you need to move order history separately, the WooCommerce export orders plugin is purpose-built for that. And for transferring customer accounts and user data, the WooCommerce user import export plugin makes the process just as straightforward. Together, they give you a complete toolkit for a full store migration.
We hope this guide helped simplify the process. If you have any questions or feedback, feel free to drop them in the comments below.


Recent Comments