Troubleshooting guide for Shopify Multi Carrier Shipping Label app
Automating Shopify shipping has become easier with the Shopify Multi Carrier Shipping Label app. The app helps you integrate with multiple carriers like FedEx, UPS, USPS, Stamps.com, DHL, Canada Post, Australia Post, etc. It displays carrier calculated shipping rates at checkout, let’s you print shipping labels directly from the merchant dashboard, automatically fulfills the Shopify orders by including the delivery tracking number, and does much more.
This guide explains the common mistakes or issues that occur while setting up the app and how you can fix them.
In this guide
- Shopify orders are not getting imported properly!
- Carrier services are not displayed under Shopify shipping profiles!
- No shipping rates are displayed on the Shopify checkout page!
- Shipping rates are not being displayed at checkout even though the carrier-calculated rate is enabled on the Shopify store!
- Mismatch in carrier account rates and Rates returned by the app!
- Unable to find how to activate UPS negotiated/discounted rates and set up UPS SurePost!
- Shipping Label generation fails!
- Shipping Label generation fails and the status is “Authentication Failed” for FedEx!
- Generated shipping labels say ‘Test – Do Not Ship’!
- The order status is still at “Initial” even though all the errors are corrected!
- The Shopify order is not being marked as fulfilled even though the shipping label is generated!
- The Pickup request keeps showing “Failure”!
- Shipping Labels are not printing properly!
- Product weight is used as 1kg, while the Actual weight is much lesser than that!
- Unable to understand the setting up of the Box packing process!
Shopify orders are not getting imported properly!
Ensure that the Shopify order is in the unfulfilled state
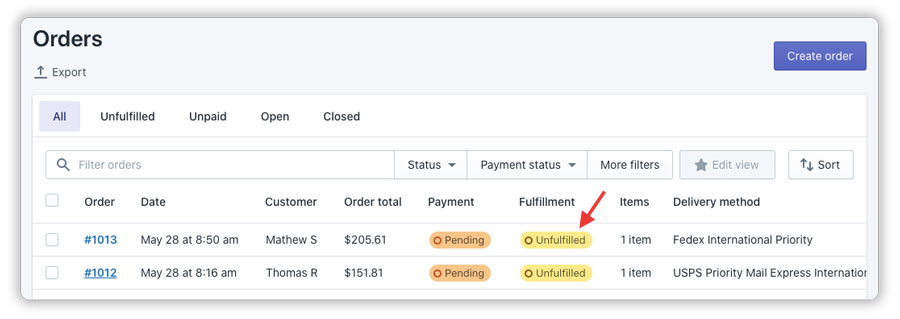
Ensure that all the products are imported into the app
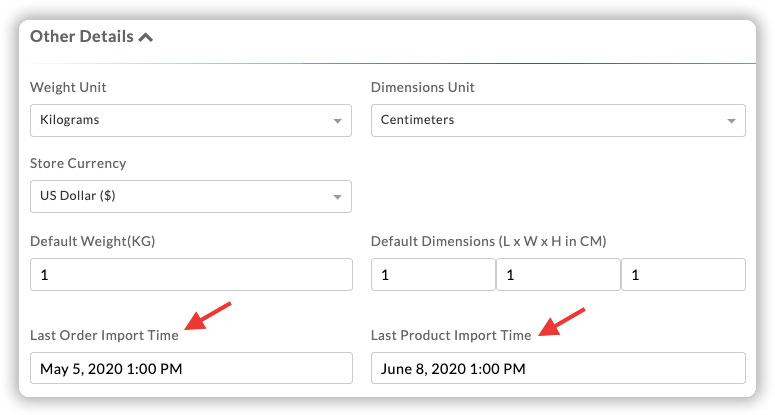
By default, the app automatically imports all the products available within your Shopify store.
If the products are not imported, change the “last product import time” under “store settings”. Now, click on “import” again. This ensures all the products added or updated after the particular date are imported into the app.
Carrier services are not displayed under Shopify shipping profiles!
There are cases when the carrier services provided by the app are not displayed under the Shopify shipping profile, even though you have set up the app properly, as shown below.
This issue occurs since this list is heavily cached by Shopify and will not refresh frequently. So, you need to clear your cache and try again, so that all the services provided by the app appear under this section.
No shipping rates are displayed on the Shopify checkout page!
This is the most common issue faced by Shopify merchants. However, there are quite a few points to consider, to ensure that the shipping rates are displayed on the Shopify checkout page.
Note:
In order to display shipping rates at Shopify checkout, you need to enable carrier calculated shipping on your store.
Ensure that the Product weight and dimensions are added properly
In order to calculate the accurate shipping rate of an order, and display at the Shopify checkout, it is very important that you configure the weight and dimensions (if available) of the product correctly. You can either configure the weight under the Shopify product section, or you can directly configure both weight & dimensions under the product settings in the app.

Ensure that the shipping carrier account details are correct
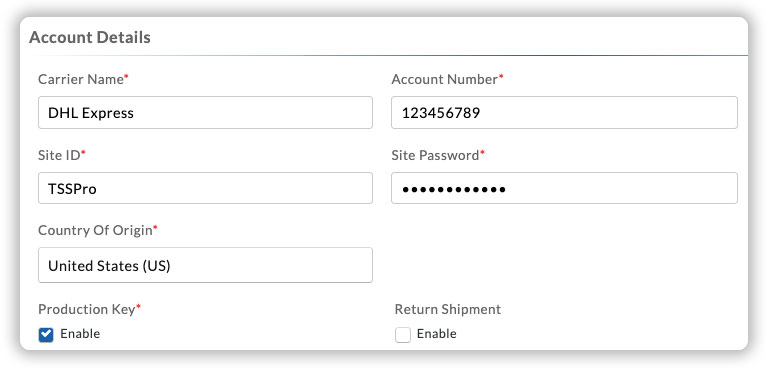
For whichever carrier you use, ensure that you have configured the carrier account with the correct account details. For example, if you are configuring a DHL account, you need to ensure that all the account details are correct along with the country of origin as well.
Ensure that the shipper address and recipient address is correct
To display the rates at checkout, it’s important that you configure the correct store address. Also, you need to ensure that the customer address to which you are shipping is correct. Whenever there is a mistake with the addresses or even the zip code within the app, the rates won’t be displayed at the Shopify checkout.
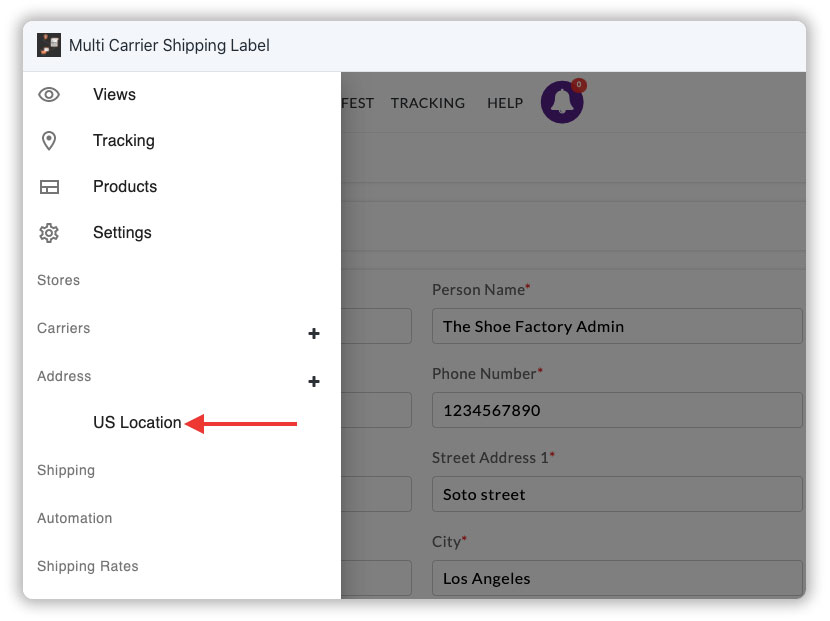
So, you need to verify if the store address is correct from the “Address” section under the “App settings“.
Ensure that the Rates Automation rules are set properly
Once you add a shipping carrier in the app, the app automatically creates shipping rate automation rules that display the shipping rates of all the available shipping services on the checkout page.
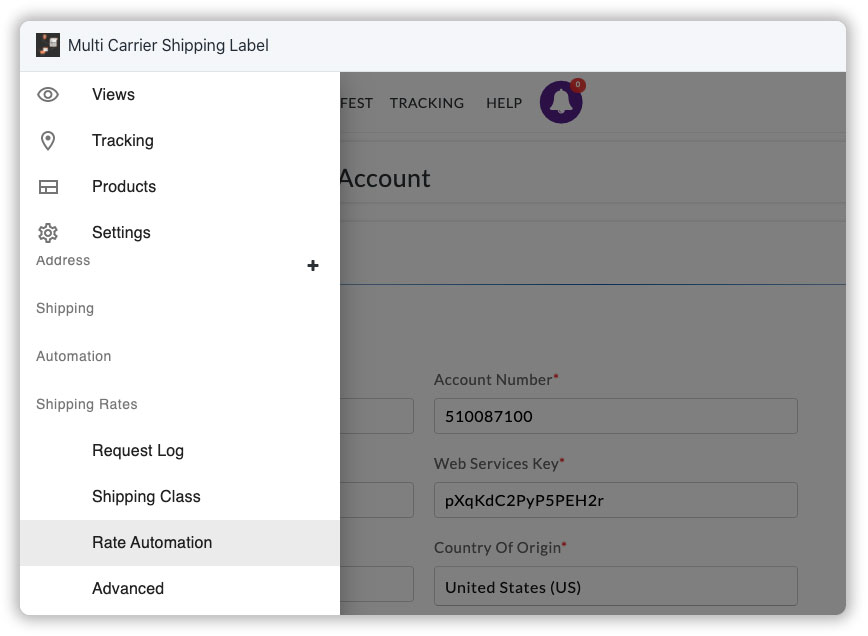
To verify the automation rules related to the carrier that you have added, head to App Settings --> Shipping Rates --> Rate Automation, as shown below.
You can see the status of the automation rule under the “Active” section. You can click on the “Edit” option to see the rules available.
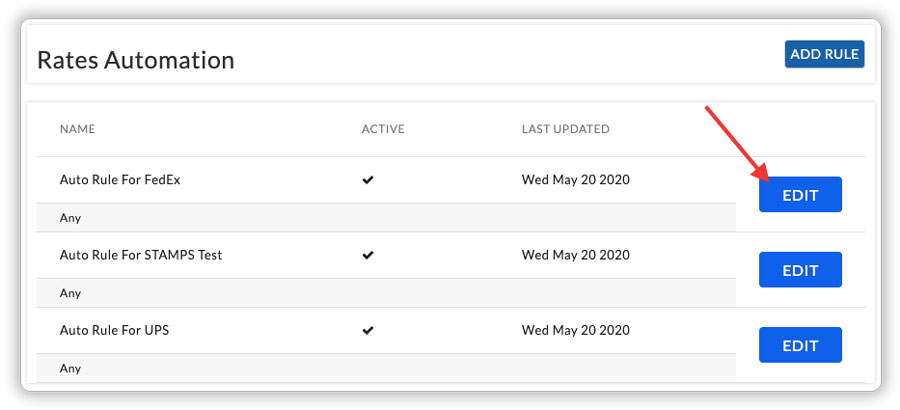
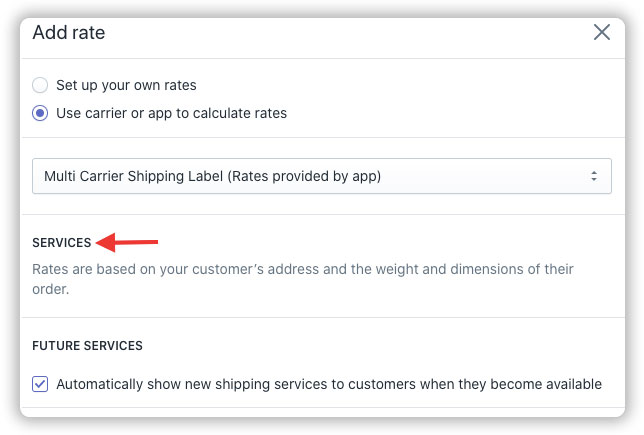
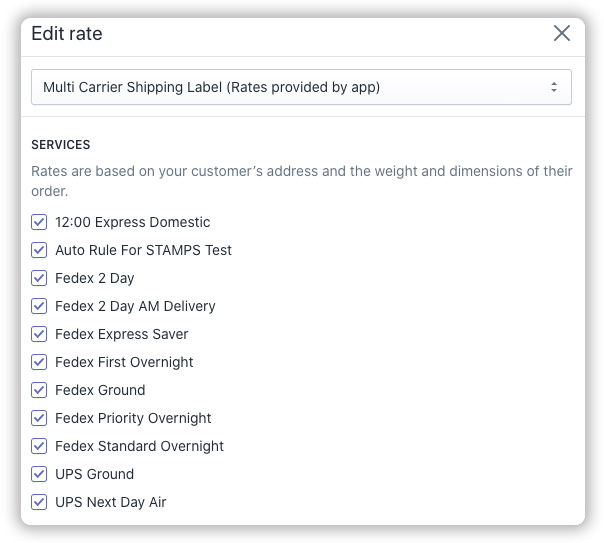
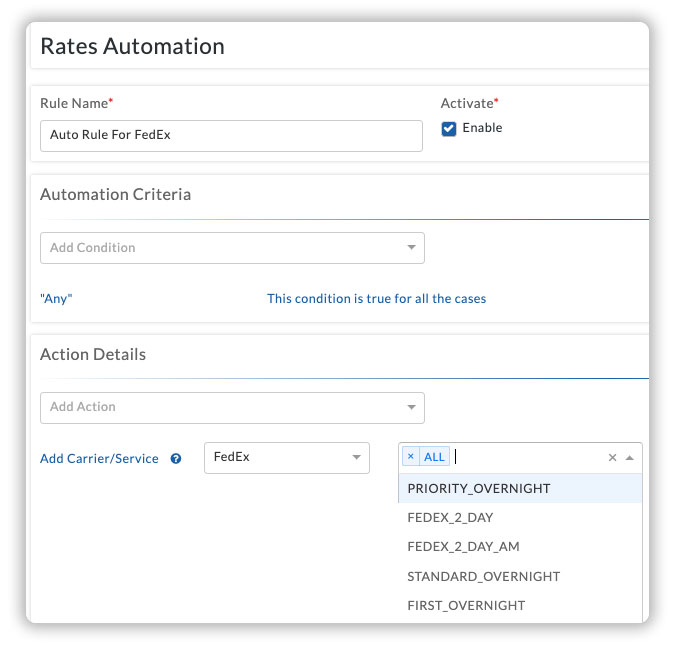
Under this section, you can “activate the rule”, if it is inactive. Also, you can select the required services for the carrier as shown below. Once done, click on “Update Rule” to save the changes.
Make sure that the selected shipping services are available for the customer address
Once the automation rules are set up and the services are selected as per your requirement, you need to make sure that these services are available for all the addresses to which you ship.
Now, if you have enabled “All” services, there may be cases, where certain shipping services are available for only one location and not for other locations. In such a case, the app will only display the shipping services that are available for that location, at checkout.
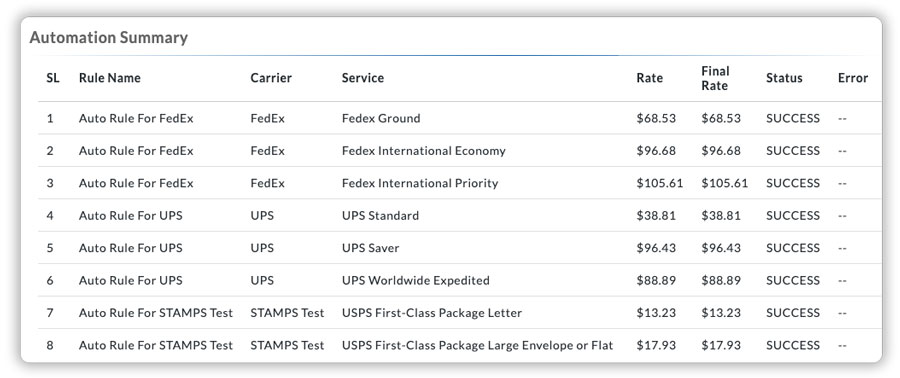
To verify this, head to App settings --> Shipping Rates --> Request Log, and click on the most recent request. Scroll down to find the Automation Summary, from where you will be able to see all the shipping services that are available for the destination address.
Shipping rates are not being displayed at checkout even though the carrier-calculated rate is enabled on the Shopify store!
Verify that you have enabled carrier calculated shipping on your Shopify store.
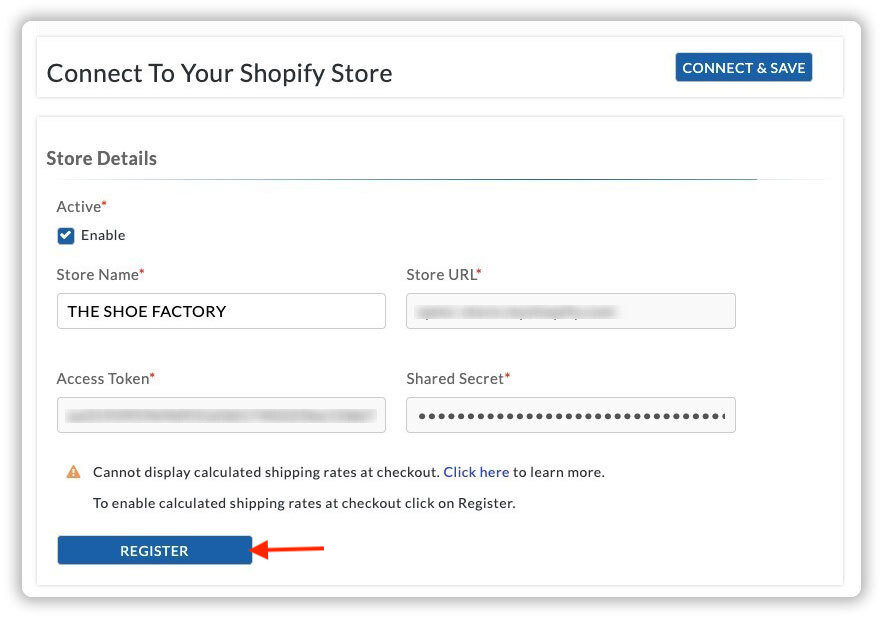
If you have enabled the carrier-calculated rates after you have installed the app, you need to register this within the app. Without registering, you won’t be able to display shipping rates at Shopify checkout.
To do that, head to App settings --> Store --> Register.
However, if you have enabled carrier-calculated shipping on your Shopify store before installing the app, it is automatically registered on your Shopify store by the app, when you install it. Please verify this under the store settings.
Mismatch in carrier account rates and Rates returned by the app!
The rates mismatch could happen due to incorrect or missing configurations in the Ship From Address, Ship To Address, Weight, Dimensions, Package Type, or the Carrier Services & Rates.
To verify if there is any mismatch, head to the App settings –> Shipping rates –> Request Log. Select the required rate log.
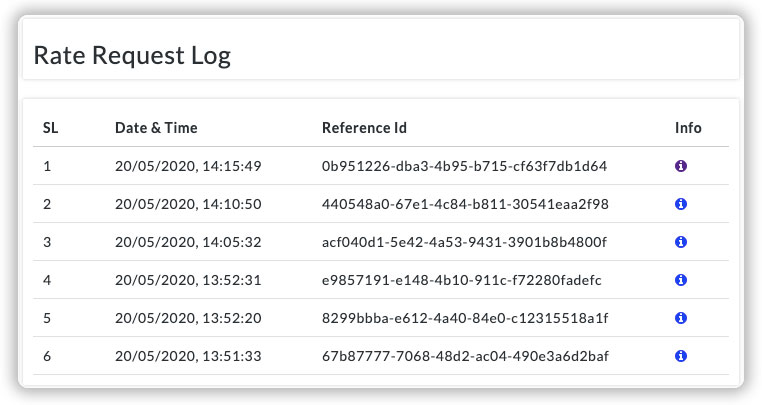
You can find the following sections under a rate request log.
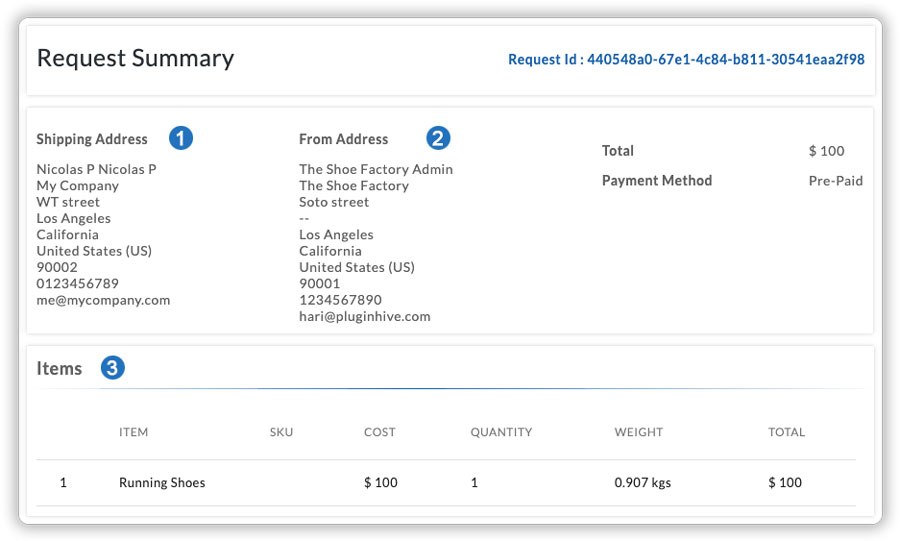
1. Shipping address (Customer address)
This is the address provided by a customer at the Shopify checkout. Verify this address and ensure that the address is within the serviceable area of the carrier that you have chosen so that, the shipping can be done without any extra charges.
2. From address (Store address)
Verify the store address and ensure that the correct location is set as the default address. If you have multiple store addresses, make sure the right one is selected.
3. Items
Here, you can see the product details, quantity, weight, and the dimensions (if available) of the product. Ensure that all these values match with the original product values configured.
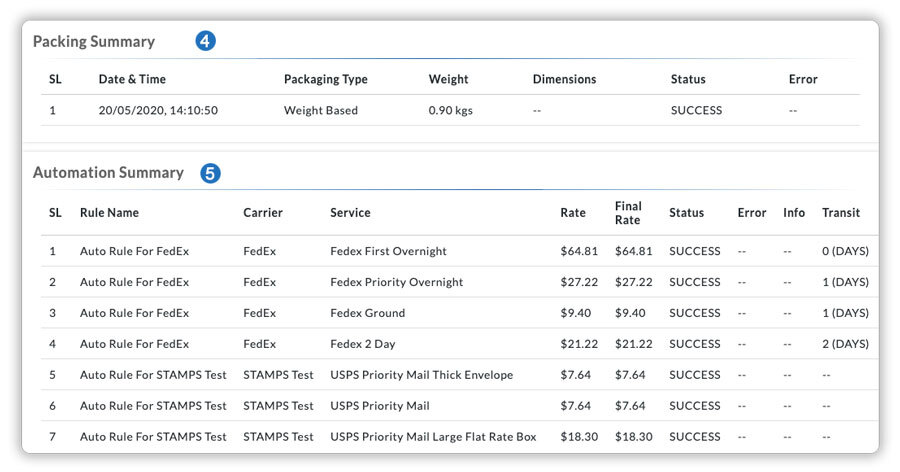
4. Packing summary
Here, you can see the packaging type, weight, dimensions (if available), and the status of the packing process. Verify if the packaging method is correct and the values used for the packing process are accurate.
5. Automation summary
Under this section, you can see all the carrier services & rates returned by the app for the selected carriers. Verify if there is any mismatch in the rates. Now, compare the rates displayed under the automation summary with the original carrier rates.
For example, you can head to the USPS rates calculator, provide all the necessary details, and find the actual rates provided by USPS. Compare these rates with the rates displayed by the app. Similarly, you can find the rates for other carriers as well.
Find the errors related to displaying rates at checkout
Now, under the “Automation summary” section, you can also find out if there are any errors with displaying the rates at checkout. This includes the errors related to incorrect store address, valid services are not available for the customer address, etc. Check out the example below.
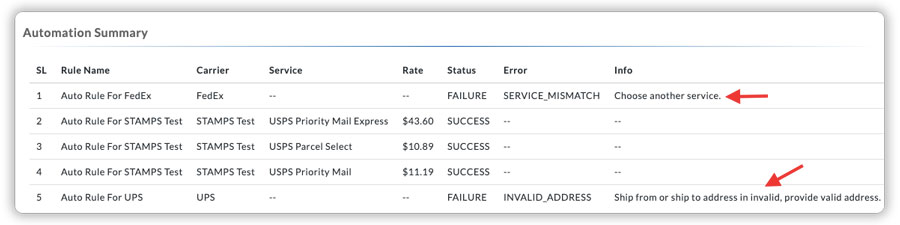
In the above image, you can see the error message for FedEx and UPS services. These errors display when the store address or the customer address is wrong.
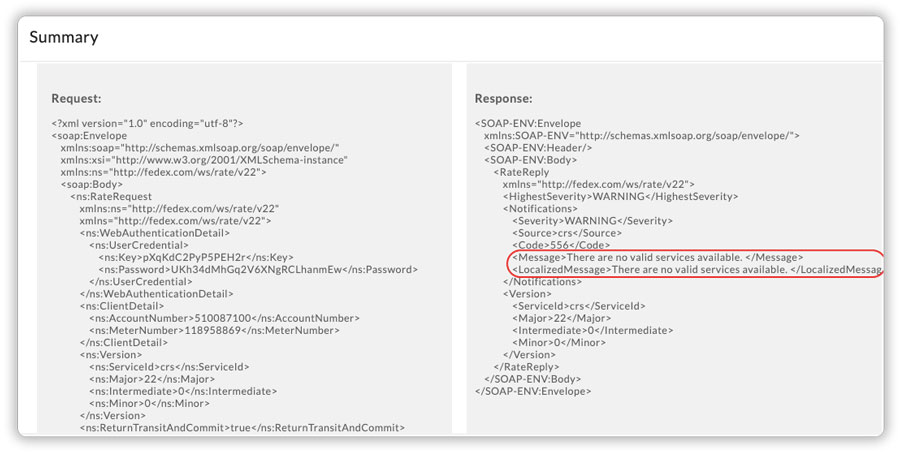
In order to get the detailed info regarding the error, you can see the XML request/response details, which is available as the next column (see the image below).
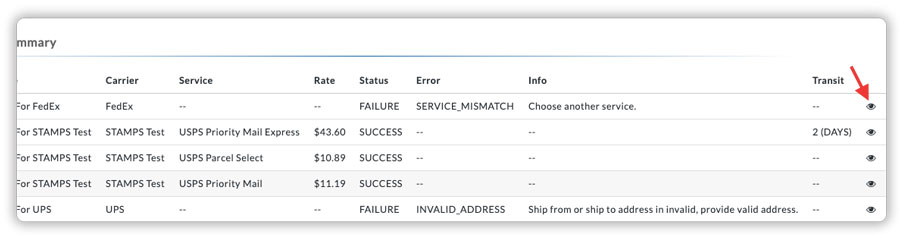
When you click on the icon, it will show you the request and response related to the error.
With similar steps, you can get to know the error related to any failed services.
If you still face any issues with the rates, do contact our support to solve the issue.
Unable to find how to activate the UPS negotiated/discounted rates and set up UPS SurePost!
The app allows you to display and calculate negotiated for all the carriers. When you add your carrier account details, the app automatically uses whatever rate your account provides; ie. negotiated/discounted rates or the normal account rates.
Enable UPS Negotiated Rates
The app provides an option to choose either negotiated/discounted rates or the normal account rates for UPS. To enable negotiated rates for your UPS account, head to App settings --> Carriers --> UPS --> Other settings --> Negotiated Rates. Enable the “Negotiated Rates” and the app will use the discounted UPS rates for calculating shipping.
Enable UPS SurePost
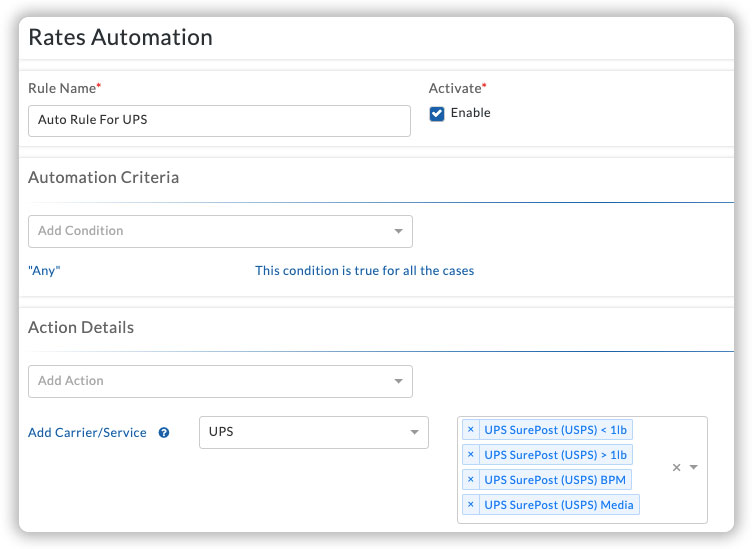
The app allows you to enable UPS SurePost. which is an economy, residential, ground service. You can enable UPS SurePost under the UPS account section within the app. Head to App settings --> Carriers --> UPS --> Other settings --> Enable SurePost.
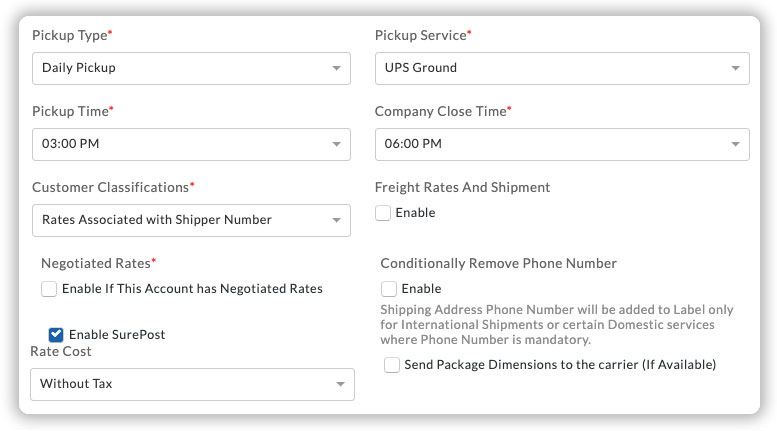
Now, head to App settings --> Shipping Rates --> Rate Automation, and select Auto rule for UPS. If you are only shipping with UPS SurePost, select only the UPS SurePost services under the UPS automation rules and update the rule as shown below.
Shipping Label generation fails!
The Label Automation Rules are not set up correctly
Similar to the selection of services to calculate the rate and display at checkout, you have to select the required services for label generation for the label generation to work properly.
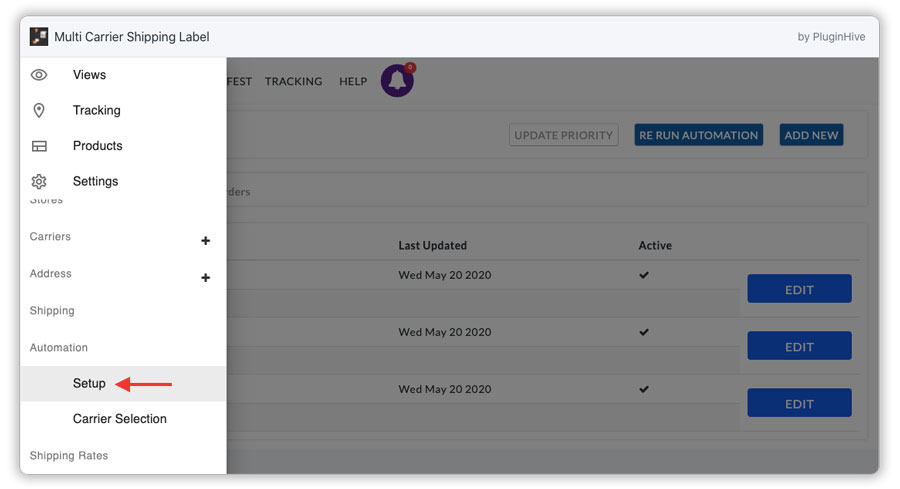
By default, all the services will be automatically selected and the app will take up the cheapest service to generate the labels. To verify the label automation rules related to the carrier that you have added, head to App Settings --> Shipping Rates --> Automation --> Setup, as shown below.
You can see the status of the label automation rules under the “Active” section. You can click on the “Edit” option to see all the rules available.
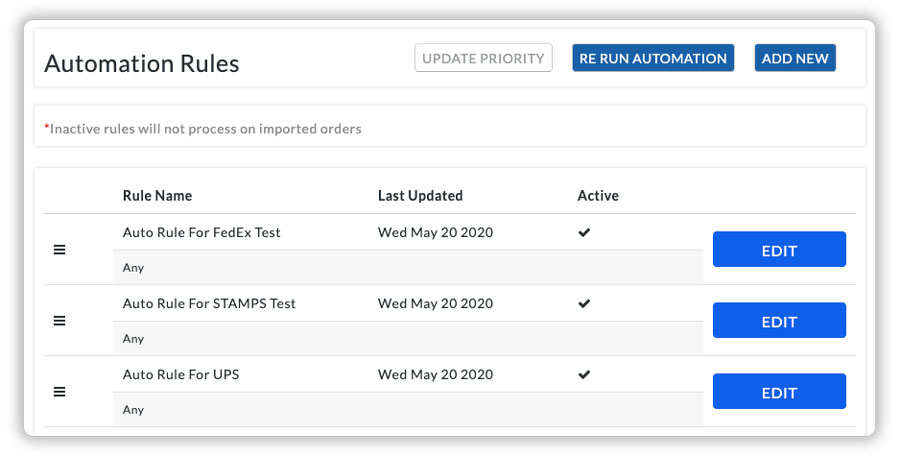
Under this, you can “activate” the rule, if it is inactive. Also, you can select the required services for label generation as shown below. Once done, click on “Update Rule” to save the changes made.

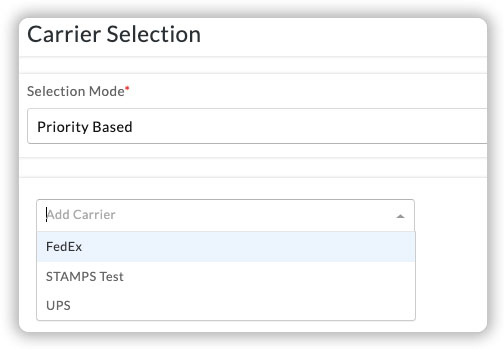
Carrier service selection mode
Once the label automation rules are setup, you can set up, how the app should select the services for label generation; ie. select the cheapest available service or select the priority-based services.
Head to App Settings --> Shipping Rates --> Automation --> Carrier Selection, to set the carrier selection mode.
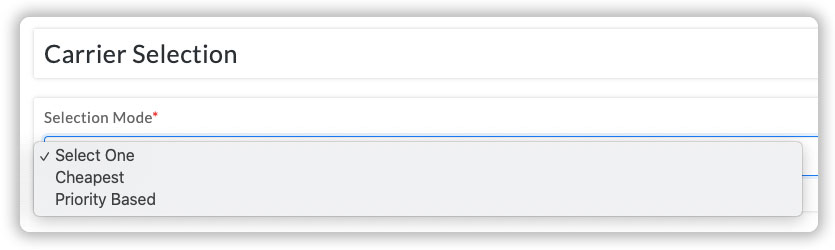
If you select the “Priority-based”, the app will generate labels by choosing the carrier that you have added under this section.
Phone number is not added for your store address/customer address
When there is no phone number added for your store address or the customer address, the shipping label generation fails. So, make sure you add a phone number to your address and enable the phone number at checkout and make it mandatory.
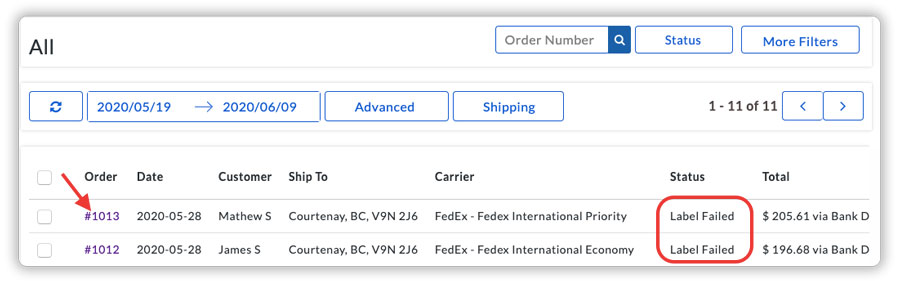
Whenever such an issue occurs, you can find the error under the label summary within each order summary. See the examples below.
You can see that the shipping label generation has failed. To understand the error, click on the order number and scroll down to see the label summary.
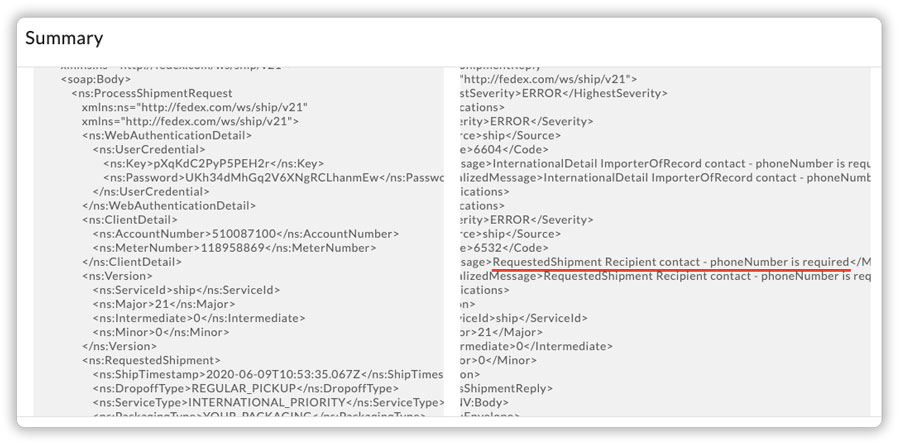
You can see that the label generation has failed. Now, click on the “view” icon to see the XML response in order to find what the error is.
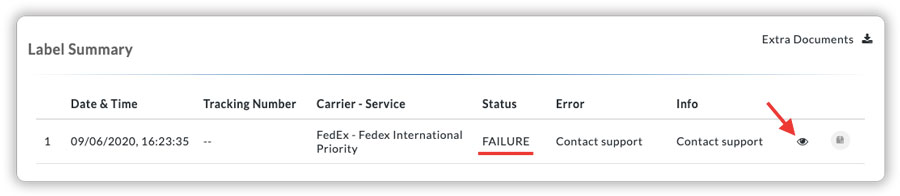
Under the response section, scroll down to see the error, which states “RequestedShipment Recipient contact – phoneNumber is required“. This means that the customer contact number is missing. You need to add the customer contact number and retry generating the shipping label.
Carrier service might be down and won’t respond
You may not be able to generate labels because of some issues from the carrier side. One such example is the FedEx Web Services Time-out Error. This error occurs since the FedEx services are down and won’t respond. As this is an error from the side of FedEx, this has to be solved from their side to continue the label generation process.
Shipping Label generation fails and the status is “Authentication Failed” for FedEx!
This issue occurs with FedEx when the FedEx label evaluation process is not completed for your account. You will be able to generate FedEx shipping labels with your own account, only if this label evaluation process is completed.
When this error occurs, the app notifies you with the error message under the notifications tab.

Under the notifications, you can see the error message and the details related to the error, as shown below.
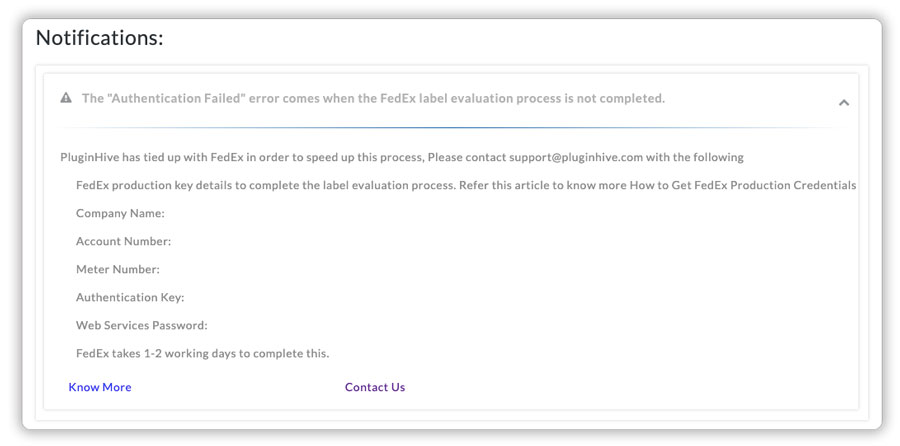
As shown in the above image, the customers of PluginHive just have to contact us with the following FedEx production key details to complete this process.
1. Company Name
2. Account Number
3. Meter Number
4. Authentication Key
5. Web Services Password
Once the label evaluation process is completed, you will be able to generate the FedEx shipping labels. To understand the process of label evaluation and how to enable FedEx label generation, visit how to get FedEx production credentials and enable FedEx label generation for your account.
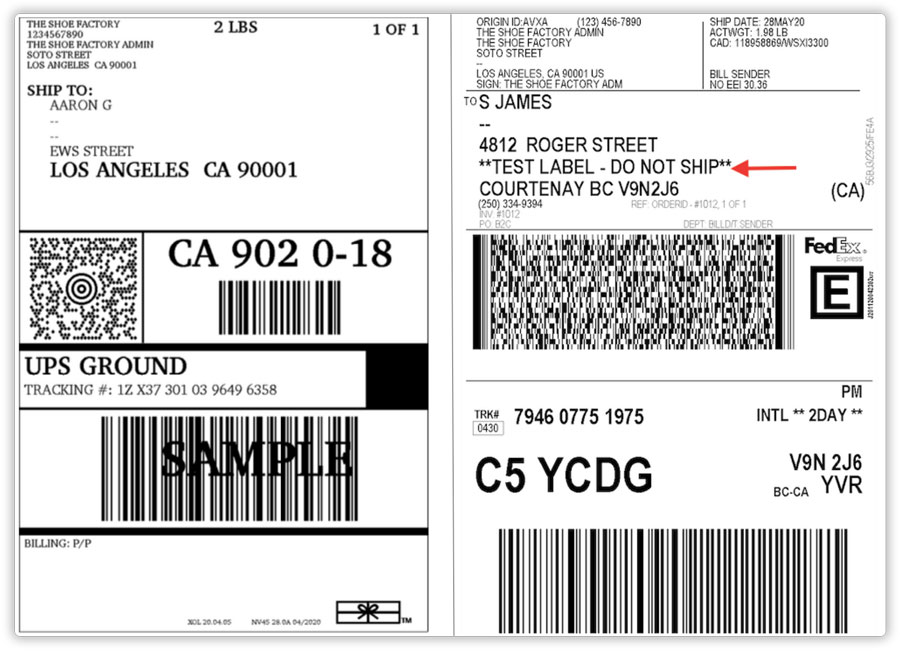
Generated shipping labels say ‘Test – Do Not Ship’!
Most of the shipping carriers provide two separate carrier account credentials.
1. Test Account Credentials
The Test credentials can be used to test any shipping apps on your website by printing the shipping labels without actually charging you any cost.
2. Production Account Credentials
The Production credentials can be used once the testing is done and you are ready to start handling the shipping process using the carrier.
When you use the test credentials to print the shipping labels, the label says “Test – Do Not Ship” or “Sample”. Below are the shipping labels from FedEx and UPS, which mention this.
Now, in order to get the live shipping labels that can be used to ship your products, head to App settings --> Carriers, and choose the shipping carrier that you have used. Enter the production credentials and enable the Production Key option under account details.
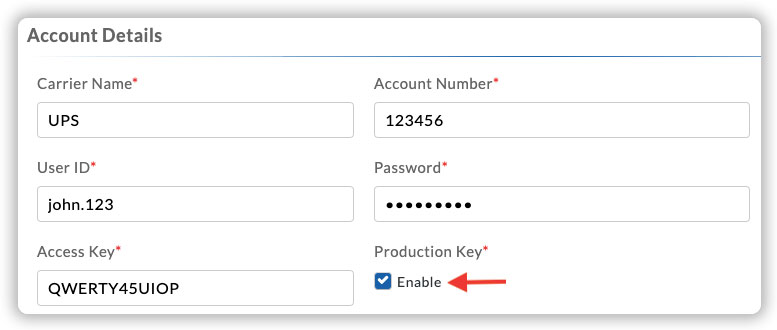
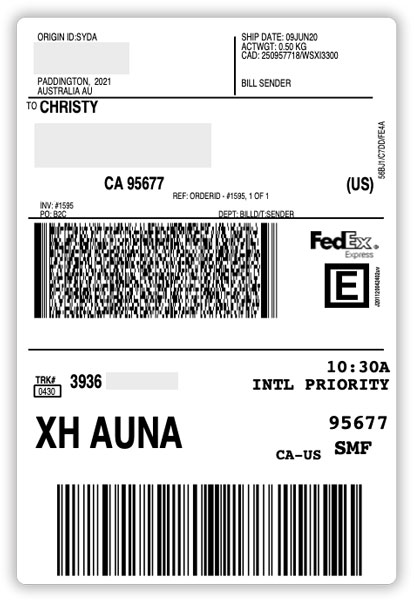
Once you add the production credentials and enable the Production key, you will be able to print live shipping labels to ship your products. Below is a live shipping label from FedEx.
The order status is still at “Initial” even though all the errors are corrected!
If an order is in the ‘Initial’ state within the app, the app automatically detects the error and shows an error symbol (red). You can click on this symbol to understand the error and correct those.
Once you have corrected all the errors, you have to make sure that the order status is processing, which does not happen automatically. So, in order to change the status of the order from “Initial” to “Processing”, click on the particular order and select “Prepare Shipment”, as shown below.
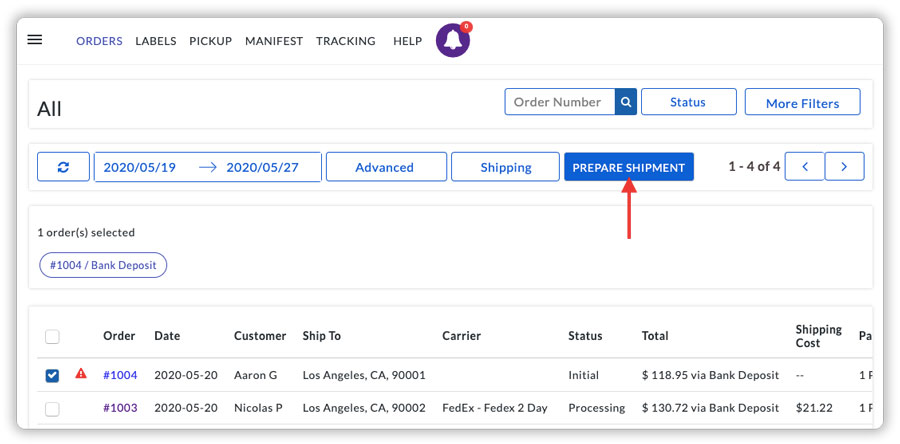
This will create the package and change the order status to “Processing” by selecting the carrier and the service.
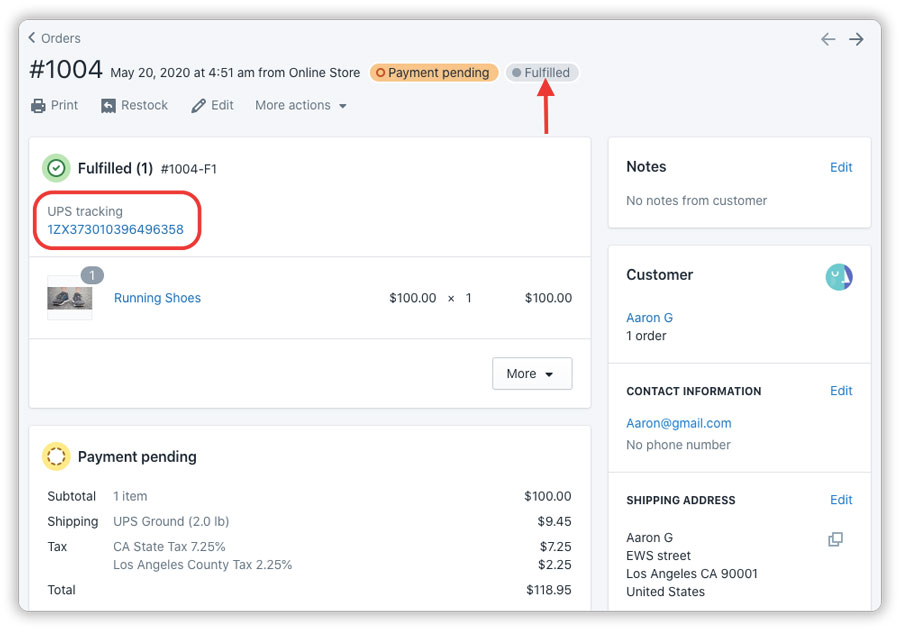
The Shopify order is not being marked as fulfilled even though the shipping label is generated!
The Shopify order does not get marked as fulfilled when the shipping label is generated. When you generate the shipping label, only the tracking number is generated.
To automatically mark the Shopify orders as fulfilled, you need to mark the orders as shipped. Once an order is marked as shipped, the manifest is generated and the app automatically marks the Shopify orders as fulfilled along with the shipment tracking number, as shown below.
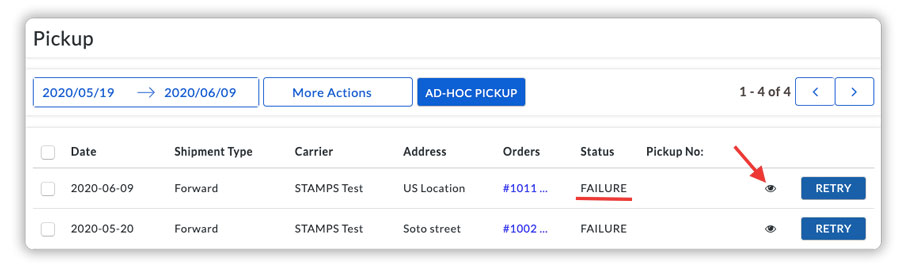
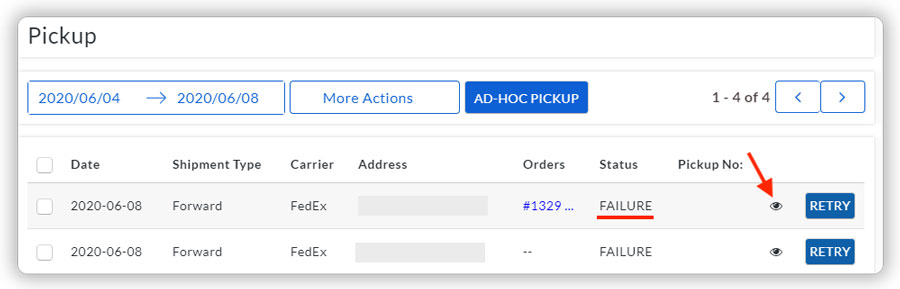
The Pickup request keeps showing “Failure”!
Pickup failure due to multiple store addresses
This is the most common reason for Pickup failure. If you have multiple store addresses and there is no default address setup, this error occurs as the carrier does not know the right address for pickup.
Whenever there is a failure in the pickup, you can see the error under the Pickup section in the app. You can click on the “view” icon to see the Pickup XML details, which will display the error related to the failure.
Under the response section, you can see the error related to the particular Pickup failure. Here, the error says “Multiple addresses were found for the information you entered, and no default exists“
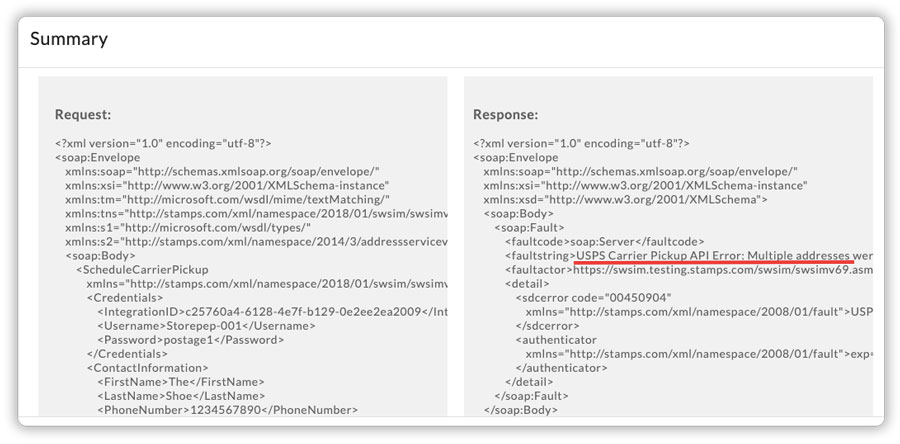
So, in order to solve this issue, you need to set the correct address as the default address and request Pickup again.
FedEx Ready Time after the cut-off time error
This error occurs when the pickup time setup for FedEx exceeds the time at which FedEx comes for pickup at a particular place. For example, if you have set up the pickup time at 3:00 pm, but FedEx does the pickup at 2:00 pm at your place, this error will display, while you try to request for pickup. See the example below.
You can see that the pickup has failed for FedEx. To see the error, click on the “view” symbol.
You can see the error as “Ready Time after the cut-off time”, under the response section within the XML.
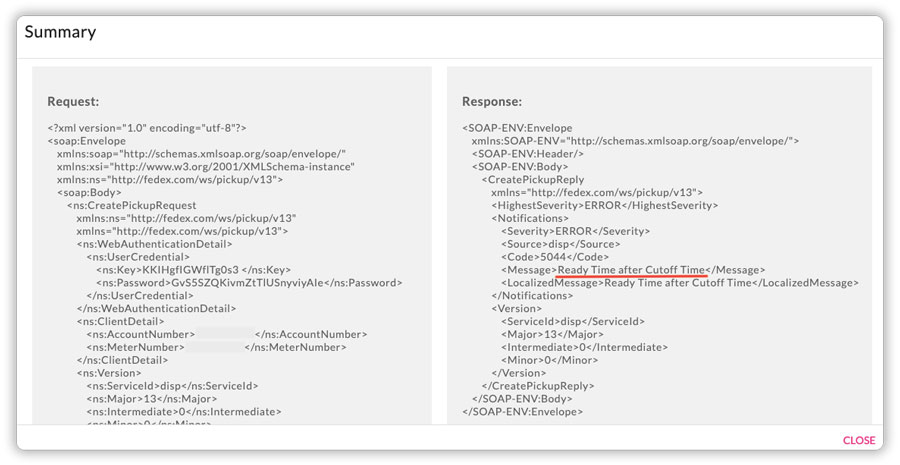
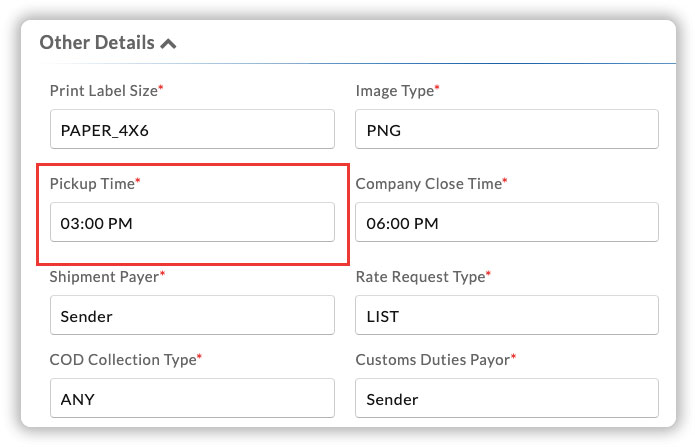
In order to solve this issue, you need to try requesting pickup by setting an earlier time as the Pickup time in the FedEx carrier setting. To do that, head to App settings --> Carriers --> FedEx --> Other Details --> Pickup Time.
Shipping Labels are not printing properly!
This issue occurs when you have not set up the print settings correctly. To set up this, head to General settings --> Print settings.
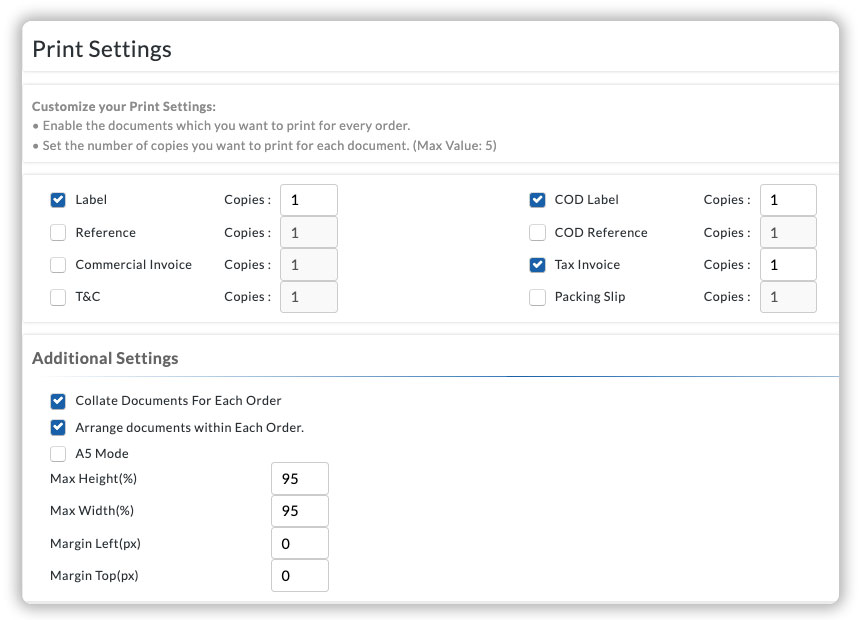
Under this section, you can enable the required documents to print and also set up the additional settings related to printing the shipping label according to your requirement. This includes the height, width, and margin settings.
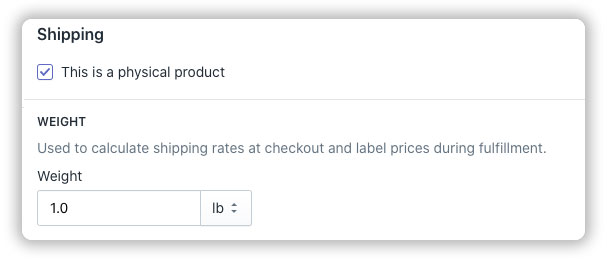
Product weight is used as 1kg, while the Actual weight is much lesser than that!
This issue occurs when you have not configured weight for your products. If you have not configured any weight for your products under Shopify, the app automatically uses the default weight, ie. 1 kg (2.2 lbs), which is configured in the app.
To avoid this issue, make sure that you add the actual weight of the product under the shipping section in the Shopify products or within the app product settings.
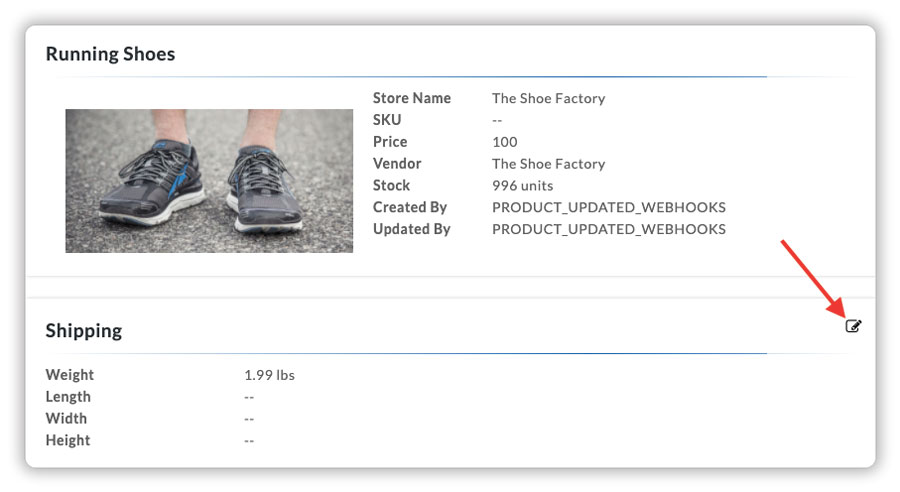
To add the weight of the product in the app, head to Products --> Choose product --> Shipping. Click on the edit symbol and add your product weight.


Note:
You can also add the product weight under the Shopify products section, which will be automatically selected while the products are imported into the app.
For example, if you have configured the product weight as 1 lb (0.45 kg), the app will use this weight to calculate the shipping cost. If you haven’t configured any weight, the app will use the default weight, which is 1 kg (2.2 lbs), which will lead to an increase in the shipping cost.
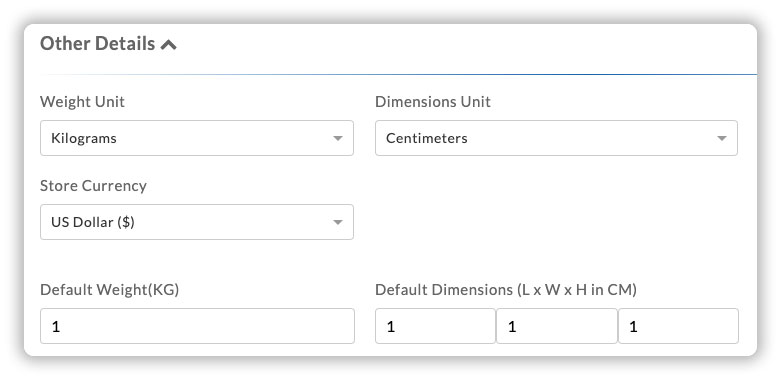
If all your products have similar/negligible weights, you can set the default weight to a fixed value so that, you don’t have to set the weight for each product separately. In order to set the default product weight & dimensions (if available), head to App settings --> Stores --> Other settings.
Unable to understand the setting up of the Box packing process!
Box packing process helps you calculate the accurate rates if the volumetric weight of your product is higher than the actual weight. This packing method uses product weight as well as the dimensions to pack the products.
Basically, the Box packing method is based on the Box Volume, Dimensions, and Weight. To use the box packing method, you have to make sure that the product dimensions are entered under the “Products” section in the app.
Here, the volume of your products is used to fit the total volume of the boxes. In order to set up the Box packing method, head to App settings –> Shipping –> Packaging, and select “Box Packing” from the available packing methods.
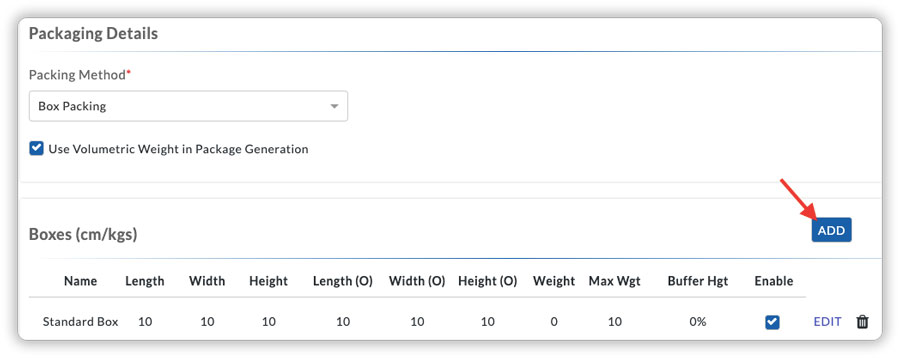
In this packing method, you can add boxes based on your product weight & dimensions. This means that a box is filled based on the dimensions of the product until the box is completely filled or a minimum space is vacant in which the product cannot be packed.
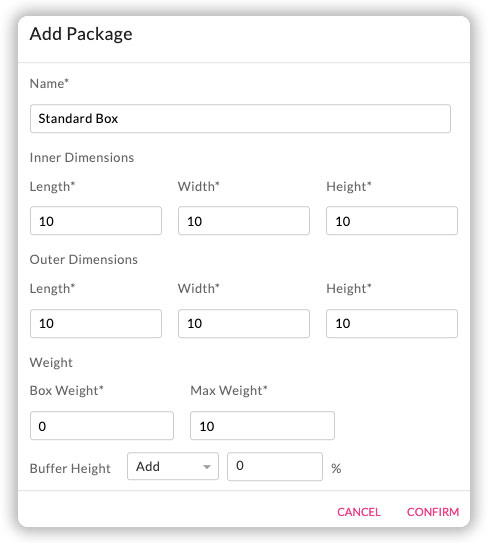
So, if the next unpacked item has a volume greater than this vacant volume, it goes into the next box and this process is continued until all the items are packed properly. You can add the Inner and Outer dimensions of the box, the weight of the box, max weight, and the buffer height.
What is Buffer Height?
Buffer height helps you to give a percentile adjustment value while packing the products based on the box height.
For example, if you have set up the box height as 50 cm, and you have a product with 10 cm height, you can fit 5 items in the particular box. But, if the product height is slightly higher, (maybe 12 cm), you would not be able to fit the products properly. To handle this, you can add a 20% buffer height, that will increase the height, and 5 items can be correctly packed in the box.
If you face any issues or have any queries on setting up the app, do contact our support.