Setting up Shopify Multi Carrier Shipping Label App
The Shopify Multi Carrier Shipping Label app reduces your effort significantly by automating shipping on your Shopify store. With this app, you can display real-time shipping rates on your Shopify checkout page, pay the postage & print shipping labels, and enable shipment tracking from within your Shopify store. This guide will provide you with step-by-step instructions to install and set up the app.
If you’re from the UK, France, Netherlands, Italy, Spain, Germany, or Belgium, you can save up to 75% on shipping with UPS. Please refer to this guide: “Obtain UPS shipping discounts“
In this guide
- Installation and Activation of Shopify Multi Carrier Shipping Label app
- Verify the store location which is automatically configured by the app
- Choose the shipping carrier and configure the account
- Ensure Shopify Store Units For Accurate Rates & Labels
- Import the Products
- Configure the product weight & dimensions and choose the right packing method
- Choose your preferred carrier services to display at the Shopify checkout
- Rename Carrier Service at the Shopify Checkout
- Update Holiday List, Buffer & Preparation Time
- Display Live shipping rates on the Shopify checkout page
- Verify if the Live rates displayed by the app are accurate
- Verify the carrier and services selected, from the order summary
- Verify the shipping address using the Auto-address correction functionality
- Resolve any order related errors and ensure that the order is not stuck at the “Initial” state
- Cross-check the list of orders which you want to ship
- Generate and print shipping labels in bulk for multiple orders
- Print Order Note on Shipping Labels
- Printing Product Description on Shipping Label & Commercial Invoice
- The tracking number is included in the Shopify “Order shipped” email, which is sent to the customers
- Printing Packing Slips
- How to Request a Pickup and generate Manifest directly from your Shopify Store?
- Shopify order is marked as fulfilled along with the shipment tracking number
- Live shipment tracking notification to customers via e-mail
- Handle the Shipment Tracking directly from your Shopify store
- How to cancel the shipping label that you have generated?
- Setting up Shipping Label Automation
- Customising Tax Invoice Template
- How to enable signature on delivery using the Shopify Multi Carrier Shipping Label app?
- Pack products optimally and save shipping costs using advanced packing methods
- Print the COD shipping labels directly from your Shopify store
- How to add default weight & dimensions for your products?
- How to handle International shipping with the Shopify Multi Carrier Shipping Label app?
- How to calculate the rates based on the shipping zones?
Installation and Activation of the Shopify Multi Carrier Shipping Label app
Follow the below steps to install and activate the Shopify Multi Carrier Shipping Label app.
From the dashboard of your Shopify store, go to the Apps section and click on Recommended apps>Shopify app store.
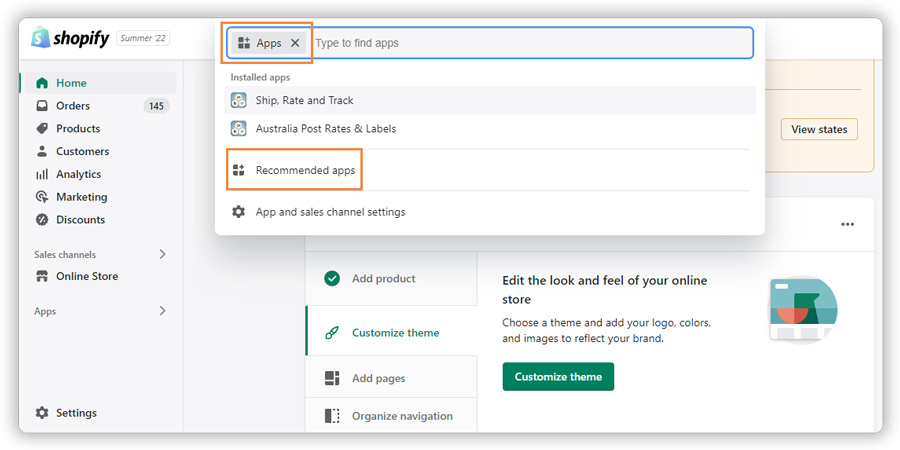

Search for “PH MultiCarrier Shipping Label”. Click on “Add app”.


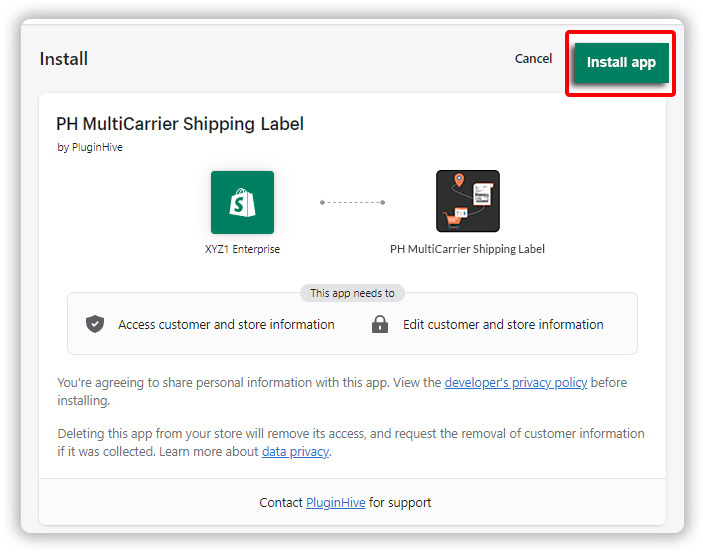
Once you add the app to your store, you will get redirected to the “Install page”. Click “Install App”
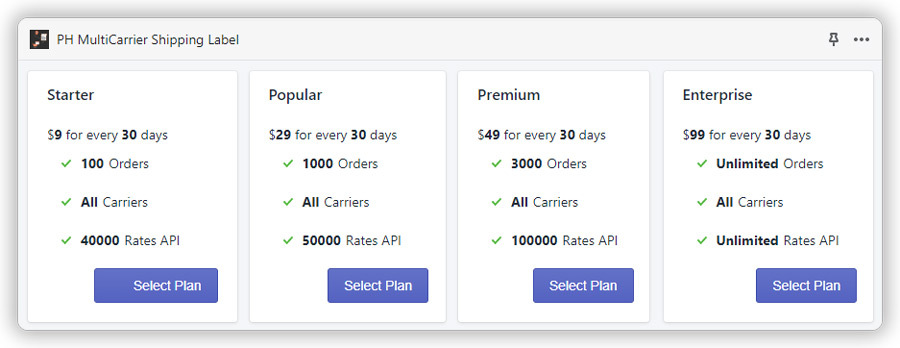
After the installation is done, select a plan to get started.
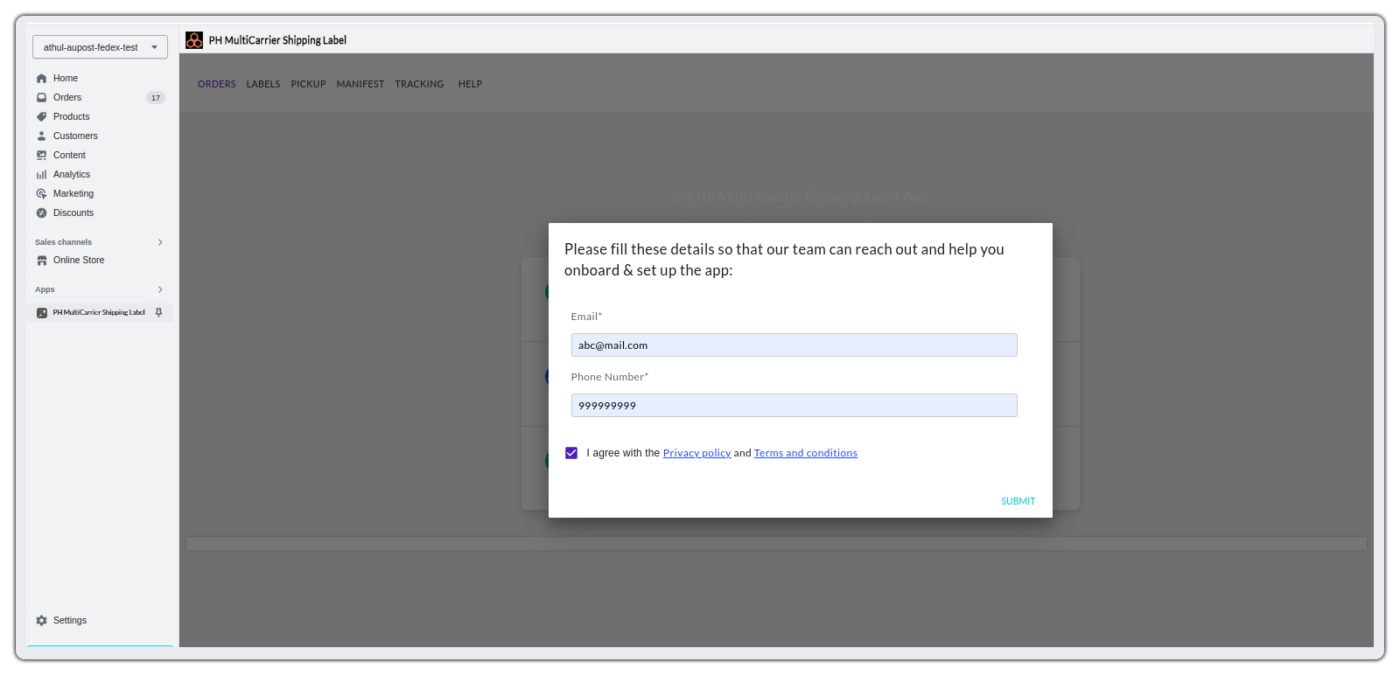
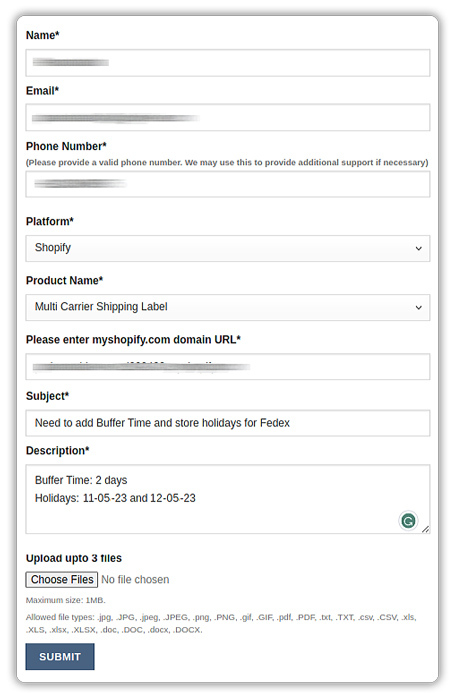
Next, enter your email address and phone number so that our team can reach out & help you onboard & set up the app:
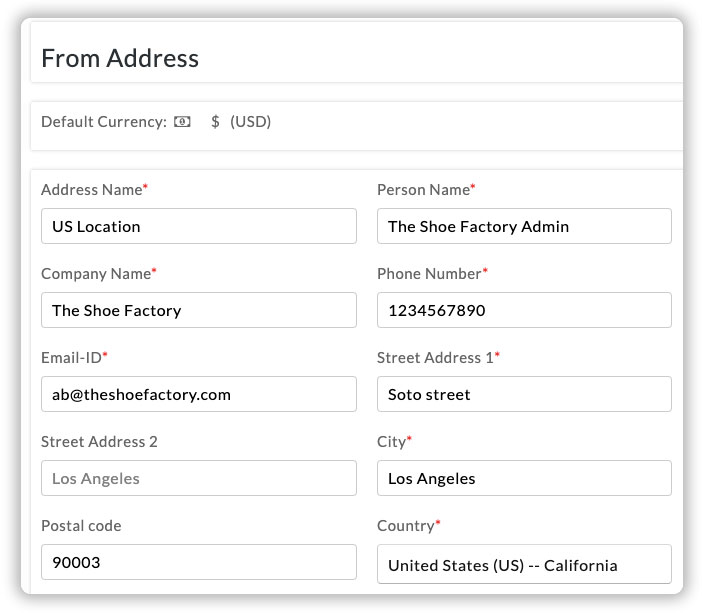
Verify the store location which is automatically configured by the app
Once you install and activate the app, it will automatically configure your store location as the shipping origin. It is very important that you verify if the store location configured is correct since this address will be used for calculating the shipping rates and scheduling pickups. If the address is incorrect, you will not get the accurate rates and the pickup might be scheduled for a different location.
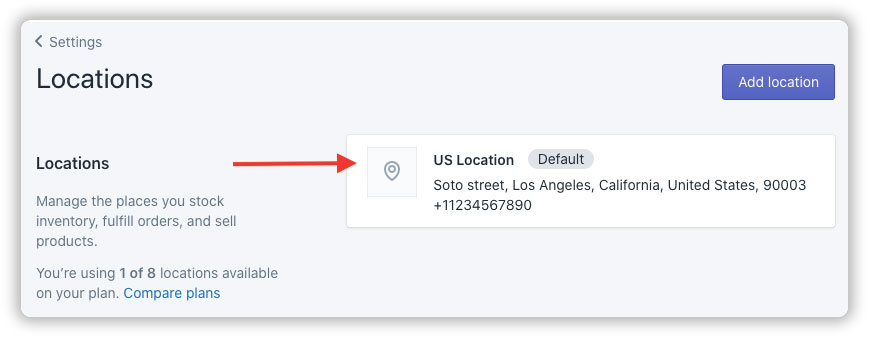
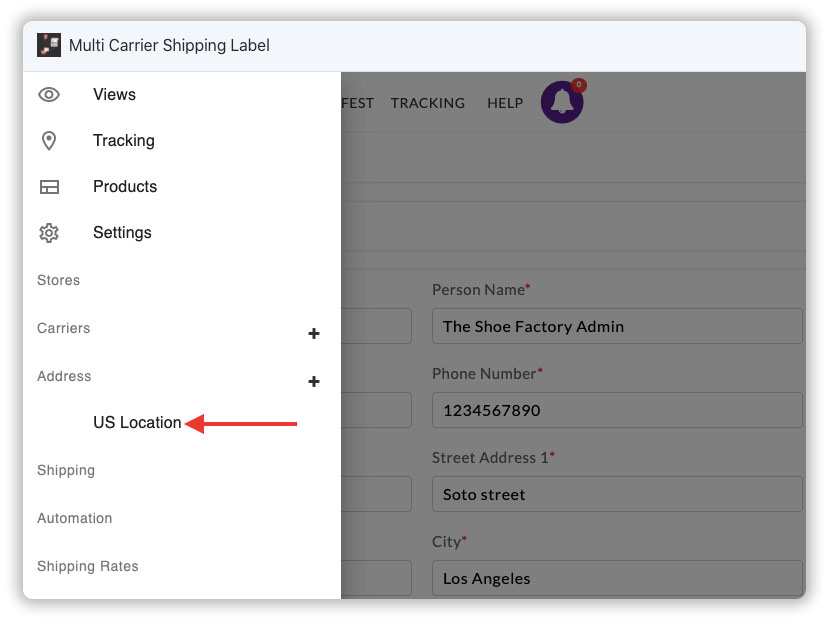
Modify the address or add multiple store locations if required
The app allows you to modify the automatically configured store location. Also, if you have different products that are shipped from different locations, the app allows you to add multiple store locations.
Choose the shipping carrier and configure the account
You can choose the preferred carriers under this section. The app helps in seamless integration with the following carriers using your own account.
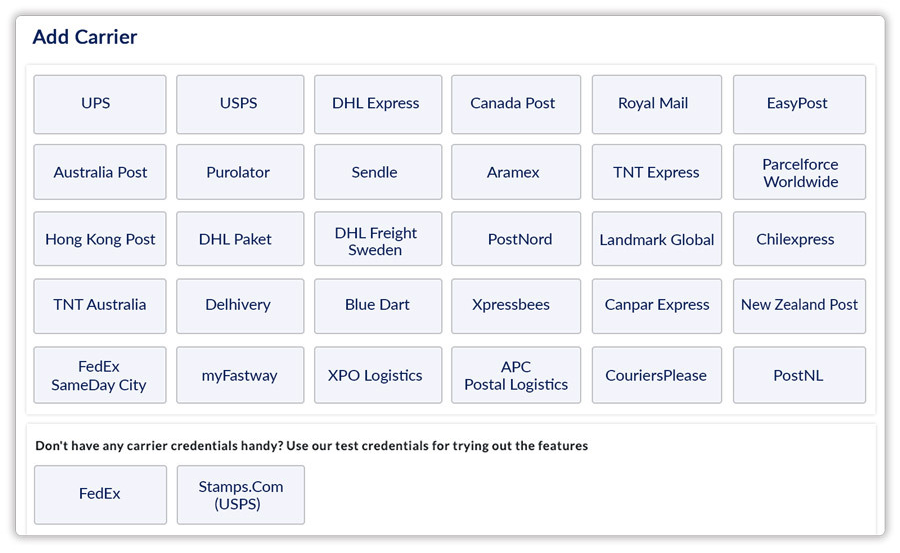
For example, if you have chosen FedEx, you need to have the Account Number, Meter Number, Web Services Key, and Web Services Password to configure your account.
Similarly, for other carriers, you need to have the account credentials to configure the carrier with the app.
If you don’t have any carrier credentials handy, you can also use our test credentials for FedEx and Stamps.com (USPS) to try out the app.
How To Register at FedEx and Get Developer Test Credentials?
How to Get FedEx Production Credentials and Enable FedEx Label Generation for Your Account?
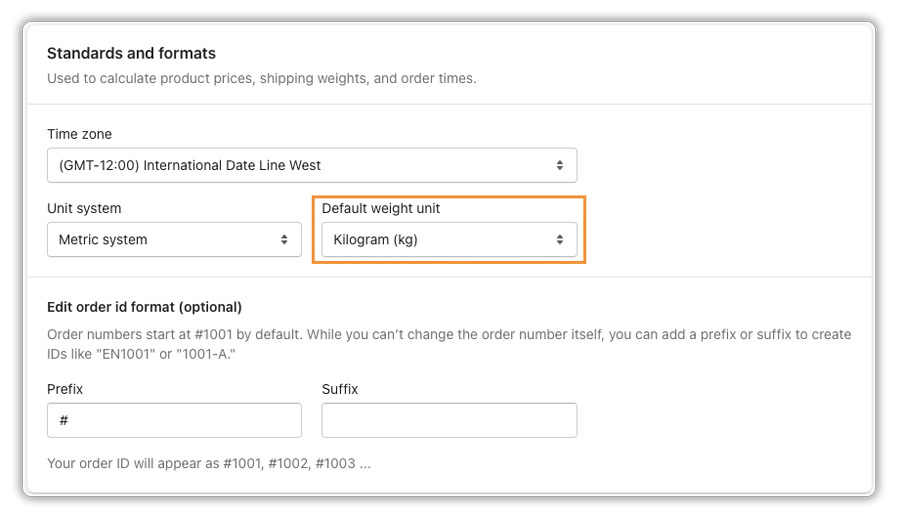
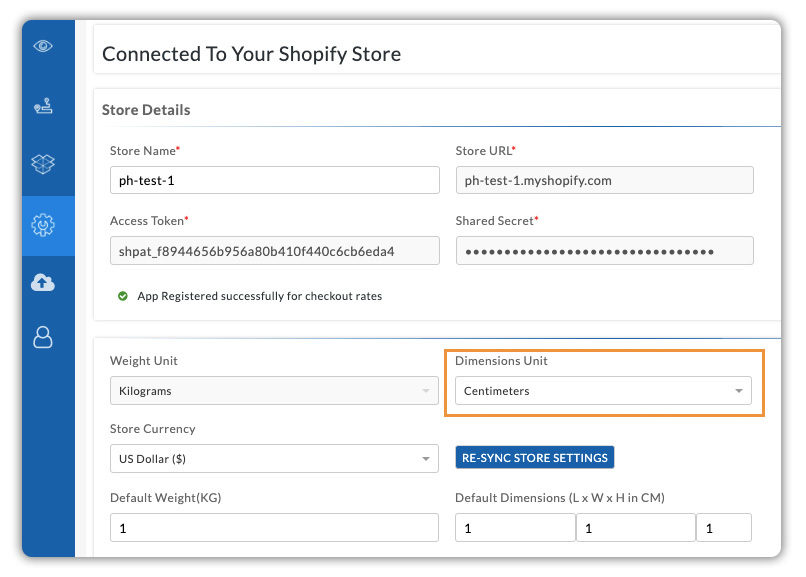
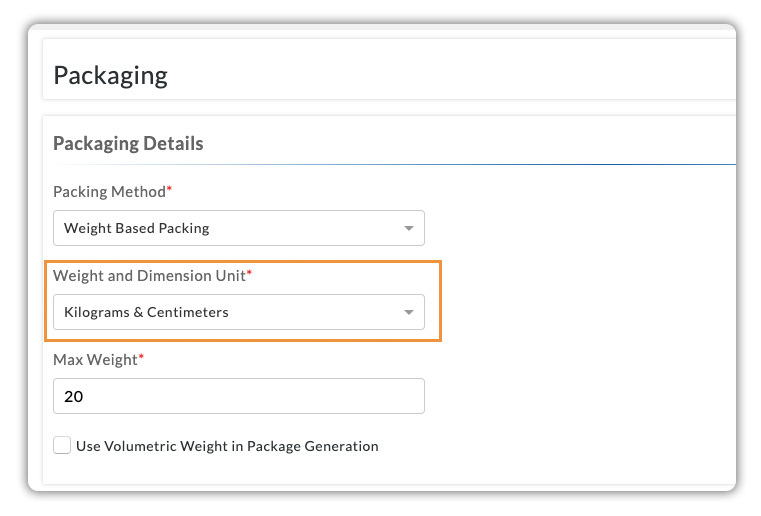
Ensure Shopify Store Units For Accurate Rates & Labels
To get accurate shipping rates & labels you should ensure that the units are configured correctly in the store as well as in the app.
Let’s check the settings which you need to check:
- First, you need to check your Shopify Store details and under Standards and formats ensure your Default weight unit is according to your ‘shipping from country’.
- Secondly, check the Dimension unit within the app under Settings > Stores
The weight unit is not editable as it is fetched from the Shopify store settings.
- Third, check the packaging weight and dimension units under Setting > Shipping > Packaging. These units will reflect in the order summary so it is important to configure them correctly.
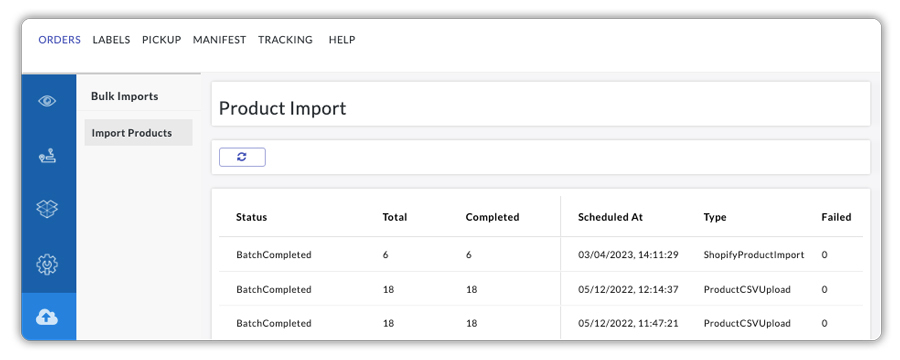
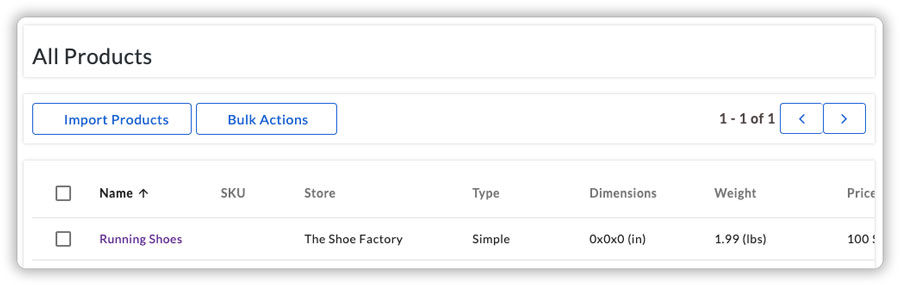
Import the products
To import the products head to the Product section in the app and click on Import Products. Refer to the image below:

Once the products are imported you can check out the Import Status, Type, Scheduled at, and Batch Failure as shown below:
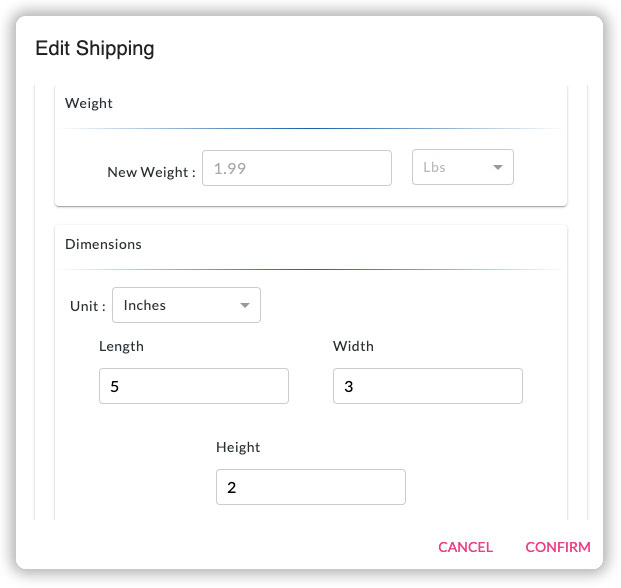
Configure the product dimensions and choose the right packing method
To calculate the accurate shipping rate of an order, you must configure the weight of the product correctly. The weight can be configured in Shopify under the ‘Product’ section.
To set the dimensions for your products, head to the “Product” section in the app.

Add the product dimensions
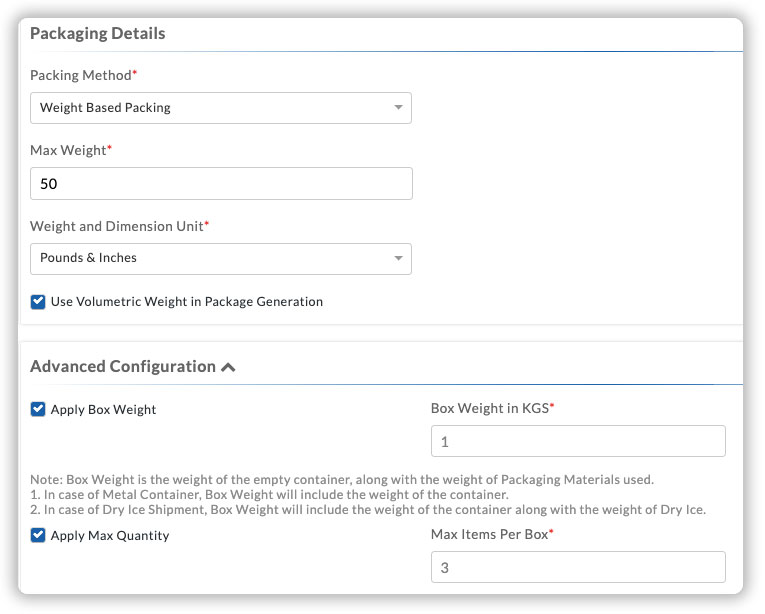
In most of the cases, only weight is required to handle the packaging and calculate the accurate rates. So, by default, the app will calculate the rates based on the weight-based packaging method.
However, if the volumetric weight of your product is higher, you can add the dimensions of the product and choose an advanced packing method.
Weight-based packing
In this packing method, you can set a maximum weight (max.weight) for your box and the app automatically packs the maximum number of products in this box based on the max.weight.
Now, to configure the weight-based packaging method, head to App Settings --> Shipping --> Packaging. You can configure the max.weight of the box and the app will automatically handle the packaging based on that. If required, you can configure the box weight and also add a max.quantity that will be packed in a box.
Choose your preferred carrier services to display at the Shopify checkout
Normally, it’s not a good practice to display too many shipping services at checkout for the customers to choose from. The checkout process becomes seamless if you display the most perfect shipping services in a very minimal number. So, the app allows you to choose the services that you want to display at the checkout.
To do that, head to App settings --> Shipping Rates --> Rates Automation. Under this section, you can choose the preferred services to display on the checkout page. Once you have added a carrier (say FedEx), the app will automatically enable all the services by default.
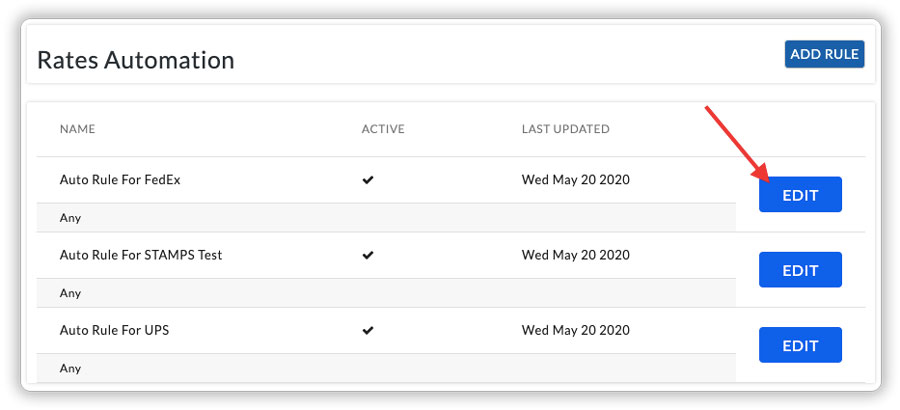
You can choose to display your preferred services if you do not require all of them
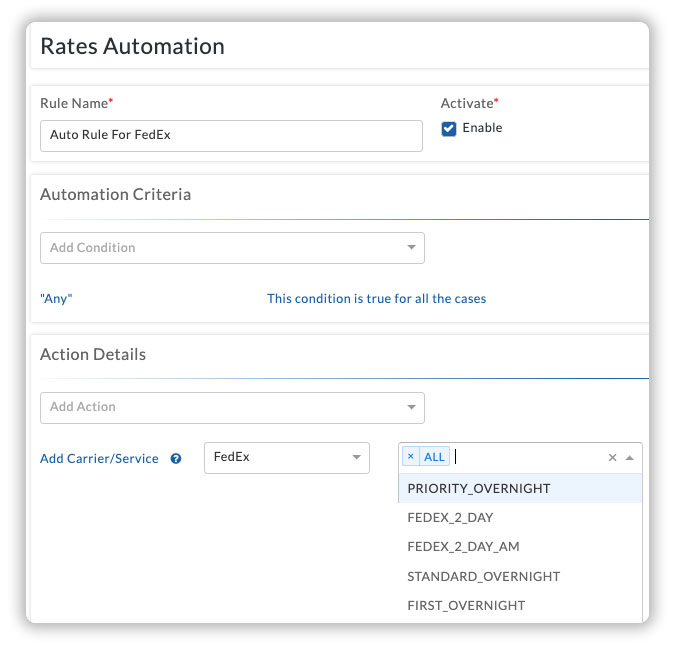
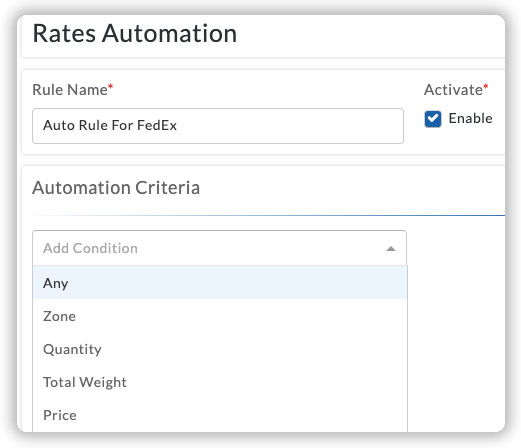
Display rates based on other conditions
You can also choose to display the services at checkout based on different shipping criteria like Zone, Quantity, Total Weight, Price, Time, and Weight Range.
Rename Carrier Service
You can display a different service name at the checkout by renaming the carrier service/s. This will make your checkout much simpler to understand for your customers and there will fewer cart abandonments and better conversions.
To rename a carrier service first make sure the carrier/s is configured beforehand. To activate or add the carrier/s head over to Settings > Carriers as shown below:
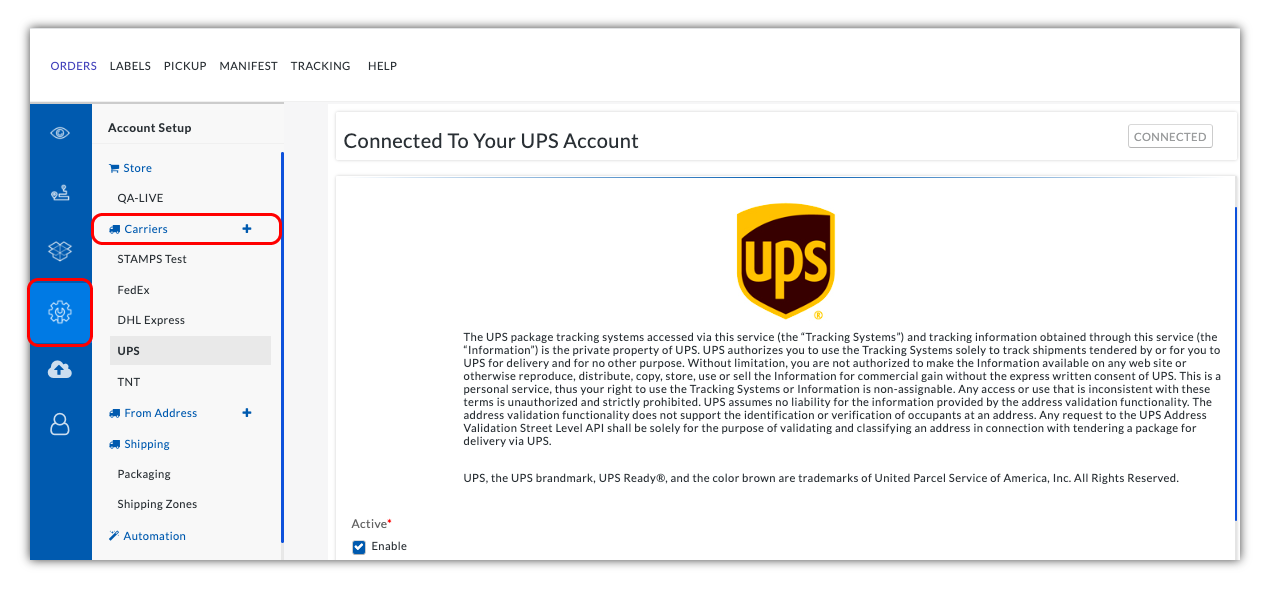
Carrier Service Renaming is currently available for these shipping carriers:
- UPS
- FedEx
- DHL Express
- Canada Post
- USPS
- Stamps USPS
- Australia Post
- ParcelForce Worldwide
- Postnord
- Purolator
- Aramex MyFastway
- CouriersPlease
- Australia Post MyPost Business
- Sendle
- TNT
- New Zealand Post
- BlueDart
- Aramex
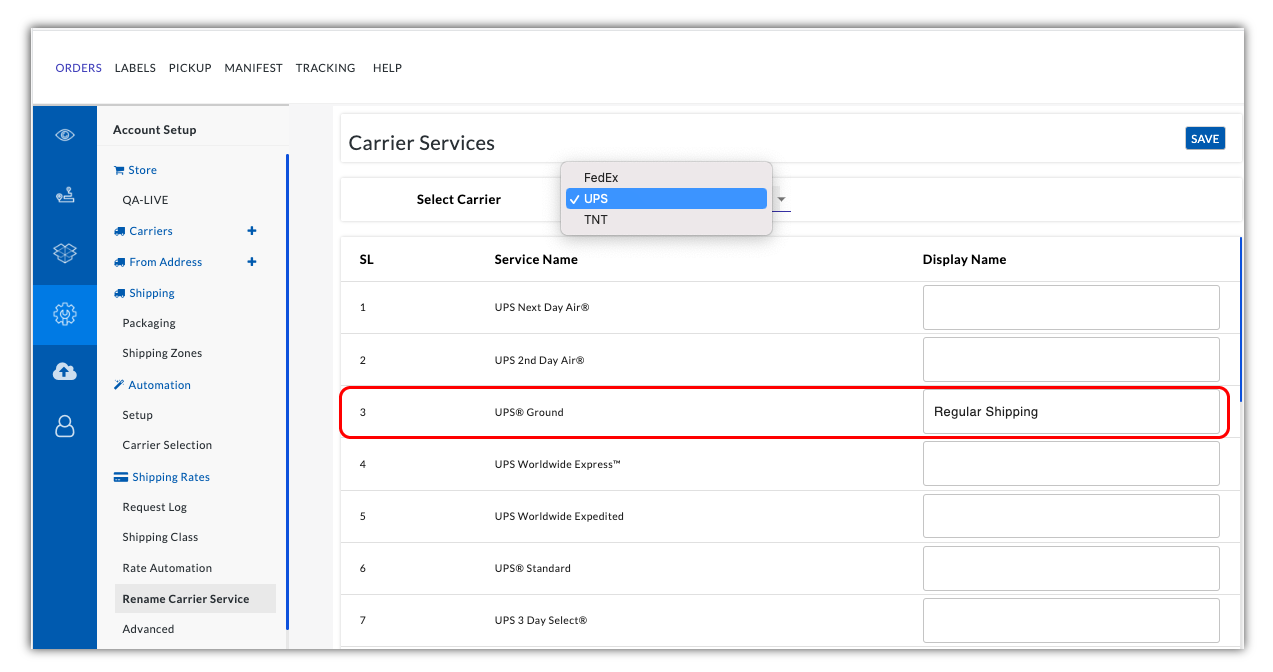
Next to setup the custom carrier service names head towards Settings > Shipping Rates > Rename Carrier Service as shown below:

Now select the carrier from the dropdown and add the custom service name/s in the Display Name column and Save it as shown below:
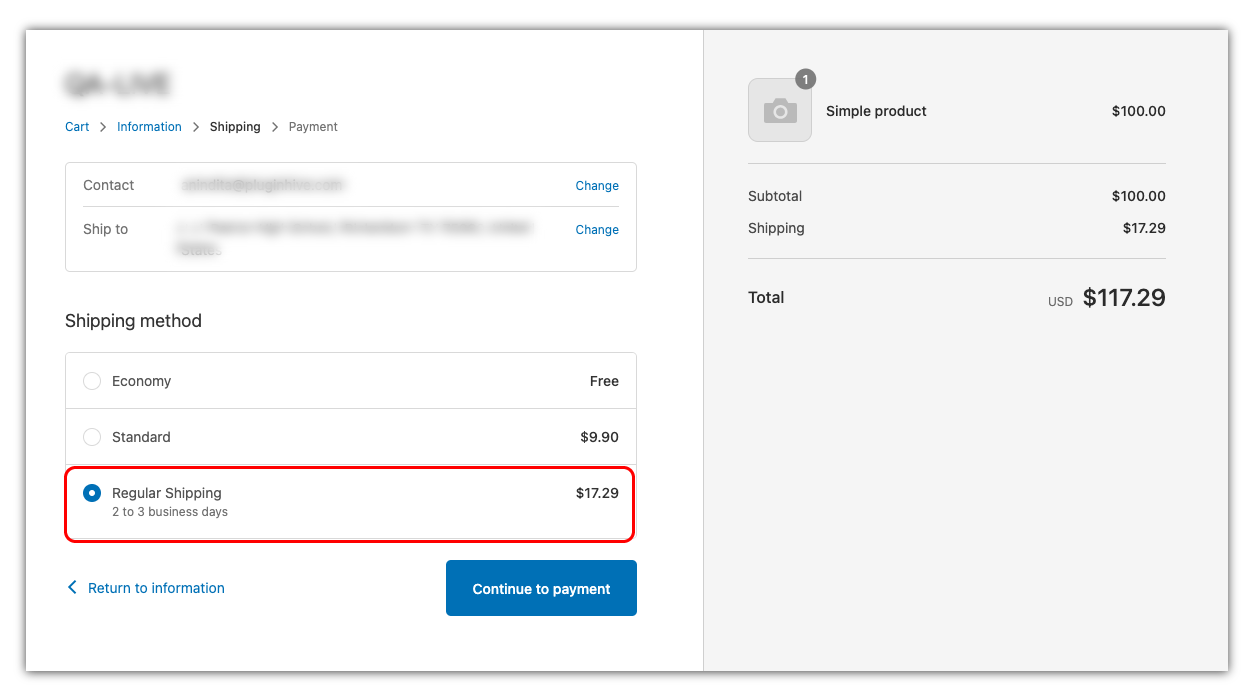
After saving it, the name will get displayed at the Shopify checkout:
Update Holiday List, Buffer & Preparation Time
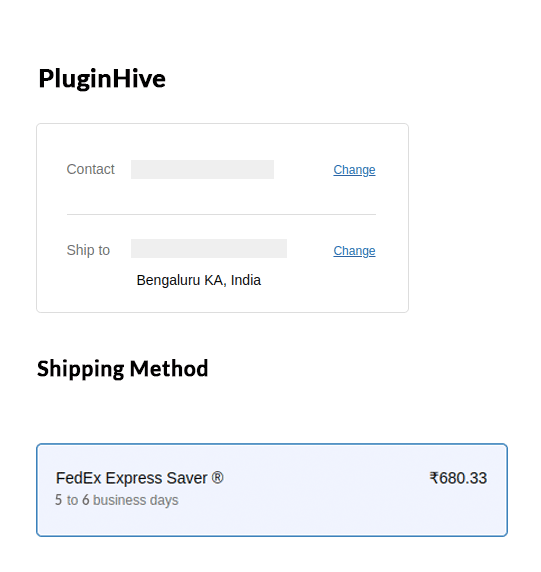
Delivery delays can occur due to holidays, while buffer and preparation time can extend the estimated delivery date or result in delays. These factors are critical in determining the delivery date and time. For eCommerce merchants, it is essential to update their holiday lists or buffer time to minimize the possibility of delays, provide accurate estimated delivery dates, and deliver a seamless delivery experience to their customers.
To update your store’s holiday dates, buffer, and shipment preparation, on your Shopify store share your list of holidays and buffer timings with the PluginHive Support team as shown below:
- FedEx supports Holiday List, Buffer & Preparation Time
- TNT supports Holiday List
For instance, if a customer is checking out on a store holiday, the rates and estimated delivery days will be based on the next working day, taking into account the store holiday and buffer time or preparation time. This ensures that the rates and delivery estimates are accurate and reliable for the end customer. For a better understanding refer to the image below:
If you would like to have this feature for other carriers, contact us.
Display Live shipping rates on the Shopify checkout page
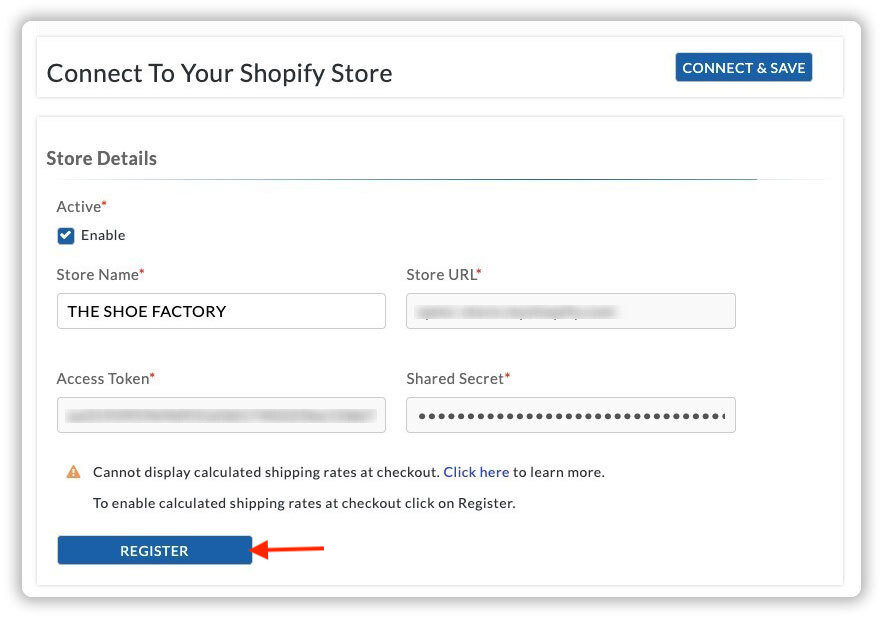
In order to display shipping rates at checkout, you have to enable carrier-calculated shipping on your Shopify store.
If you have already enabled the carrier-calculated rates on your store, it will automatically get registered in the app. But, if you have enabled the carrier-calculated rates after you have installed the app, you need to register it under the store settings.
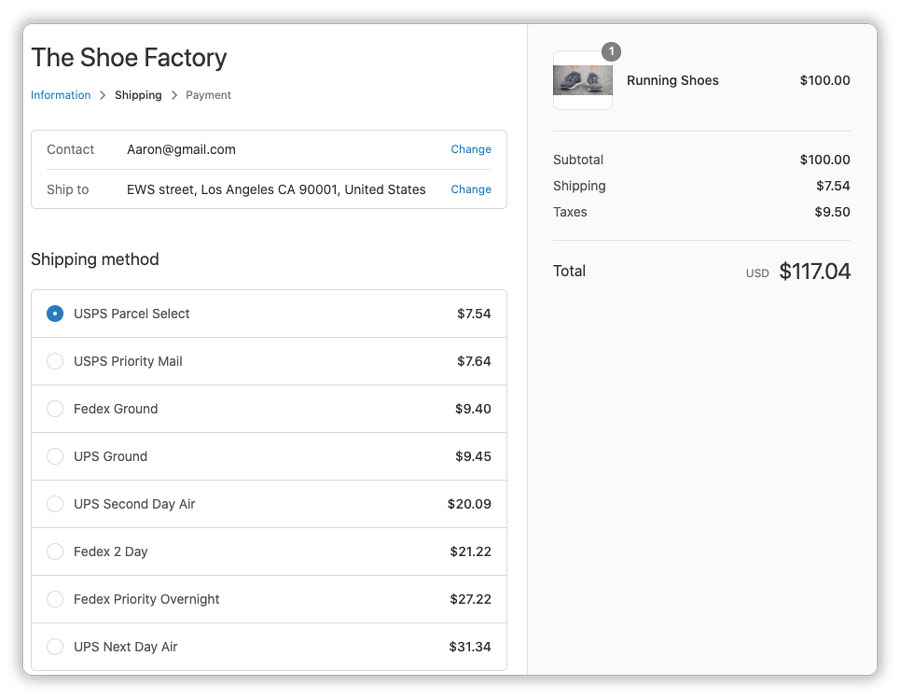
Once you have registered the carrier-calculated rates, added the carrier, and selected the preferred services, add a product to the cart, and checkout. The app displays real-time shipping rates based on the carriers & services that you have chosen.
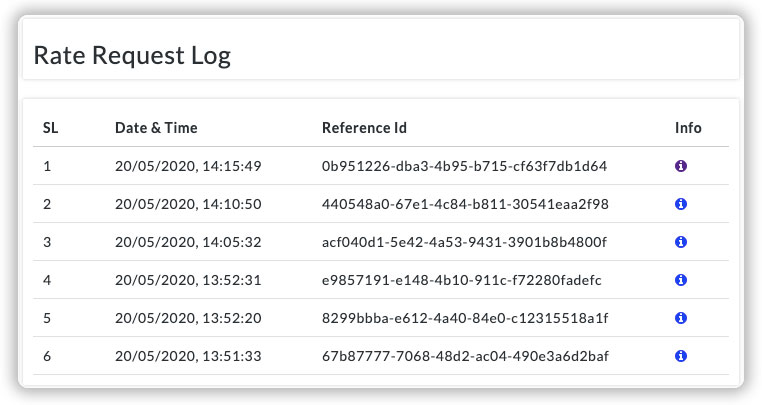
Verify if the Live rates displayed by the app are accurate
Once the live shipping rates are displayed at the Shopify checkout, you have to verify, if these rates provided by the app are accurate. To verify this, head to the App settings --> Shipping rates --> Request Log. Select the required rate log.
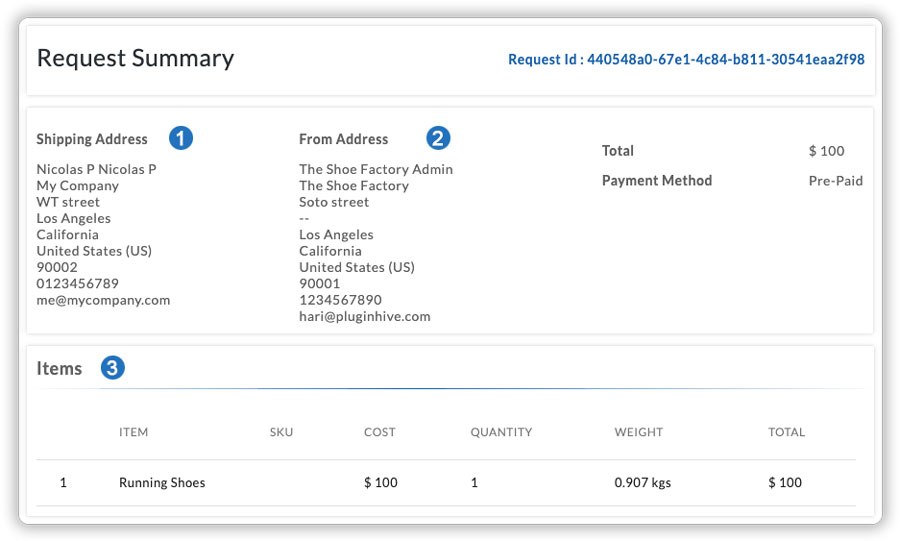
1. Shipping address (Recipient address)
This is the address provided by the customer at checkout. Verify the shipping address and ensure that the address is within the serviceable area of the carrier that you have chosen so that, there is no extra charge added.
2. From address (Shipper address)
Verify the “from address” and ensure that the correct location is set as the default address if you have multiple “from addresses”, and make sure it is correct.
3. Items
Here, you can see the product details, quantity, weight, and dimensions (if available) of the product. Ensure that all these values match with the original product values.
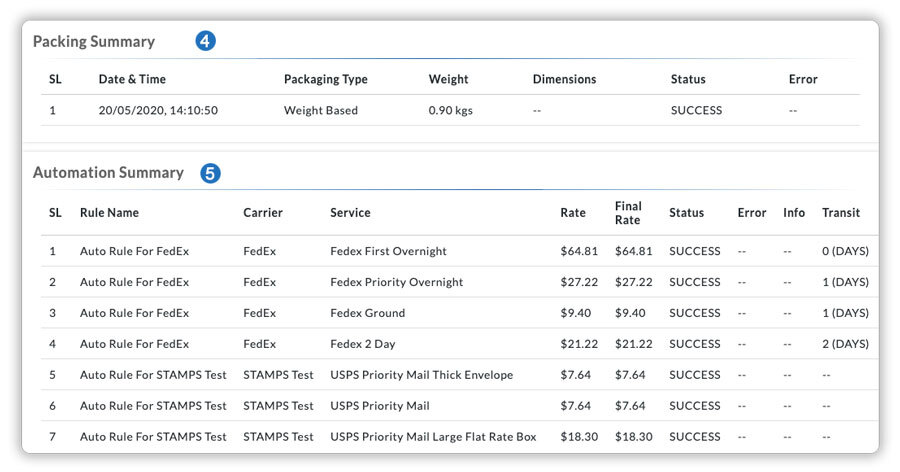
4. Packing summary
You can see the packaging type, weight, dimensions (if available), and the status of the packaging process. Ensure that the packaging method is correct and the values used for determining the packaging are accurate.
5. Automation summary
Under this section, you can see all the carrier services and the rates returned by the app for the available carriers. Verify if there is any mismatch in the rates.
Now, compare the rates displayed under the automation summary with the original carrier rates.
For example, you can head to the FedEx rates finder, provide all the necessary details, and find the actual rates provided by FedEx. Compare these rates with the rates displayed by the app. Similarly, you can find the rates for other carriers as well.
Now, place a few orders by choosing to ship via USPS Priority Mail, UPS Ground, UPS Second-Day Air, etc.
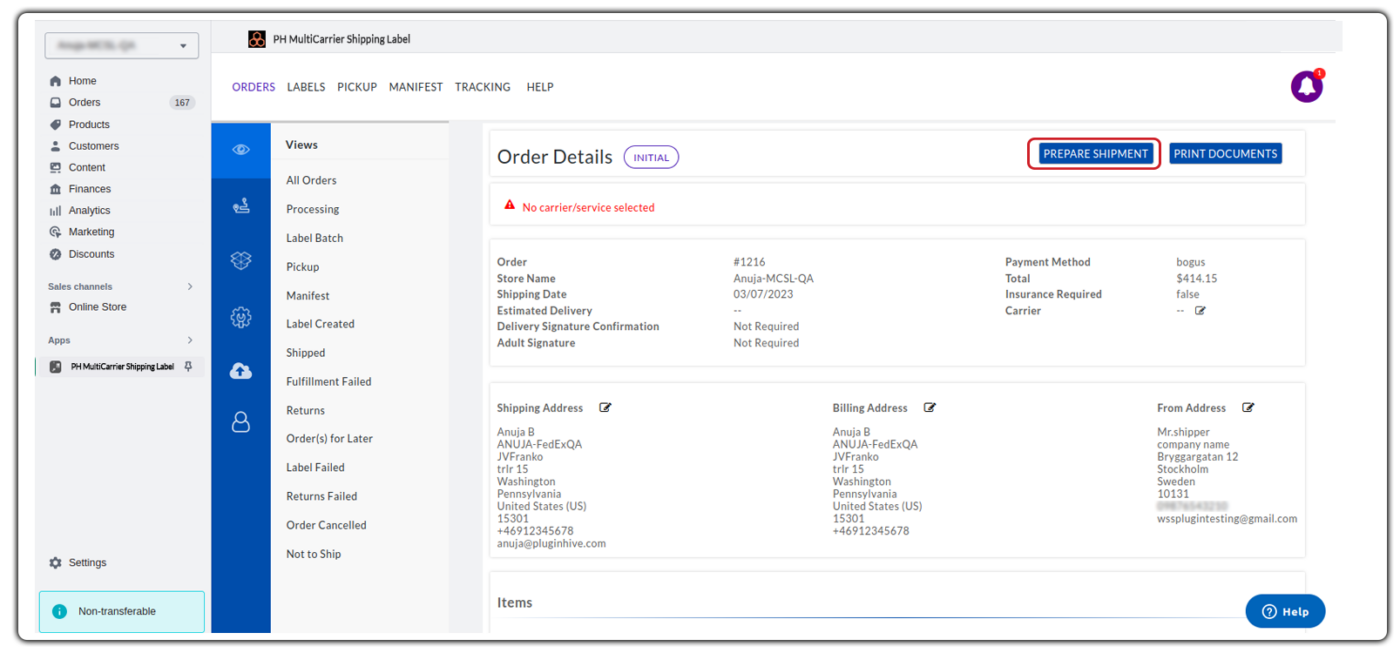
Verify the carrier and services selected, from the order summary
Once the order is placed, it will be automatically imported into the app and the order status will be either initial or processing. Usually, all the orders will be in the ‘Processing’ state, for which the carrier & service is selected, and the package is ready.
To view the details and verify the carrier & service selected, click on the required orders.

For all the orders, the app automatically chooses the cheapest available service or the customer-selected service for shipping.
The app automatically chooses the cheapest shipping service
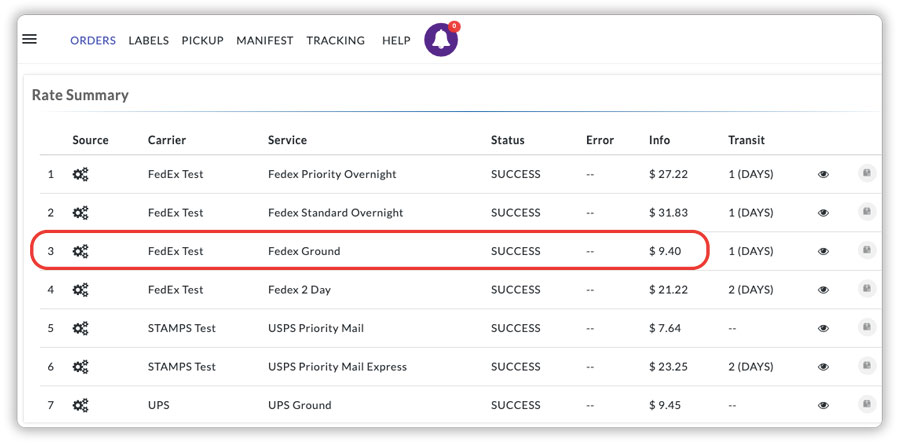
By default, the app automatically chooses the cheapest available shipping service for shipping. For example, consider a case where the customer chooses “Free Shipping” at checkout. In this case, the app automatically chooses the cheapest shipping service available, which is FedEx Ground in this case.
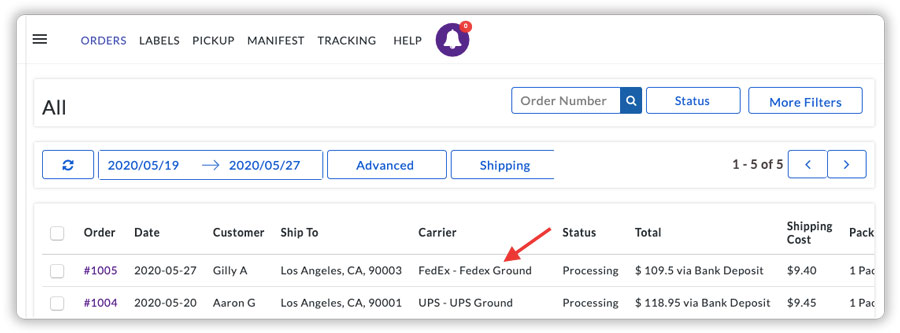
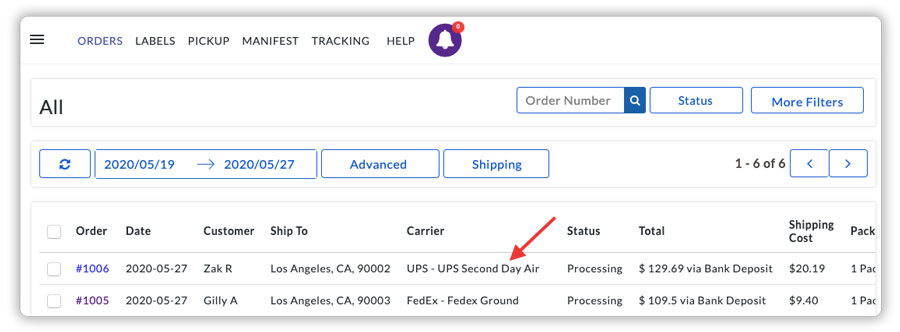
The app chooses the customer-selected service
Now, consider an example where the customer chooses UPS Second-Day Air at the checkout as the shipping service. Now, once the order is imported into the app, it automatically chooses the customer-selected service, ie. UPS Second-Day Air, for shipping.
The PH MultiCarrier shipping label app allows users to update order details. Refer to the details below for more information on editing order details, updating the order status, and generating labels using the app:
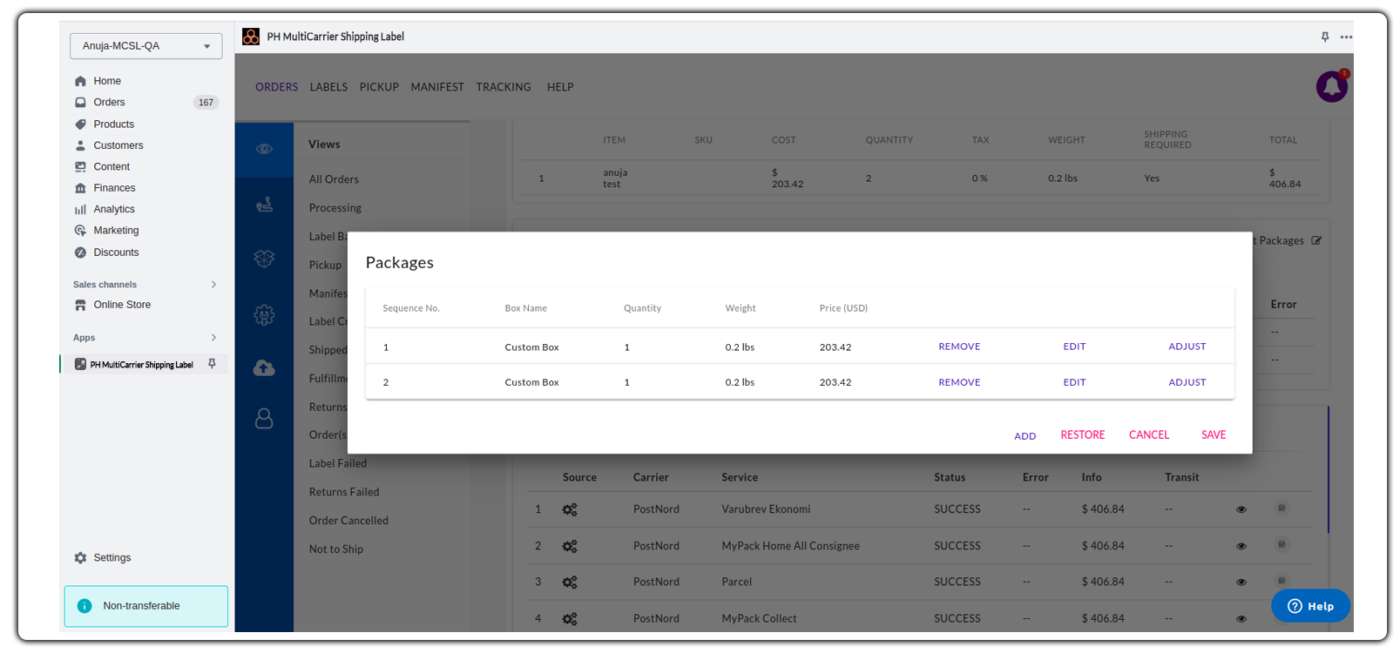
Editing Packages under Order Details
To edit your packages weight, dimensions, and quantity, navigate to the Order Details Page and click on Edit Package as shown below:

Next, a pop-up will open as shown below where you can edit, remove and adjust your package’s weight, dimensions, and quantity:
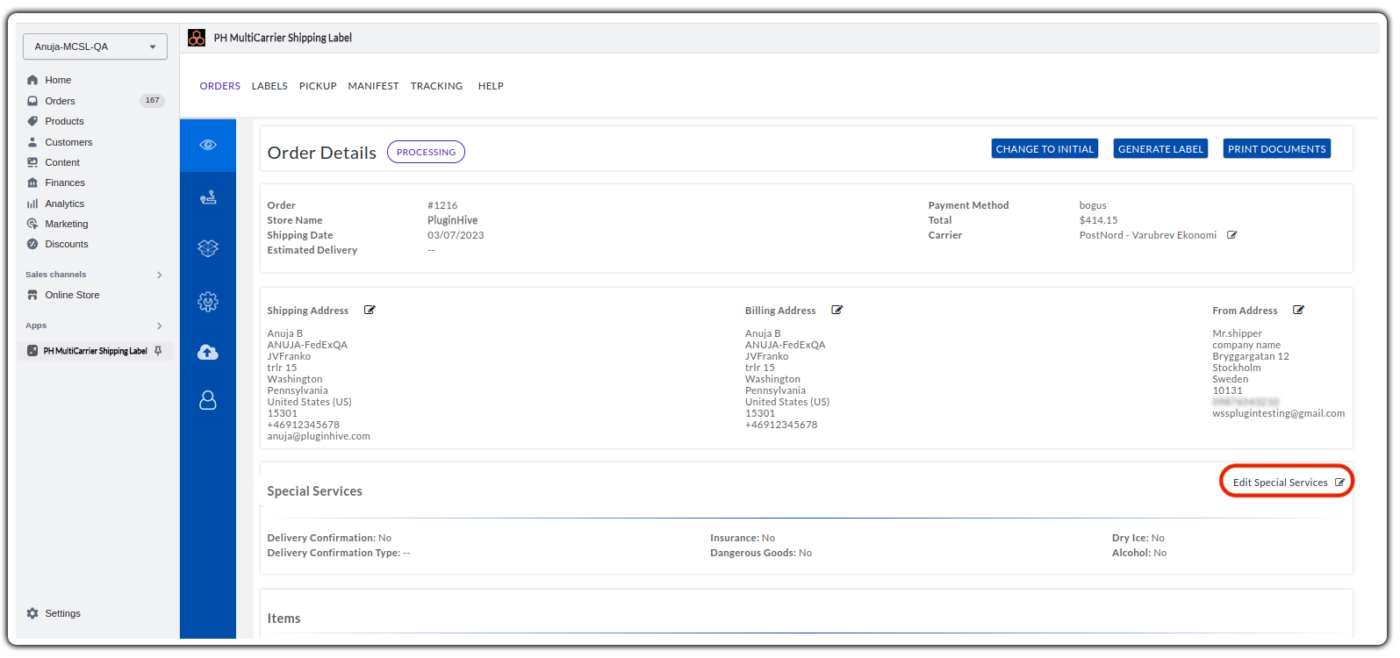
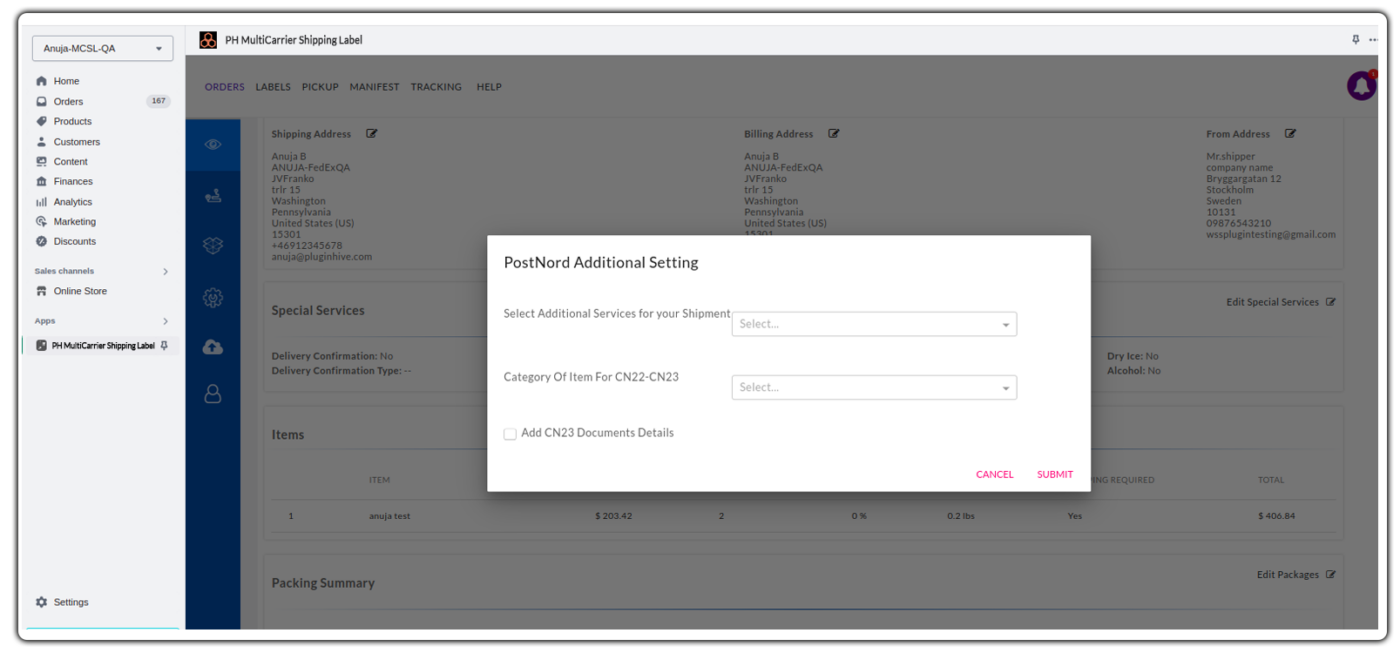
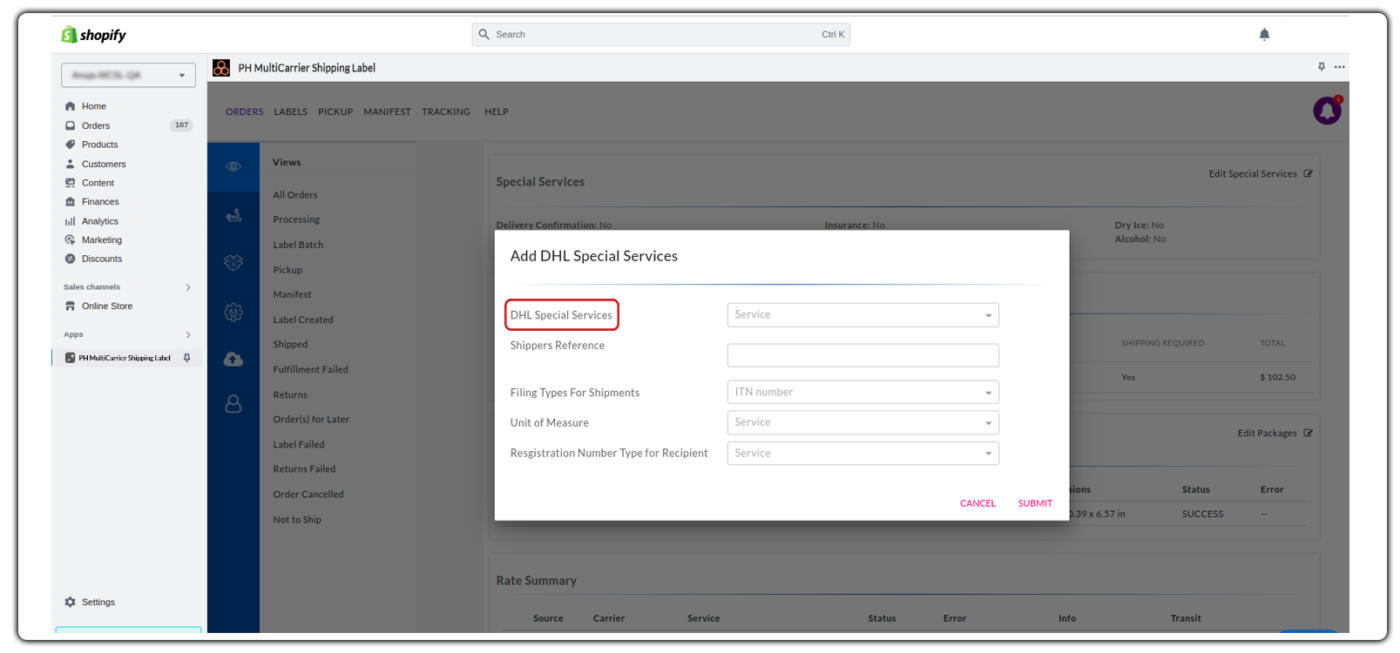
Update Special Services under Order Details
To update the special service under order details, click on Edit Special Services under Special Services:
Note: Currently this feature is available for two carriers: Postnord and DHL Express
For Postnord it will display a popup as shown below for Selecting Additional Services, Category of item, and Adding CN23 document details:
For DHL special services a popup will be displayed with the below fields and you can choose special service options based on your requirements:
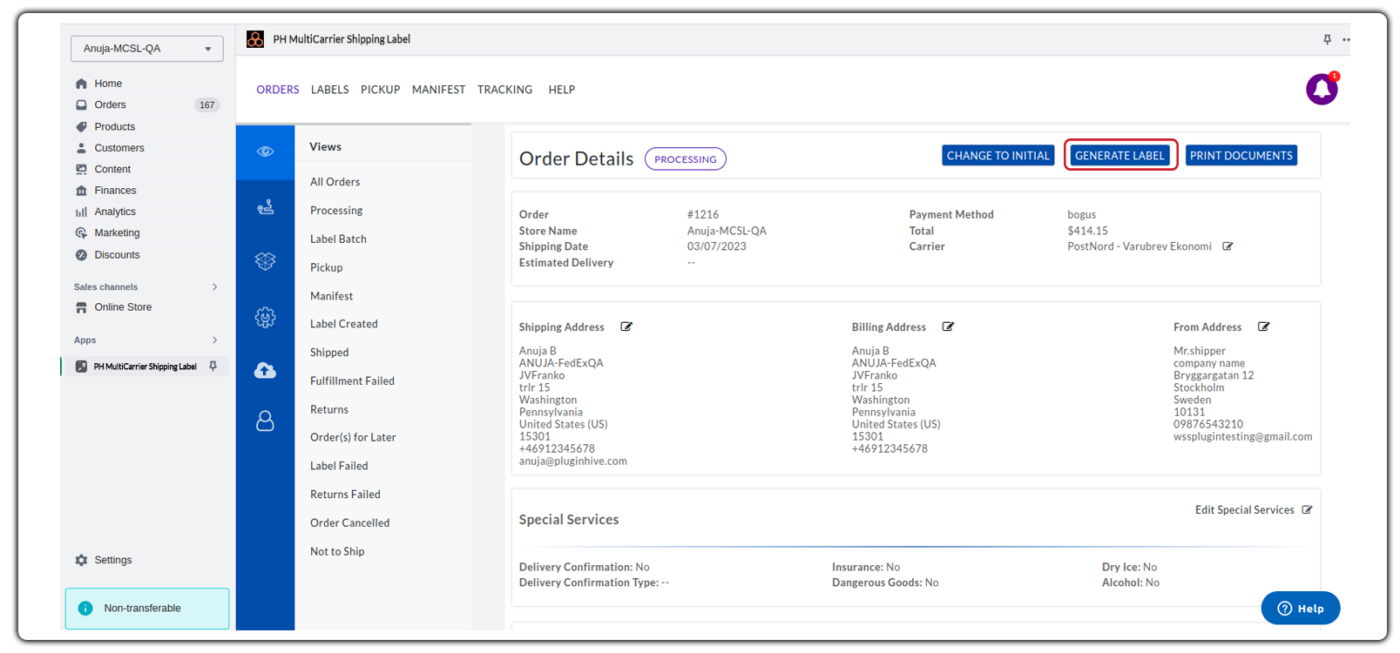
Generating Labels from the Order Details Page
To generate shipping labels directly from the Order Details Page, click on Generate Labels as shown below:
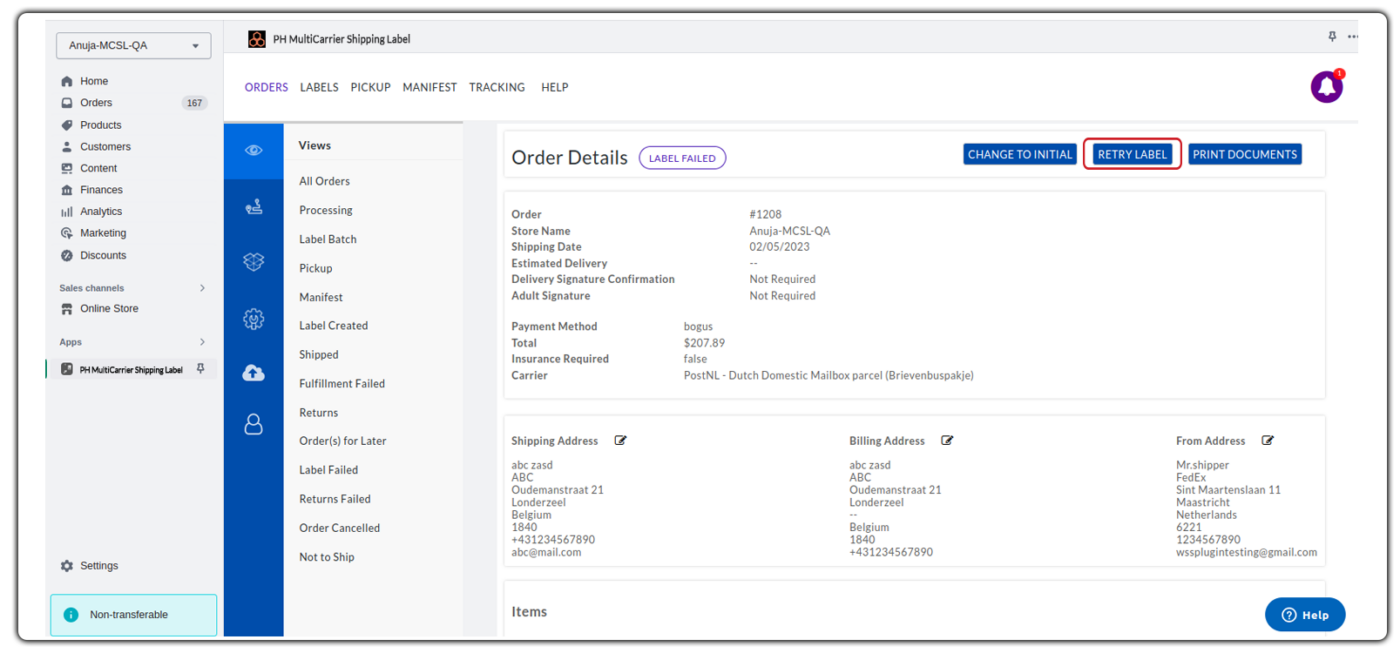
In case your label generation fails, click on Retry Label:
If you want to restore the previous Order Details, click on Change to Initial as shown below:

If you want to select the shipping service to generate a label, click on Prepare for Shipment as shown:
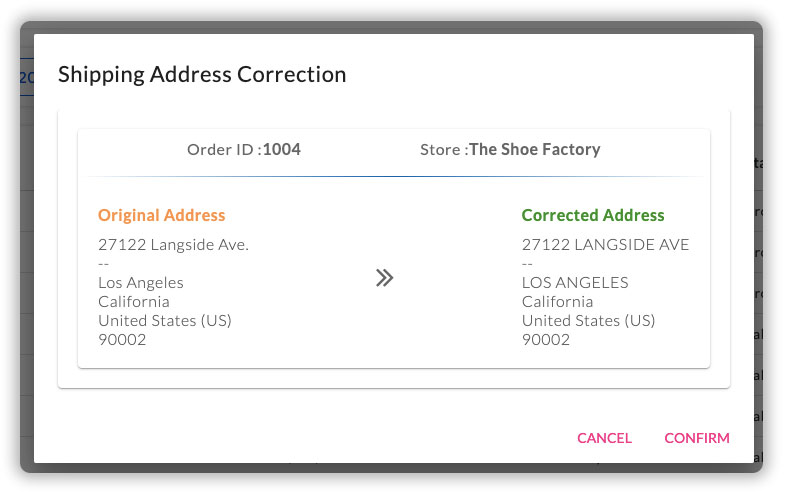
Verify the shipping address with Auto-address correction functionality
With the Auto-address correction functionality in the app, the address gets auto-corrected if there is an error. For the orders, which are auto-corrected, the app displays a yellow symbol. You can click on the symbol to get the wrong address and the corrected one. See the example below.
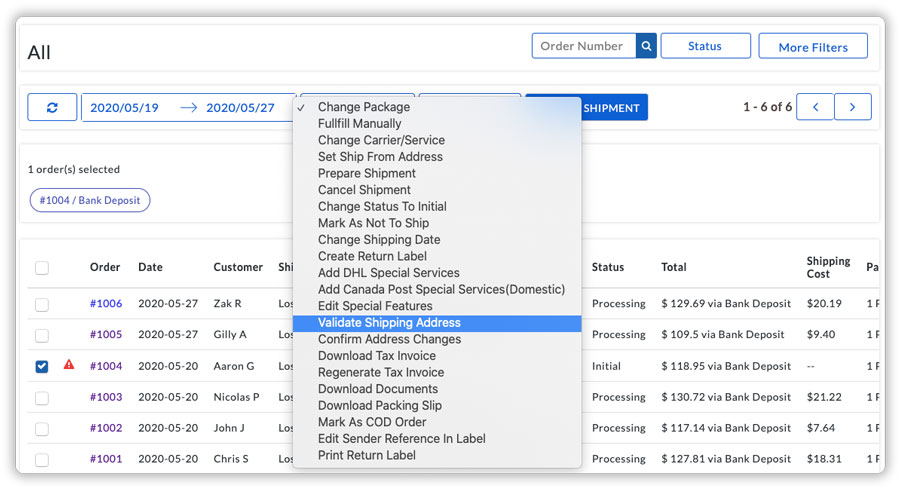
Manual Address Validation
You can also manually do the address validation from the orders page if required. Select the order for which you need to do the address validation and choose “Validate Shipping Address” under the Advanced tab. The app validates the address and corrects it if there are any errors.
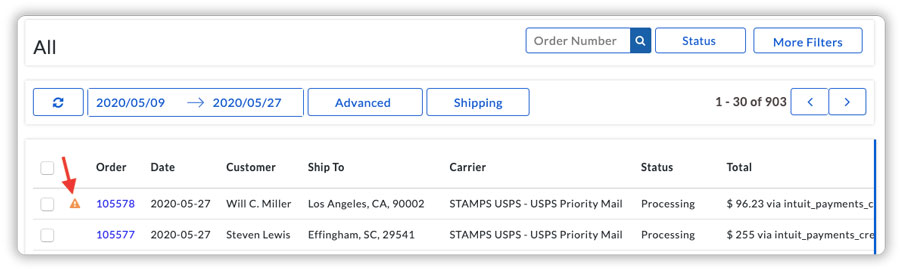
Resolve any order-related errors and ensure that the order is not stuck at the “Initial” state
If an order is in the ‘Initial’ state, the app automatically detects the error and shows an error symbol (red).
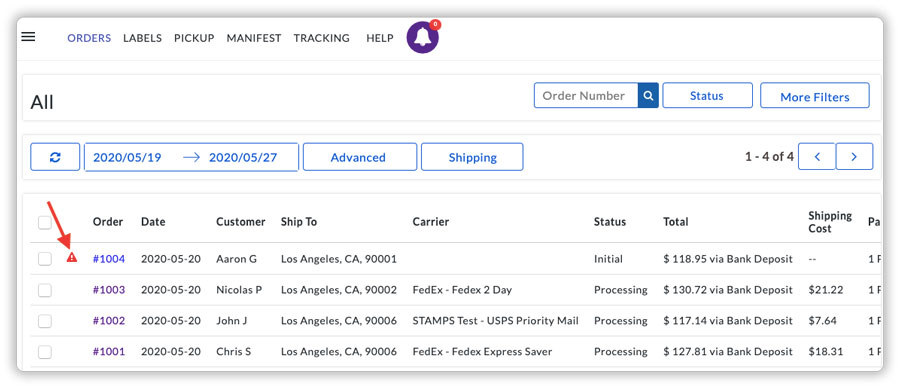
Click on the symbol to understand the error. Make sure that you correct all the errors that are mentioned.
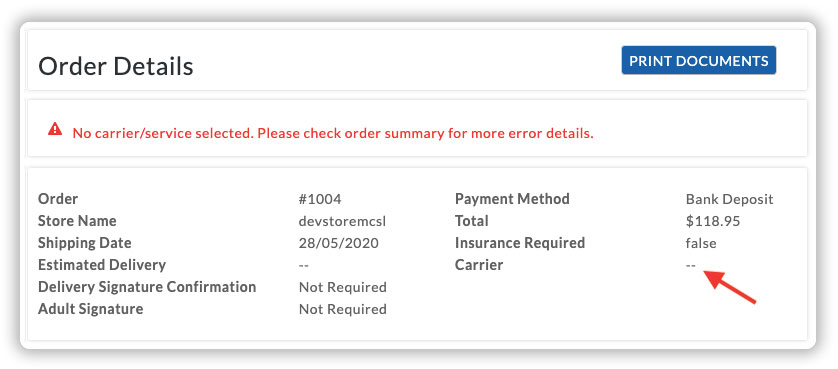
Once you have corrected all the errors and the address is verified, you have to make sure that the order status is processing. To change the status of the order from “Initial” to “Processing”, click on the particular order and select “Prepare Shipment”.
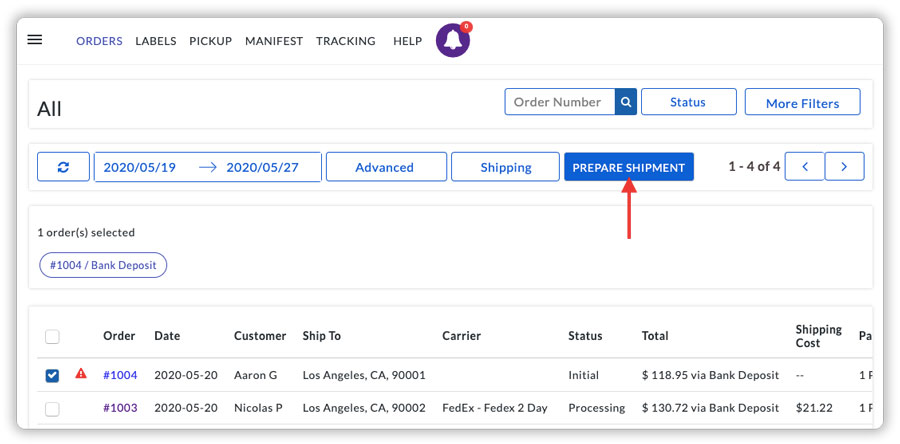
This will change the order status to “Processing” by selecting the carrier & service.
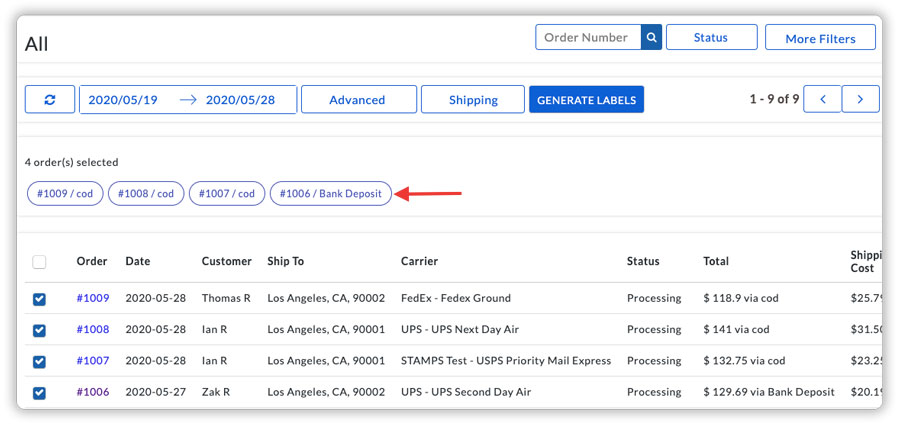
Cross-check the list of orders which you want to ship
Mark the orders as “Not to ship”
The app allows you to mark an order as “Not to ship” if you don’t want the order to be marked as fulfilled and send it to the customers. You can only mark an order as ‘not to ship’ if it is in the processing state. To do that, you can select the order and choose “Mark as not to ship” under the advanced tab.
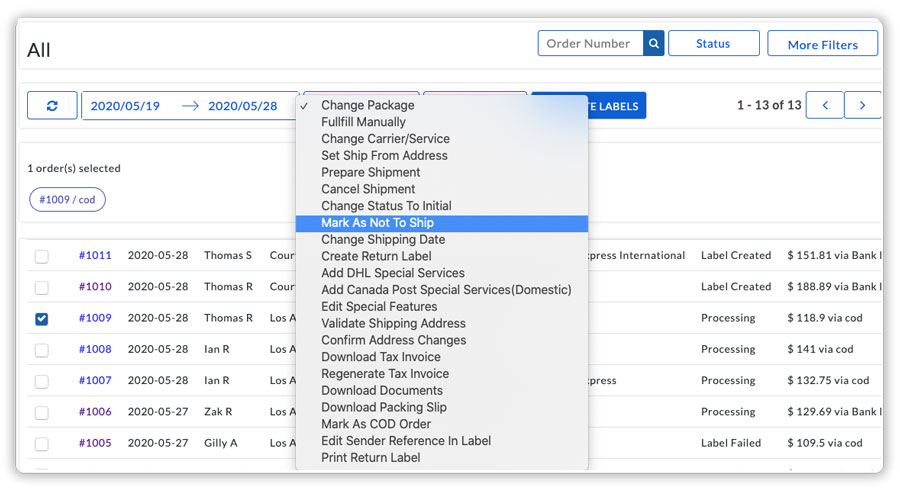
Head to “Not to Ship” section under “Views” to find the orders which are marked as not to ship.
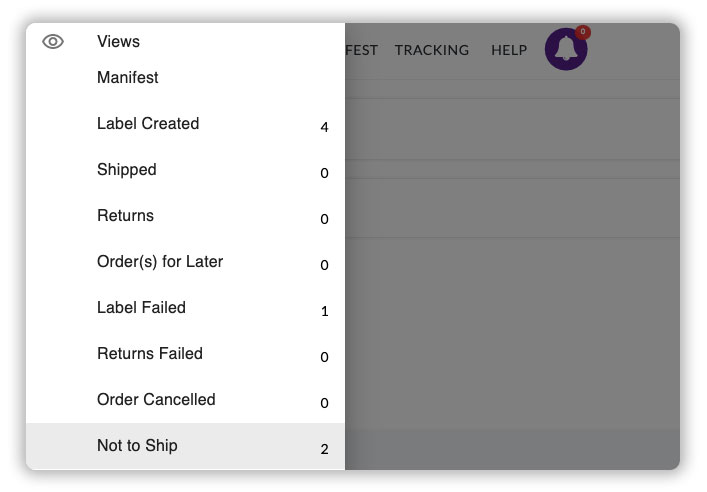
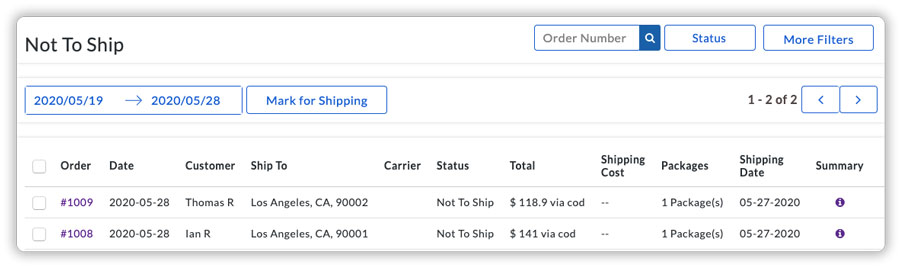
If required, you can remark the order for shipping by selecting the orders and choosing “Mark for Shipping”.
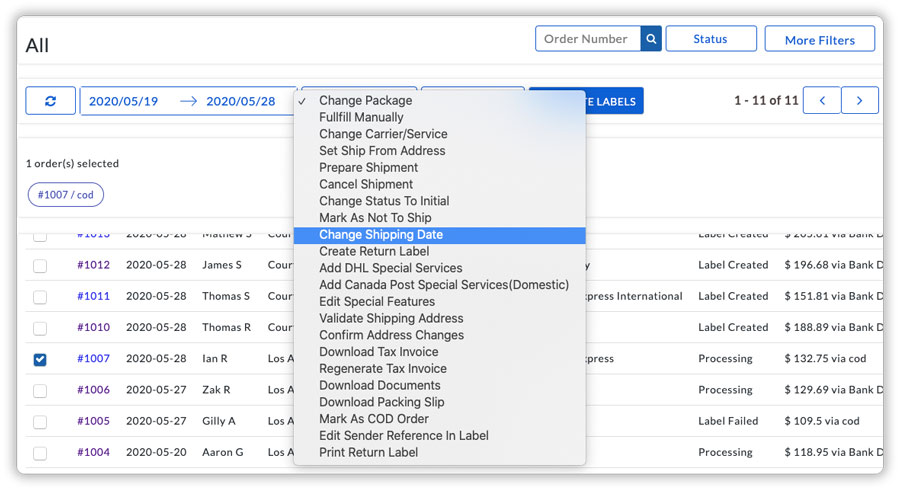
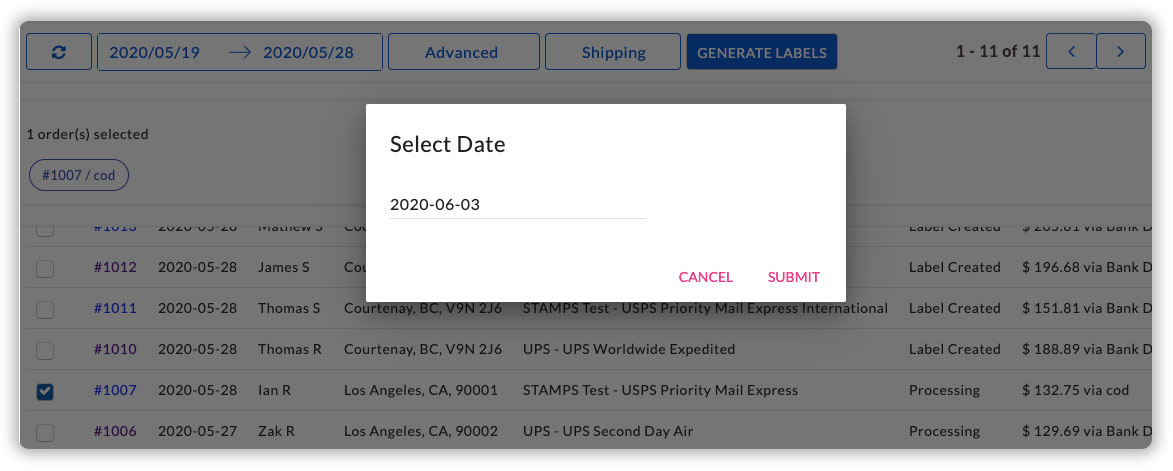
Change the shipping date of orders
The app also helps you to change the shipping date of the orders. To change the shipping date of an order to a future date, you can select the order and choose “Change Shipping Date” under the advanced tab.
Printing shipping labels in bulk for multiple orders
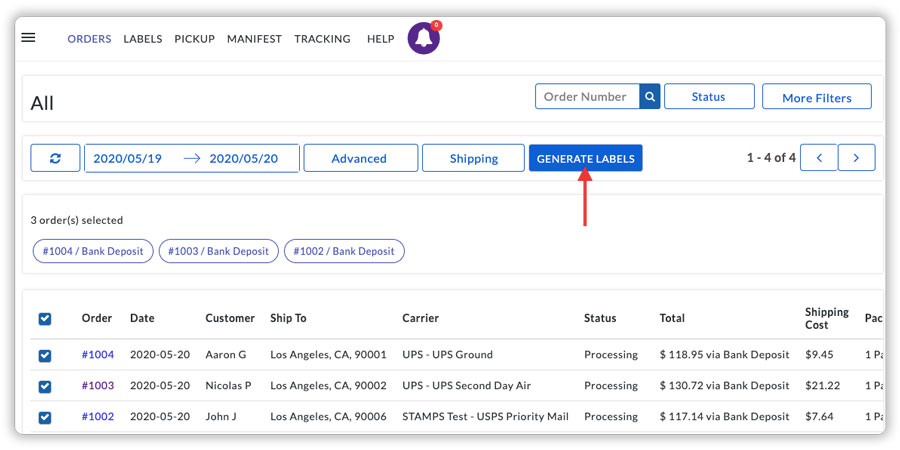
Once you have verified all the orders and the order status is changed to processing, generate & print shipping labels for your orders. In order to print shipping labels for all the orders in bulk, head to the “Orders section” under the app. You can find all the orders in your store with the order status as ‘processing’.
Select all the orders and click on “Generate Labels”. You can easily generate labels for all the orders with different carriers as well.
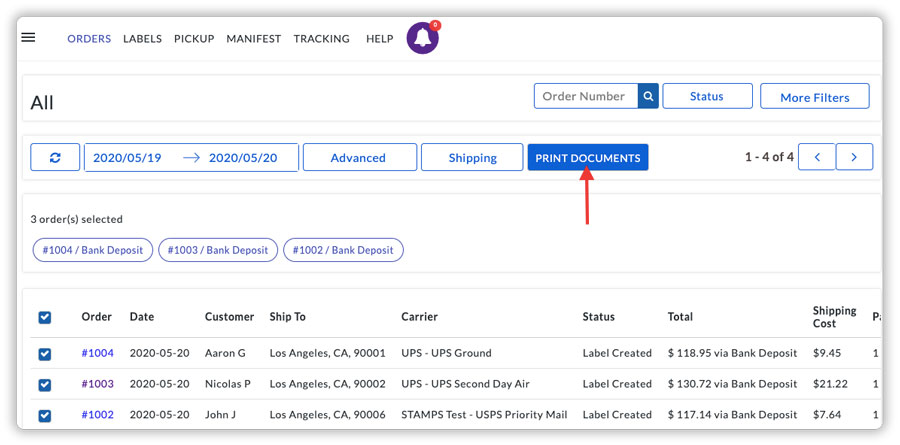
Once the labels are generated, select all orders and click on “Print Documents”. You can easily print all the labels from within the app.
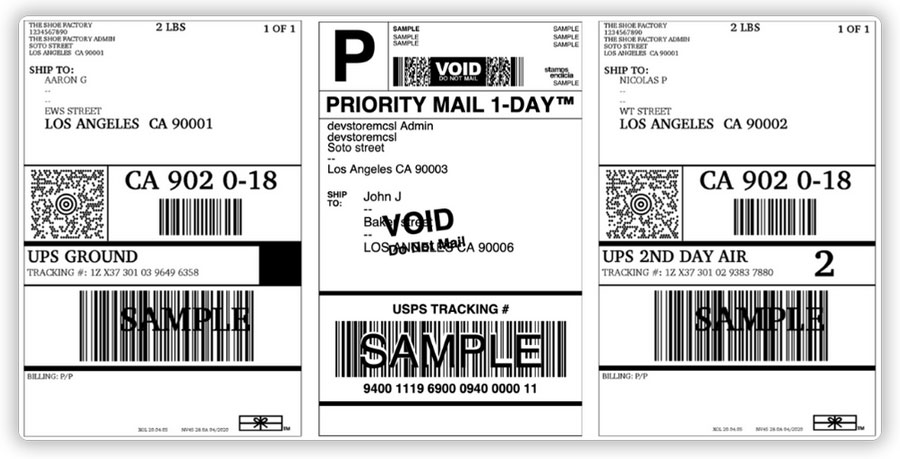
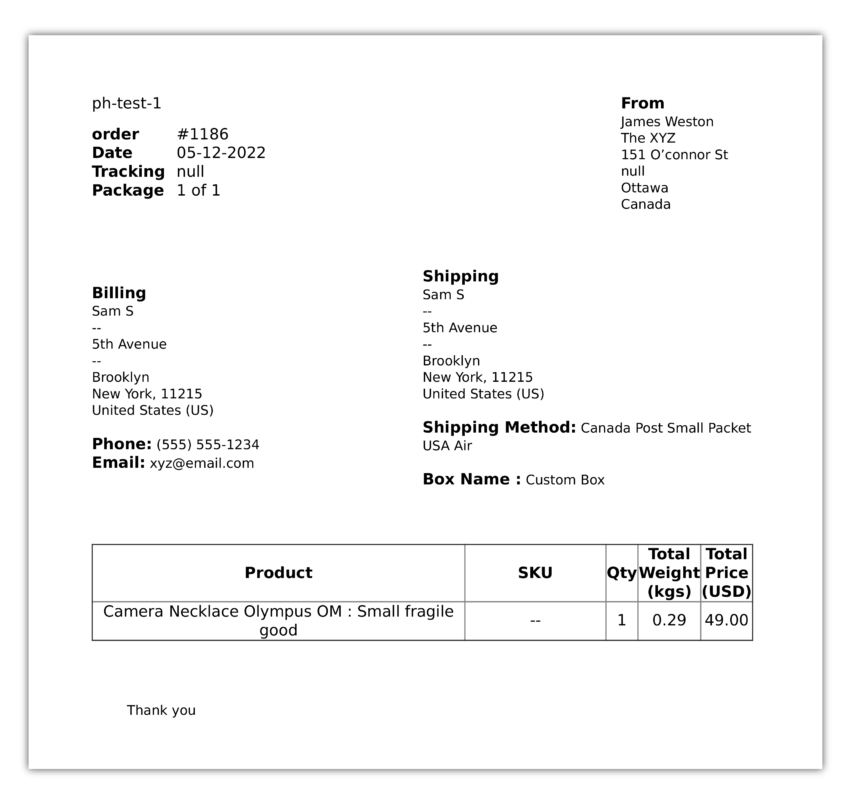
Here are the sample labels from USPS & UPS
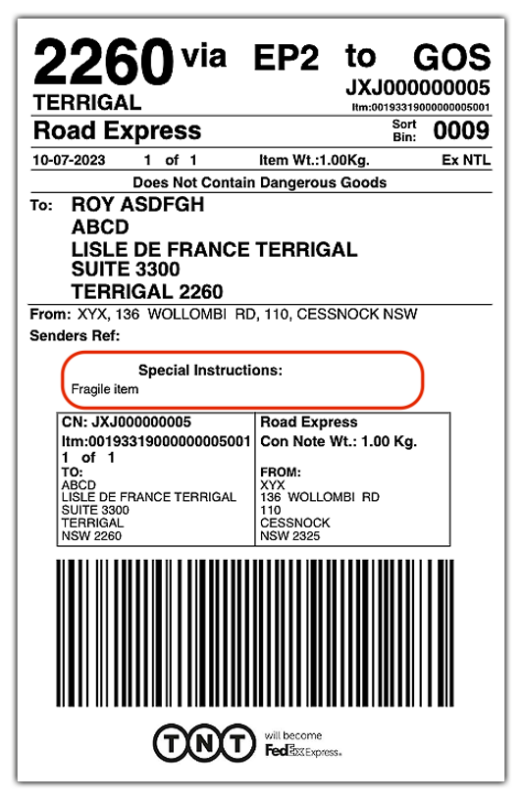
Print Order Note on Shipping Labels
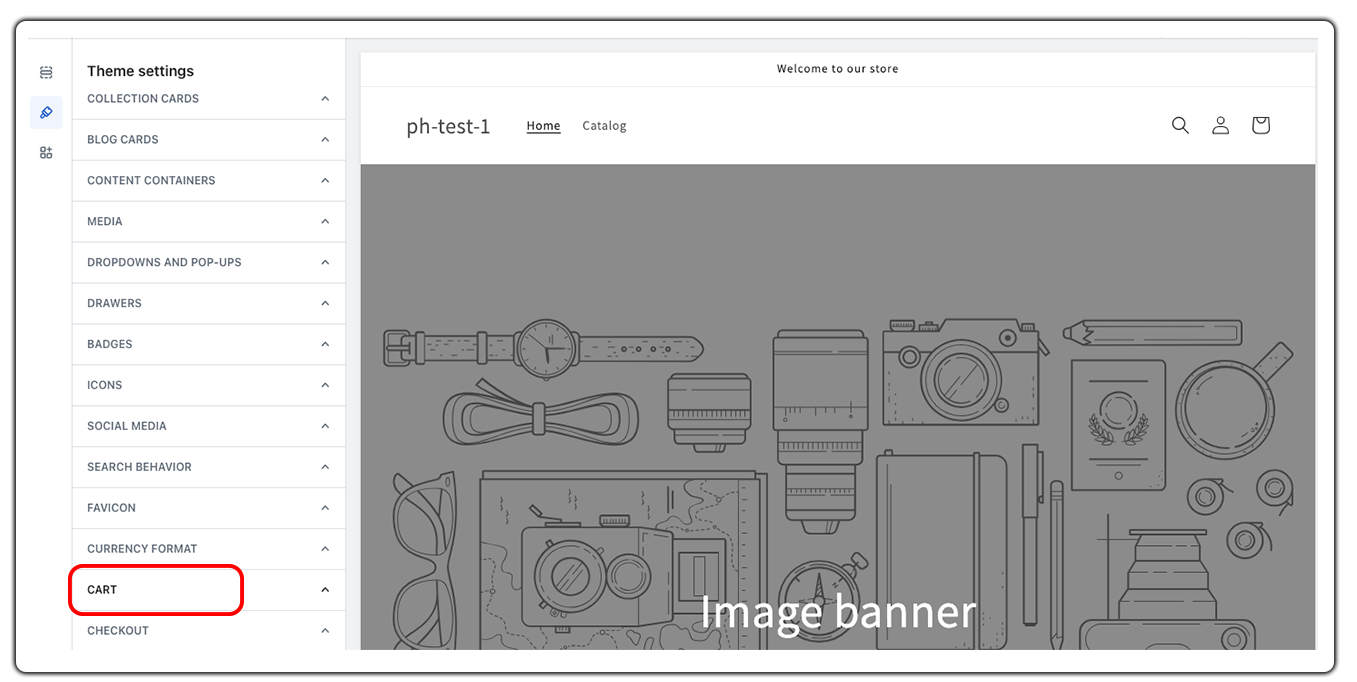
To print Order Note on your shipping label, first, you need to first customize your Shopify Order Note, click on Online Store> Themes> Customize as shown below:
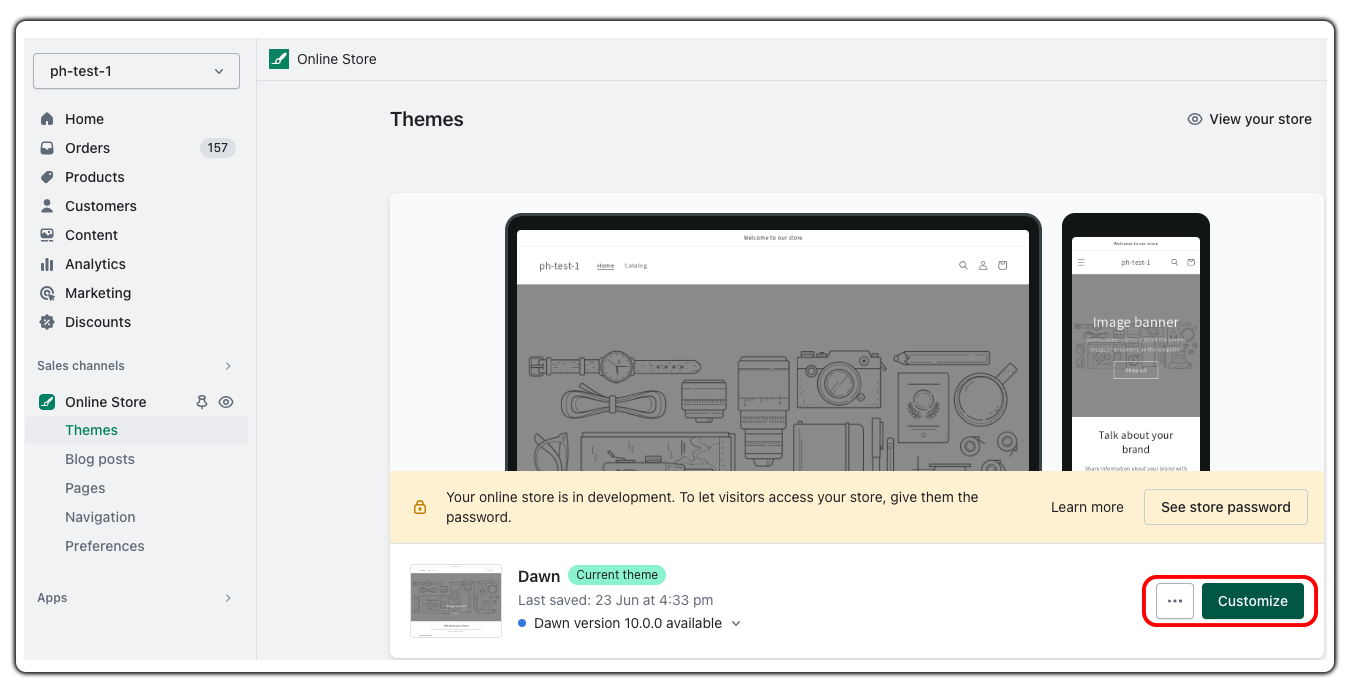
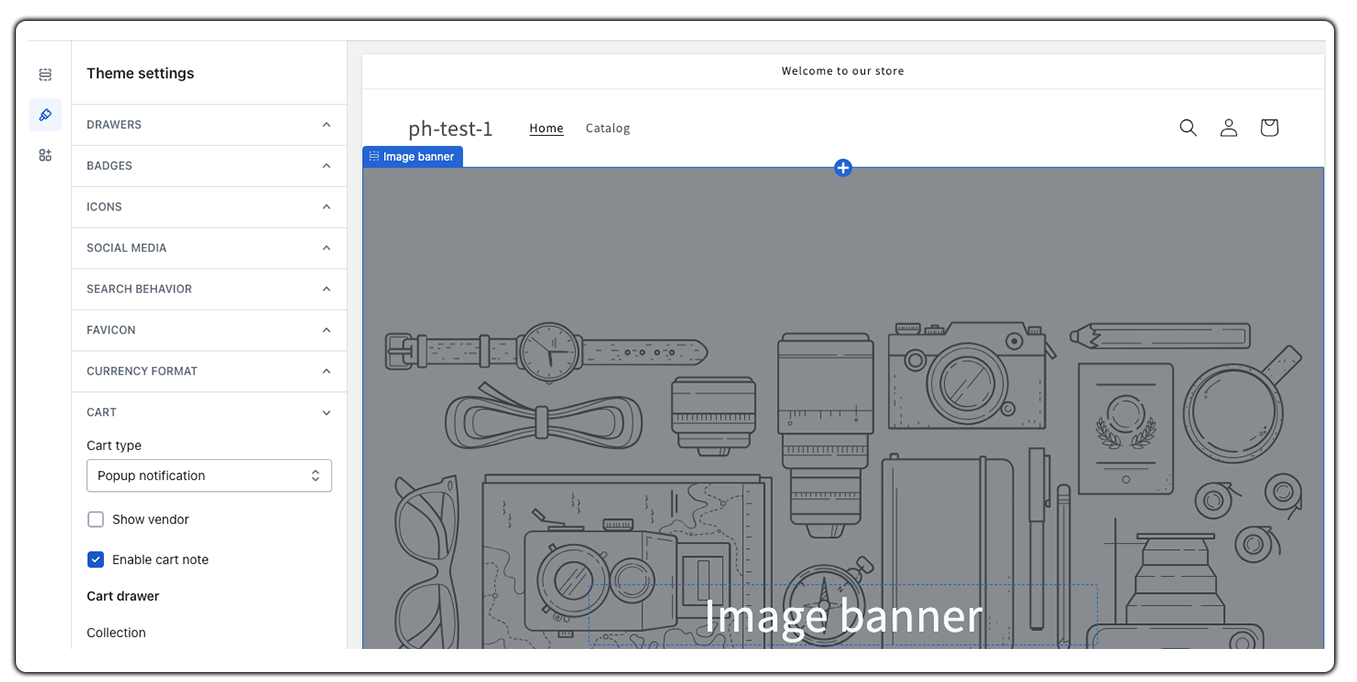
Next, select Cart under the Themes icon:
Under the dropdown enable the Enable Cart Note as shown below:
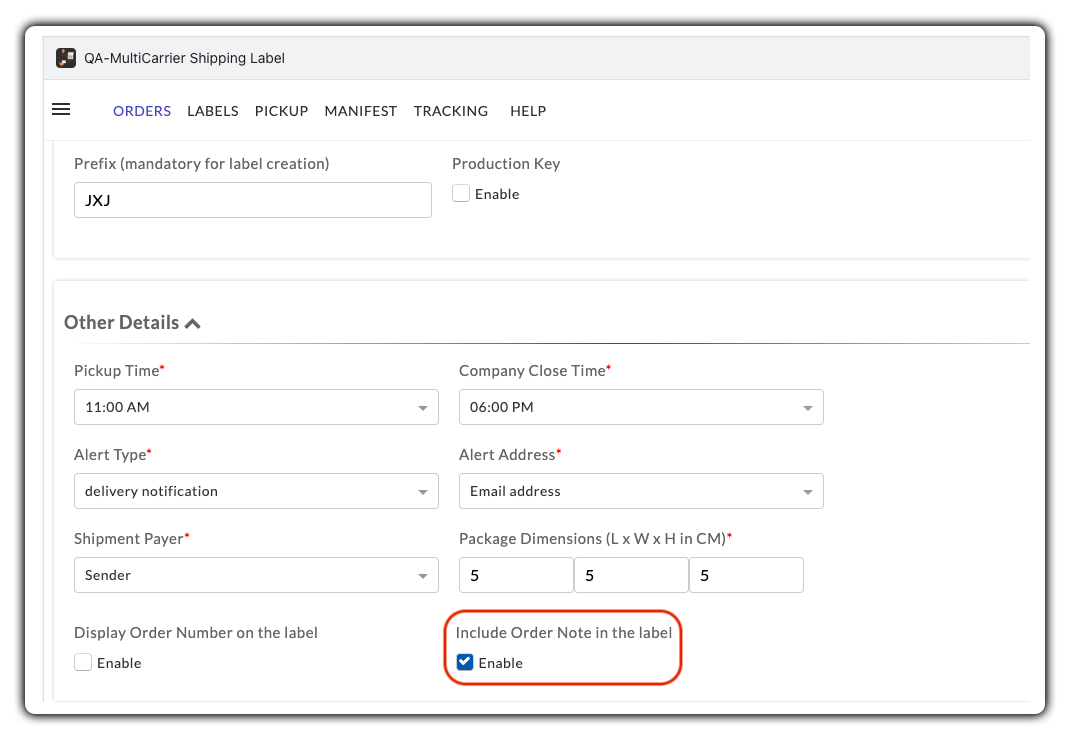
Now, navigate to the PH MultiCarrier Shipping Label app and enable Include Order Note in the label under Carriers section as shown below:
Currently this feature is available with two carriers: TNT & Couriers Please
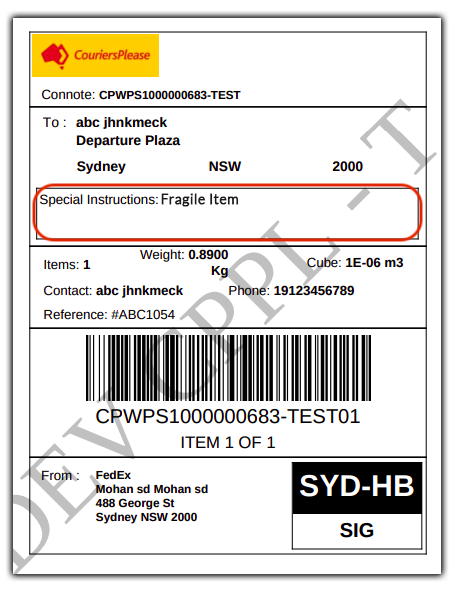
Here are the samples of TNT and Couriers Please sample labels with order notes:
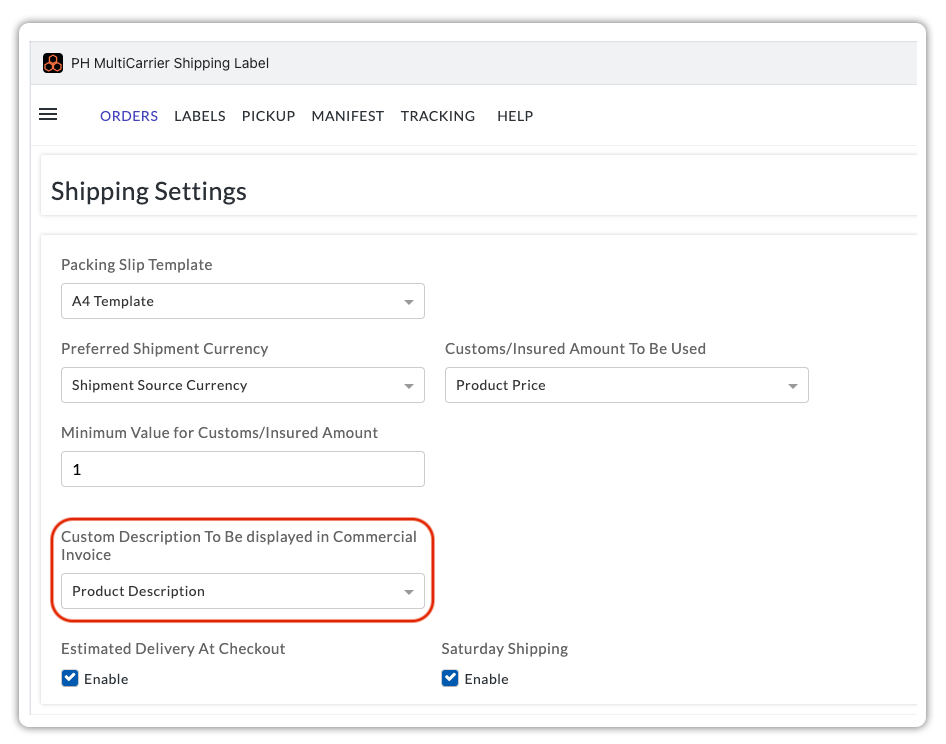
Printing Product Description on Shipping Label & Commercial Invoice
To print the Product description on your Shipping label or Commercial invoice, first, add the custom description under Products as shown below:
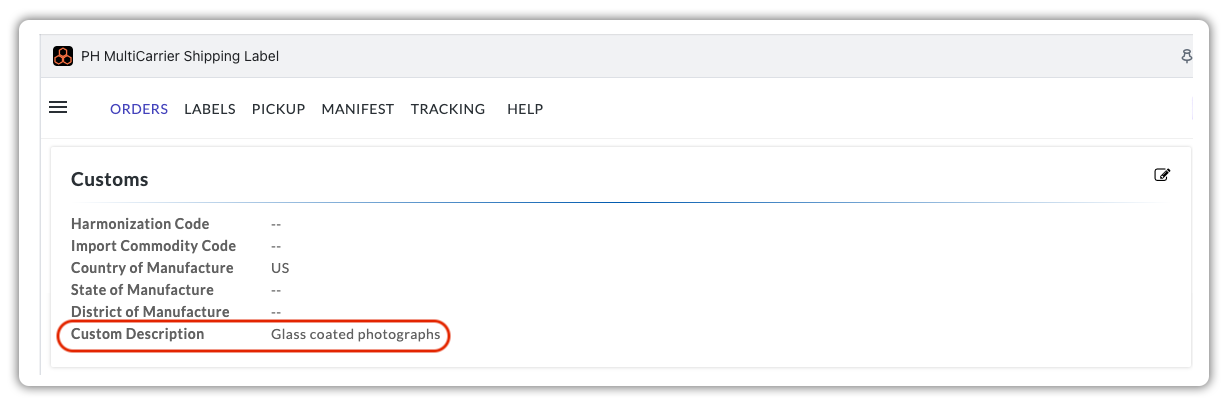
Now select Custom Description to be displayed in Commercial Invoice as Product Description under General Settings > Shipping as shown below:
The tracking number is included in the Shopify “Order shipped” email, which is sent to the customers
Once the order is marked as fulfilled, the tracking number is also included in the Shopify shipping confirmation e-mail, which is sent to the customers.
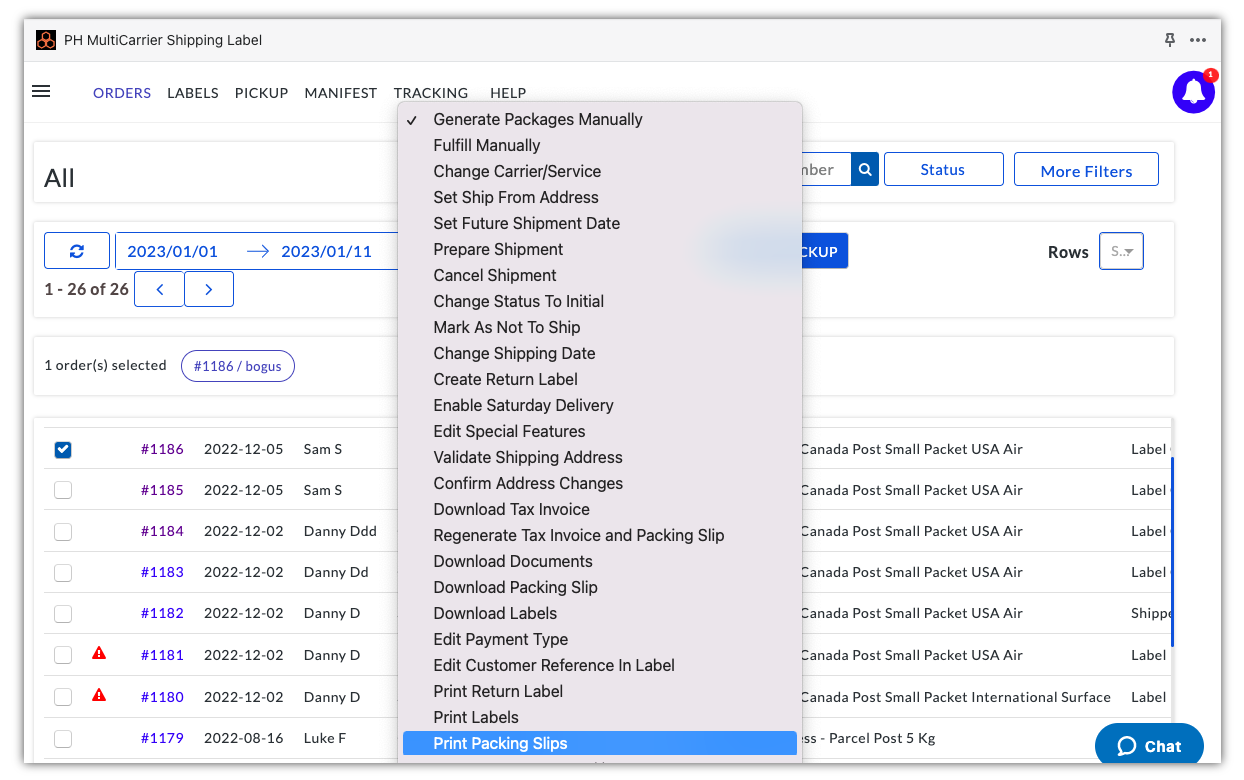
Printing Packing Slips
To print your packing slips within your Shopify store, first, select the orders/s and head over to the Advance section, and select Print Packing Slip as shown below:
Here have a look at the default packing slip:
Carrier Pickup and printing Manifest
After you generate the shipping labels, you can request a pickup for your shipment directly from your Shopify store. To do that, select all the orders for which the labels have been generated and click on “Request Pickup”.
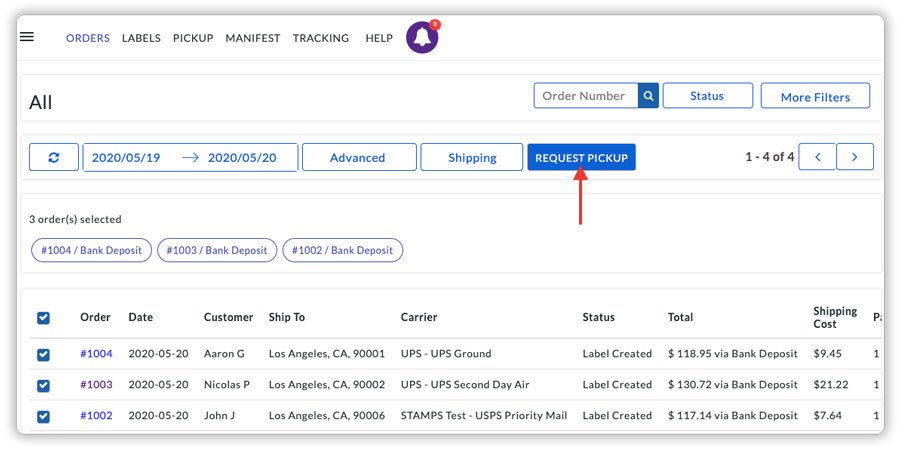
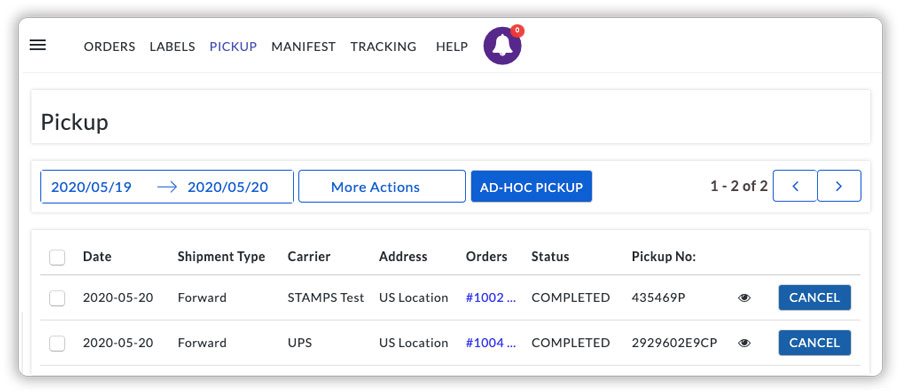
You can see the pickup status under the “Pickup” section.
If required, you can request an Ad-Hoc Pickup, using which you can request the earliest possible pickup.
Generate Manifest directly from your Shopify Store
Once the pickup request is completed, you can select all the orders and “Mark them as Shipped”. This will generate the Manifest and the orders will be marked as shipped. Manifest is a list of shipments that are to be handed over to the pickup agent when they arrive for pickup.
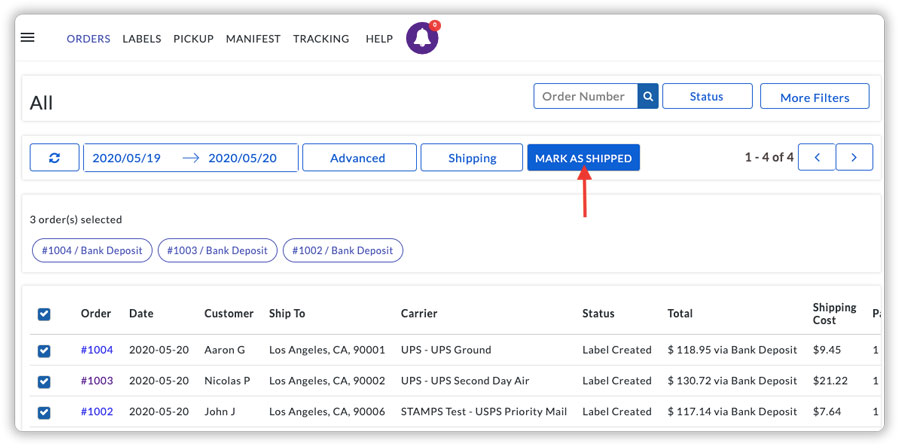
You can find the Manifest status under the “Manifest” section. Now, you can print the Manifest, which is to be handed over to the pickup agent. In the case of carriers like Canada Post or Australia Post, you can also print the Carrier Manifest from this page.
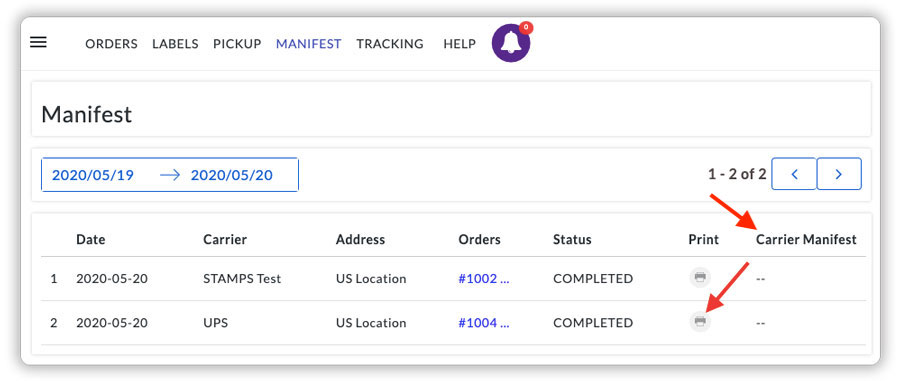
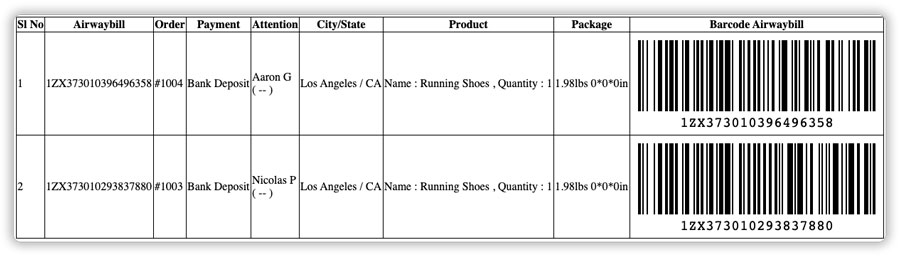
Here is a sample UPS Manifest.
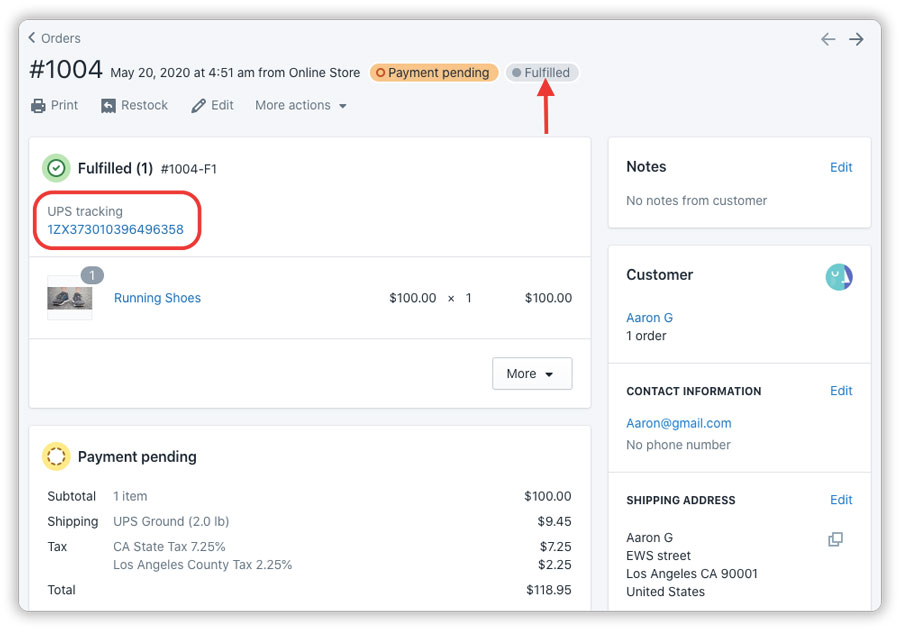
Shopify order is marked as fulfilled along with the shipment tracking number
Once you mark the orders as shipped, the manifest is generated and the app automatically marks the Shopify orders as fulfilled along with the shipment tracking number.
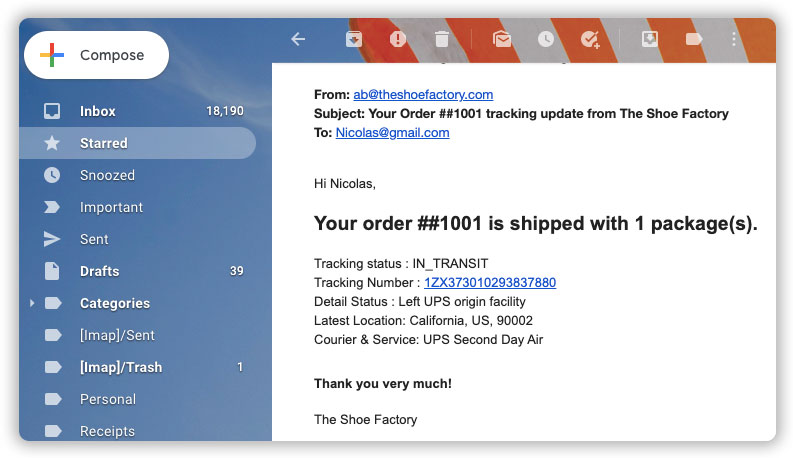
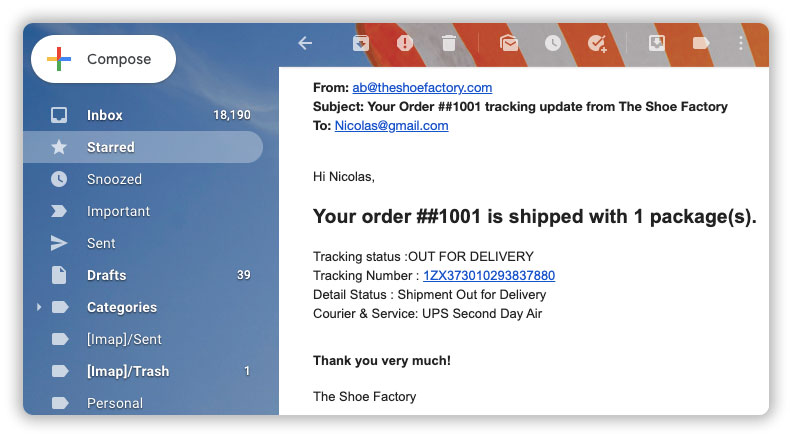
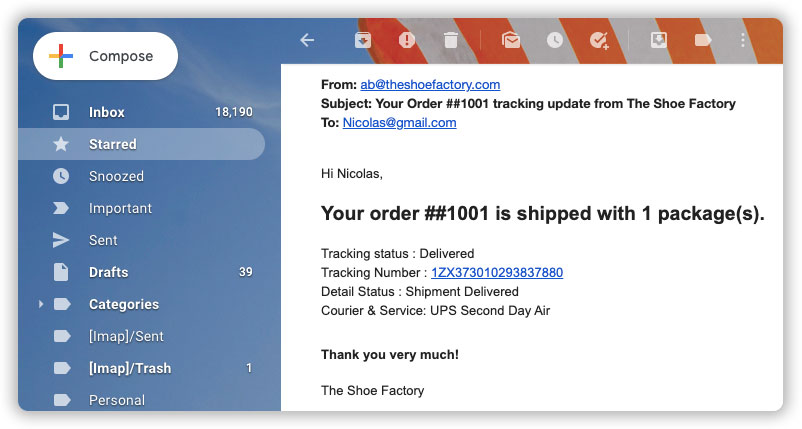
Live shipment tracking notification to customers via e-mail
Once the order is shipped, the app sends tracking notifications via e-mail to the customers which include In-transit, Out for Delivery, and Delivered e-mails. Here are the sample e-mails, which show the tracking status.
Order is IN TRANSIT
Order is OUT FOR DELIVERY
Order is DELIVERED
Order Tracking within your Shopify store
To make the order tracking process easier for the merchants, the app allows you to view the tracking status of all the orders under a single dashboard. You can start tracking your orders once the order is marked as shipped and the package has been picked by the carrier agent. Select the orders and click on “Track Your Orders”.
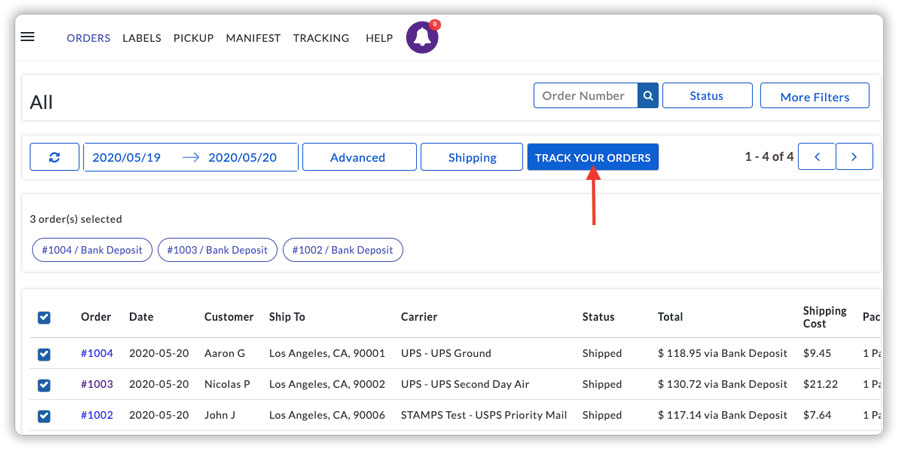
You can view the order status under the tracking dashboard within the app. Click on each order to get the detailed tracking status.
Canceling shipping label
The app allows you to cancel the shipment for the orders for which the shipping labels are generated. In order to cancel the label for the shipment that you have generated, select the required orders, and click on “Cancel shipment” under the Advanced button.
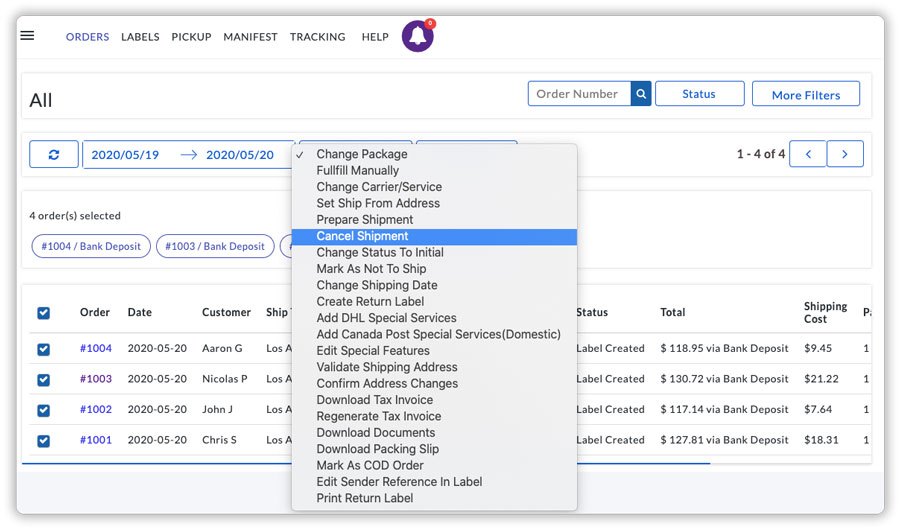
Once you cancel the shipment, the order status will be changed to “Initial”. Now, you can make the required changes and then “Prepare shipment” for the orders.
Setting up Shipping Label Automation
Similar to the selection of services to calculate the rate, you have to select the required services for label generation. By default, all the services will be automatically selected and the app will take up the cheapest service to generate the labels.
To set up the shipping label automation, Head to App settings --> Automation --> Setup.
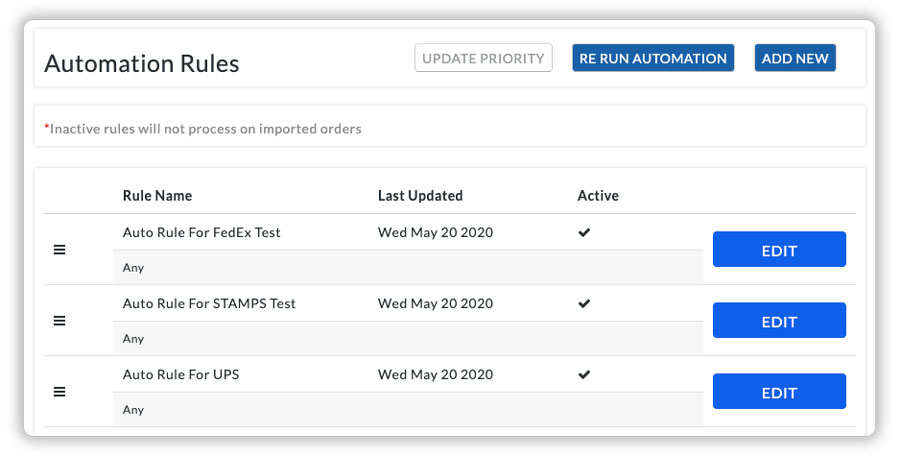
You can set to all the services or select the preferred services to generate the labels.

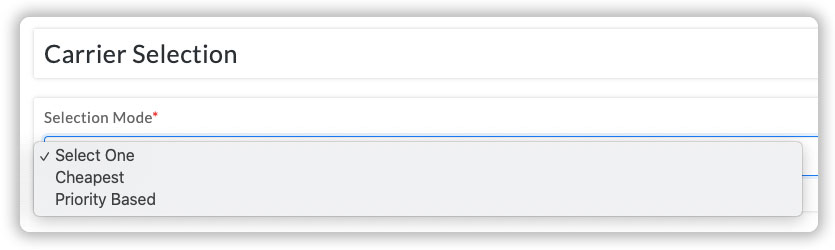
Carrier service selection mode
You can set up, how the app should select the services for label generation; ie. select the cheapest available service or select the priority-based services, under the “carrier selection” tab. If you select the “Priority-based”, the app will generate labels by choosing the customer-selected carrier service.
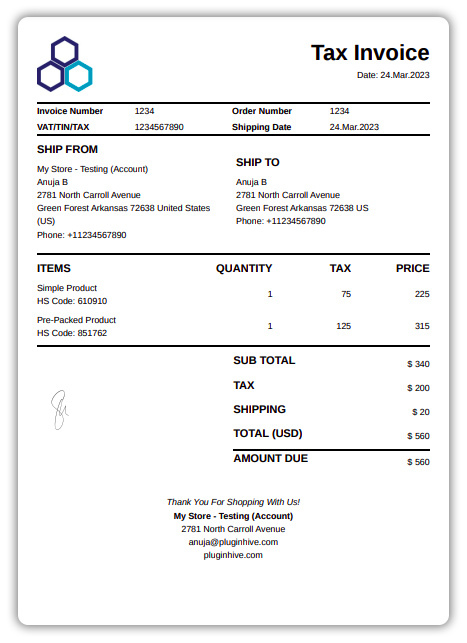
Customizing Tax Invoice Template
Customizing tax invoice templates allow eCommerce merchants to tailor their invoices to fit their brand and specific business needs, which can enhance their professional image and improve customer experience. Additionally, customized templates can help merchants comply with legal requirements and facilitate easier tracking and reconciliation of sales and tax data.
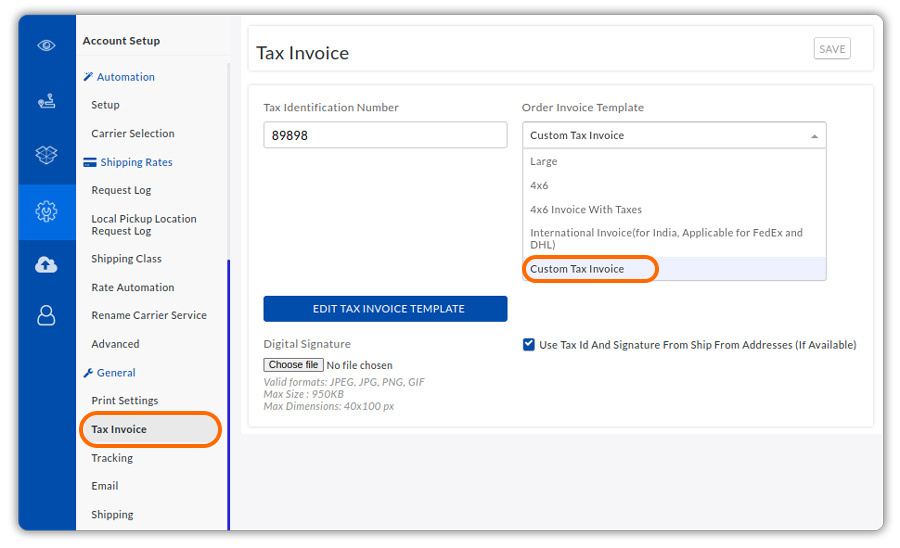
Using the PH MultiCarrier Shipping Label app you can customize your Tax Invoice Template. To customize navigate to the app’s Settings, and then click on General > Tax Invoice. Next, under Order Invoice Template choose Custom Tax Invoice as shown below:
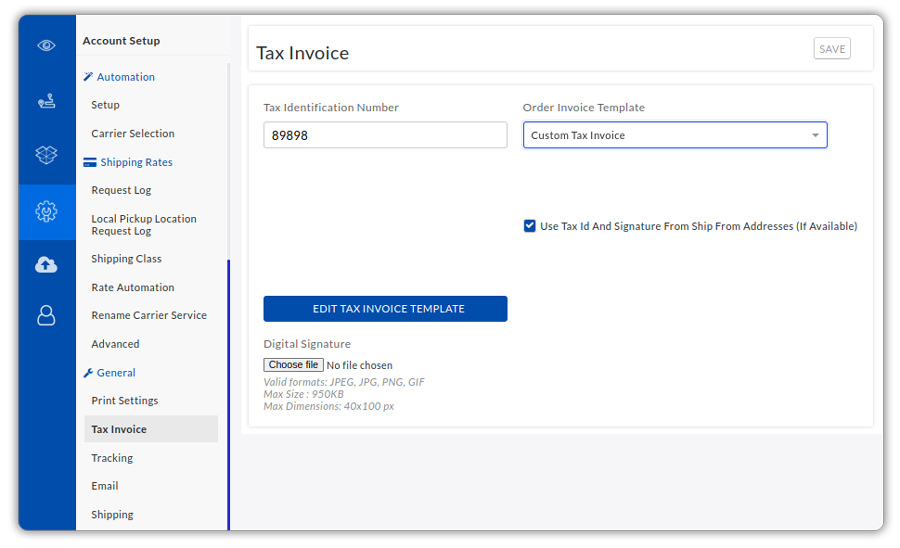
Next, click on Edit Tax Invoice Template for modifying your Invoice:
Once you click on the Edit Tax Invoice Template, the page with the template language will open and you can make changes to it. You can add or edit the alignment of:
- Order Details like Order Number & Date of Order
- Invoice Number & Date of Invoice
- Store Address
- Product Details including Product name, Product price, Tax
- Customer Shipping and Billing Address
- Additional Note/Branding message
- Tax ID / Tax ID type
- Digital signature / Company logo
You can also Preview the changes before saving and once confirmed click on the Save button as shown below:
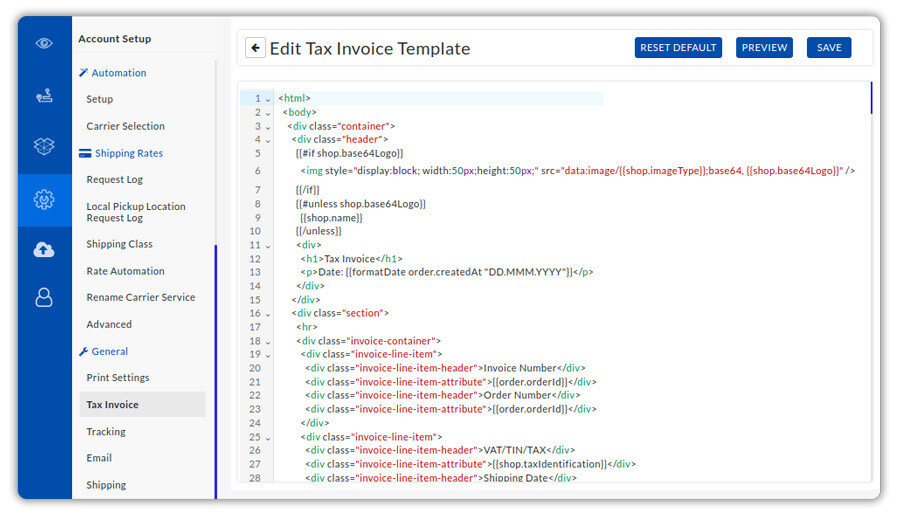
Let’s check out one small example of resizing a brand logo using the Tax Invoice Customisation Template
Adding your company logo on the tax Invoice makes a strong first impression, creates brand identity, and also fosters brand loyalty. In the Tax Invoice template, you can align or resize your logo. This is how the logo was:
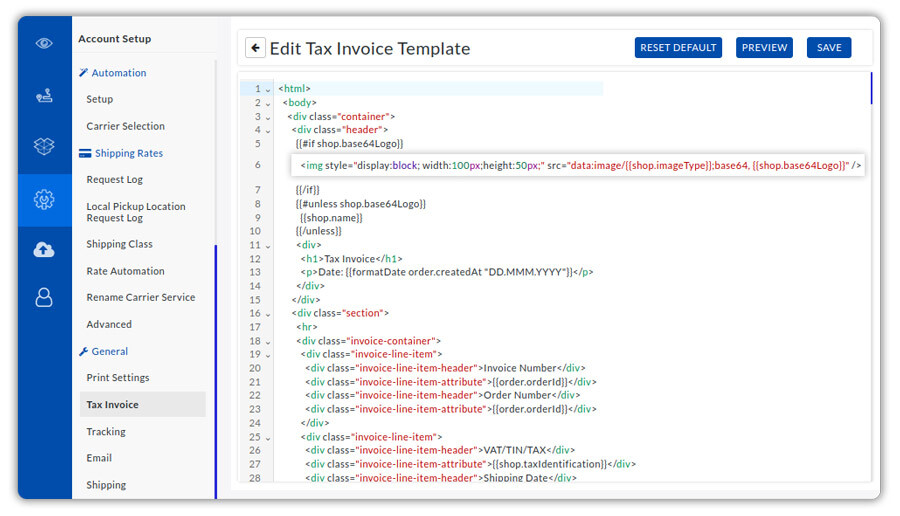

Here we made some changes in the Width of the Custom Invoice Template:
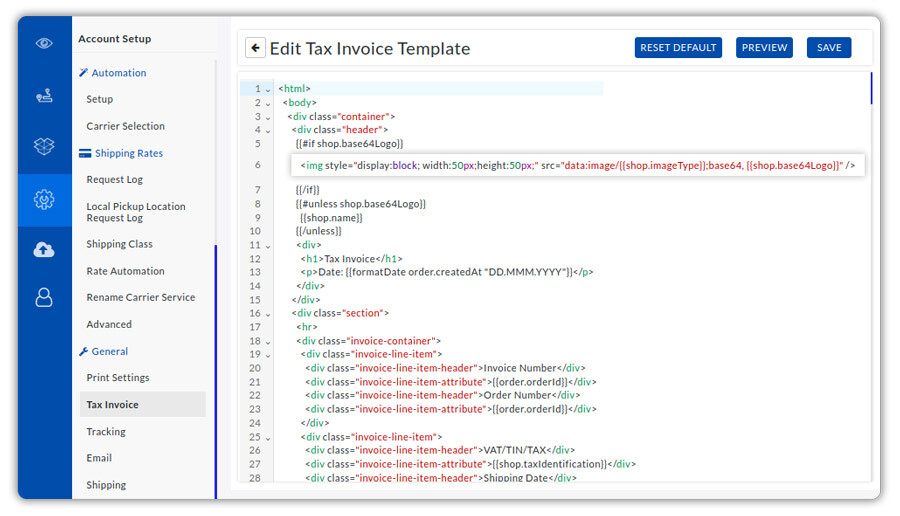
Here have a look at the resized logo:
Proof of delivery with the PH MultiCarrier Shipping Label app
The app helps you enable the Signature on Delivery service for FedEx, UPS, and USPS. Head to App settings --> Product and choose the required product.
You can see the signature on the delivery service under the “Special Services” section.
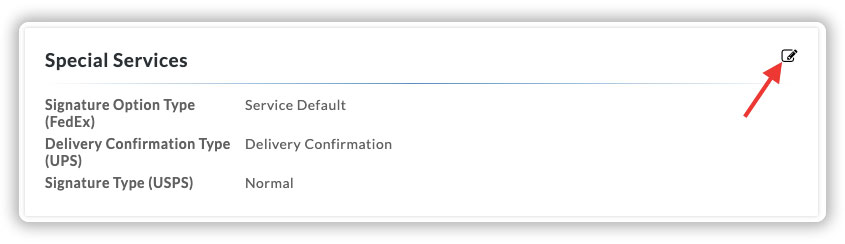
Choose the signature on the delivery service based on the different carriers that you use for shipping. For each carrier, the mode of the “signature on delivery” changes. So, you have to choose the options accordingly. For example, USPS has a signature type which includes, normal and adult signatures.

Packing methods
If the volumetric weight of your product is higher than the actual weight, then, you will have to use a packing method that uses the product weight as well as the dimensions to pack the products. So, apart from weight-based packing, there are 3 other packaging methods available in the app, that uses the product dimensions.
Box Packing
Box Packing method is based on the Box Volume, Dimensions, and Weight. To use the box packing method, make sure you have entered the product dimensions under the “Products” section.
Here, the volume of products is used to fit the total volume of the packages. To set up Box packing, head to App settings --> Shipping --> Packaging, and select “Box Packing”.
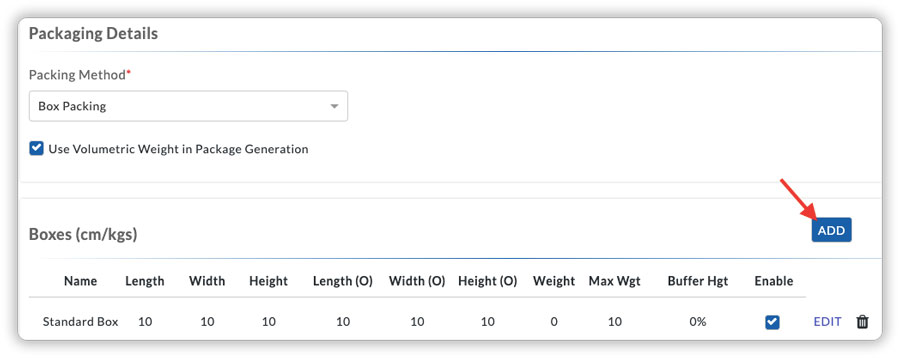
In this method, you can create boxes based on your product weight & dimensions. Here, a box is filled based on the dimensions of the product until the box is completely filled or a minimum space is vacant.
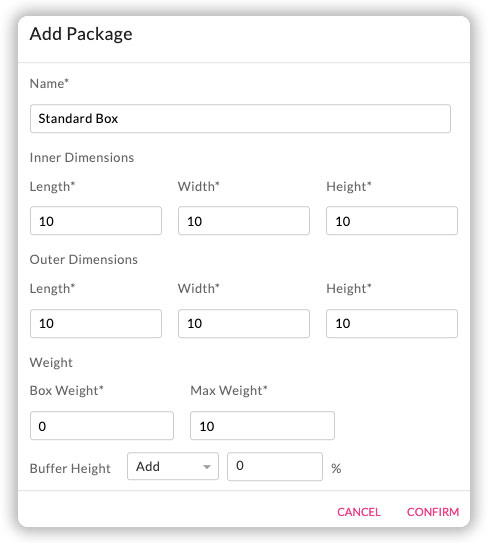
If the next unpacked item has a volume greater than the vacant volume, it goes into the next box and this process is continued until all the items are packed properly. You can add the Inner and Outer dimensions of the box, the weight of the box, max weight, and the buffer height.
Buffer height allows you to give a percentile adjustment value while packing the products based on the box height. For example, if you have set up the box height as 100 cms, and you have a product with 20 cms height, you can fit 5 items in the particular box. But, if the product height is slightly higher, (maybe 22 cms), you would not be able to fit the products properly. To handle this, you can add a 10% buffer height, that will increase the height, and 5 items can be correctly packed in the box.
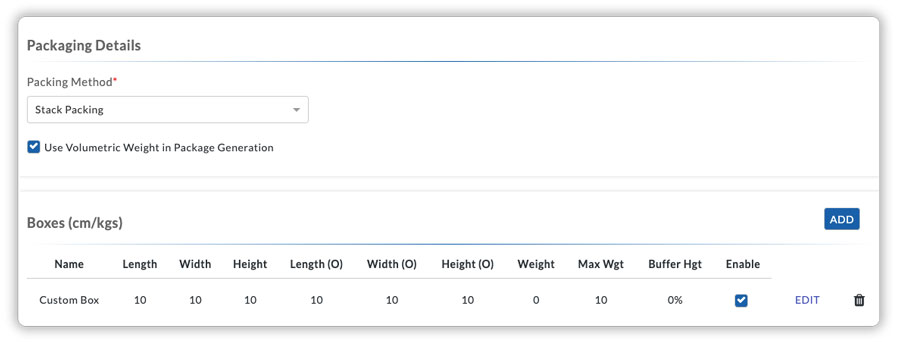
Stack Packing
This packing method is based on the product height. You can add a box based on your product dimensions and the app automatically packs the products one over the other, based on the height configured. You can also add a Buffer Height similar to box packing, if required.
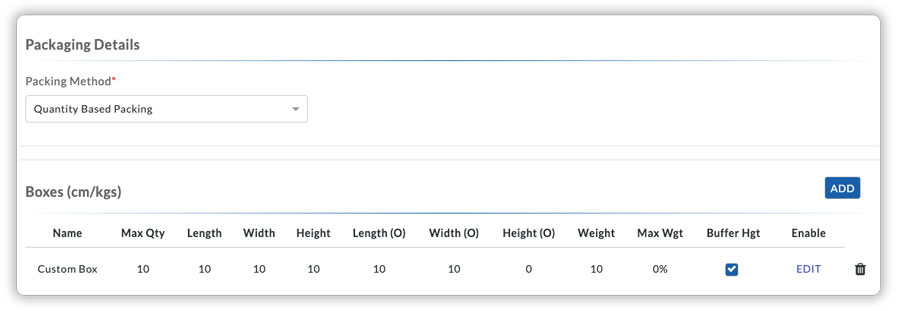
Quantity-based Packing
Using this method, you can set up the packing based on the number of items that can be packed in one box. Add a box based on your product dimensions and you can set the max.quantity that can be packed in one box.
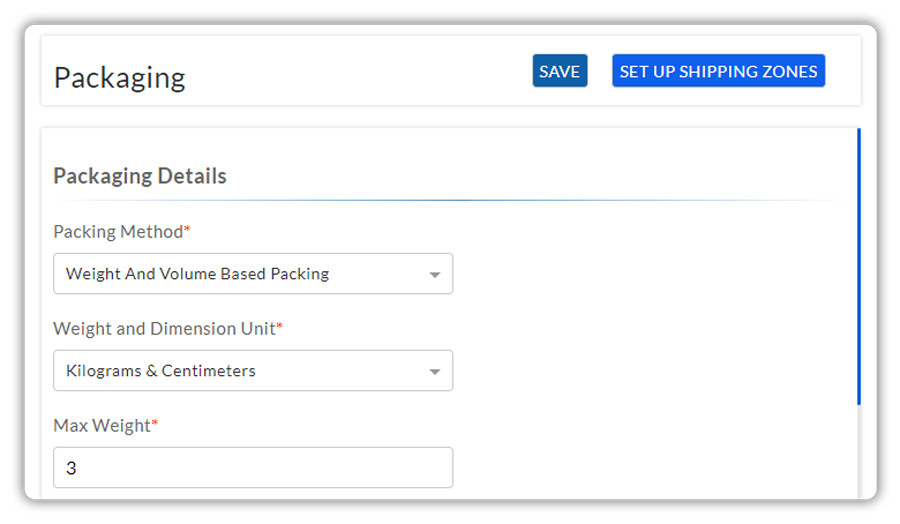
Weight And Volume Based Packing
Weight and volume-based packing help when shipping things like cotton. Since cotton can be light but take up a lot of space, it’s important to consider both its weight and how much space it needs. If we don’t do this, the shipping rates cost might vary.
For example, imagine we’re sending a bunch of cotton shirts. If we only look at how heavy they are and not how much space they take up, the shipping cost may vary. It is the same if we take into account their volume and not weight.
By using weight and volume-based packing, we can make sure to take both weight and volume into account to get accurate shipping rates.
Calculation of Weight and Volume-Based Packing
The first largest value among the dimensions will be taken as Length (any value)
The second largest value among the dimensions will be taken as Width (any value)
To calculate the height, use the following formula:
Height = Volume of product – P1 (V1) + Volume of product – P2 (V2) / length*width
Let’s say you have two Products P1 and P2 with dimensions as follows:
| Length | Width | Height | Volume | |
| P1 | 07 | 04 | 05 | 140 |
| P2 | 08 | 05 | 03 | 120 |
Length – 8 Width – 7
To calculate height: 140 + 120 / 8*7 = 4,642
Therefore, the dimensions of the package will be as follows:
Length – 8; Width – 7; Height – 4.642
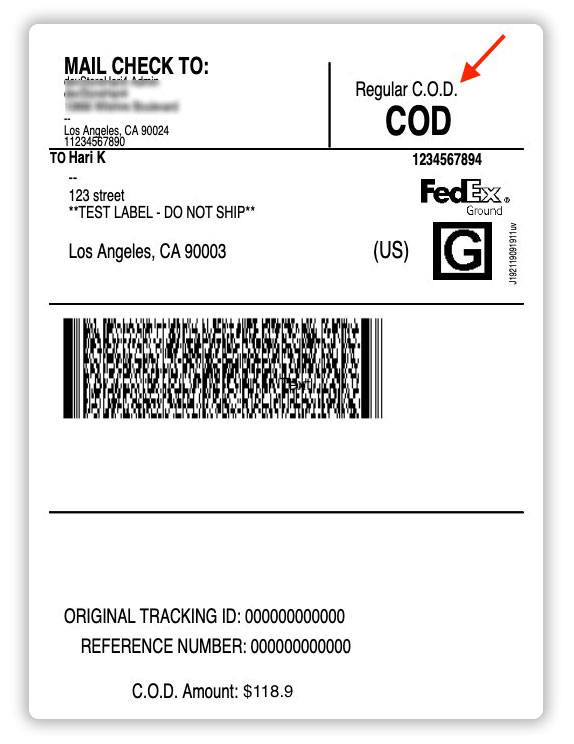
Printing COD labels from your Shopify store
With the Shopify Multi Carrier Shipping Label app, you can handle the COD orders and print the COD labels directly from your Shopify store.
Once a COD order is placed, you can view the order under the “All orders” section in the app. Also, when you select the orders, the app automatically displays the order type, as shown below.
Similar to other orders, you can create the labels and the order will be marked as fulfilled. Here is a sample COD label for FedEx Ground.
Mark an order as “COD”
The app also allows you to change the payment type from the order section. With this option, you can mark an order as COD, even if a different payment option was selected at checkout. To do this, select the order and choose “Mark as COD order” under Advanced options.
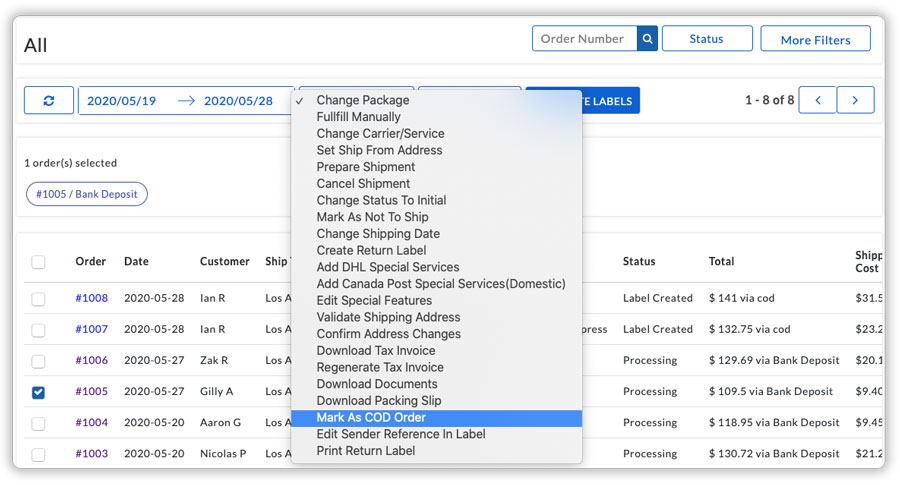
This will change the payment type for the order and will be marked as a COD order.

To more on how to handle COD orders, visit how to handle COD effectively to increase sales on your Shopify store.
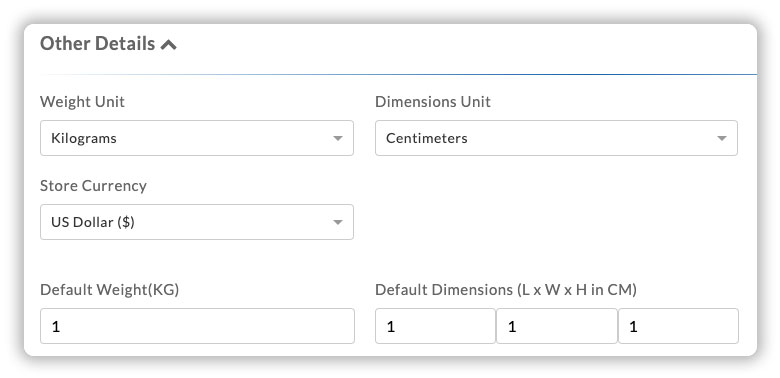
Adding default weight & dimensions for your products?
If you have products with similar weight & dimensions or negligible values, you can add default weight & dimensions for all your products so that, the packaging is handled and rates are calculated based on these values.
Also, if you have not set the actual & dimensions for your products, the default weight & dimension values will be used for handling the packaging of your products and thereby calculating the rates.
International shipping with the Shopify Multi Carrier Shipping Label app
With the app, you can easily handle International shipping. The app helps you generate a Commercial invoice for your orders and also allows you to set the customs duties payer as “Sender” or “Recipient”. Now, let’s understand the process of generating a Commercial invoice for FedEx.
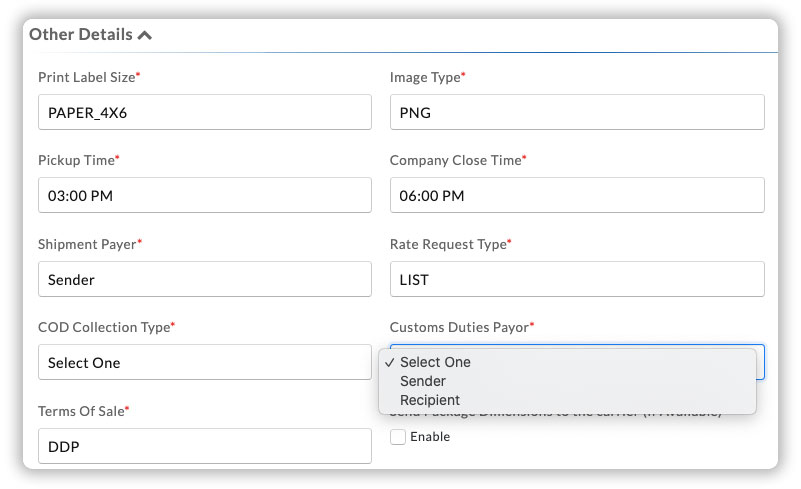
Set up the Customs Duties payer
Before generating the shipping labels and commercial invoice, you need to set up the customs duties payer. To do that, head to App settings --> Carriers --> FedEx --> Other settings --> Customs duties payer. You can set the duties payer as “Sender” or the “Recipient.”
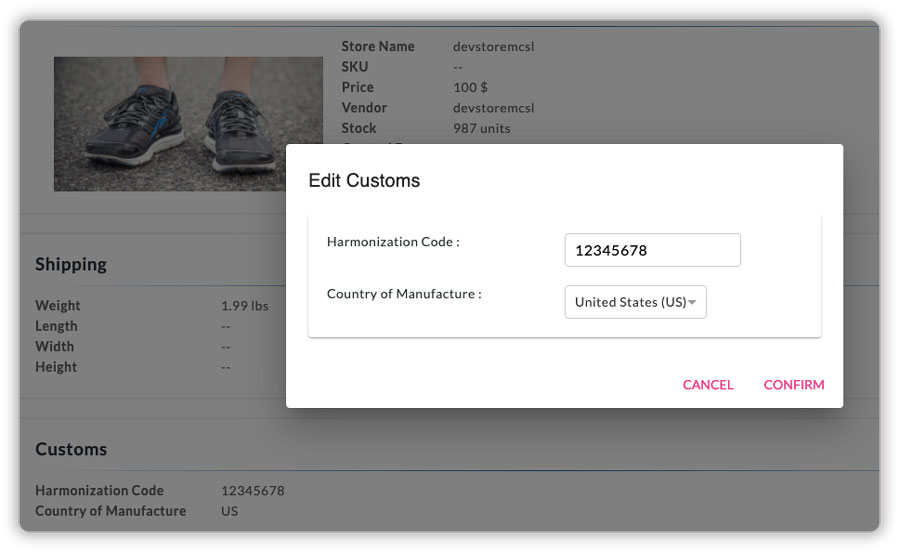
Set up the HS code and Country of Manufacture
Now, you can set up the Harmonization Code (HS Code) and the Country of Manufacture of your products. To do that, head to Products --> Select the required product --> Customs. You will be able to add the HS code and the Country of Manufacture here.
Generate the Shipping label, Commercial invoice, and other documents
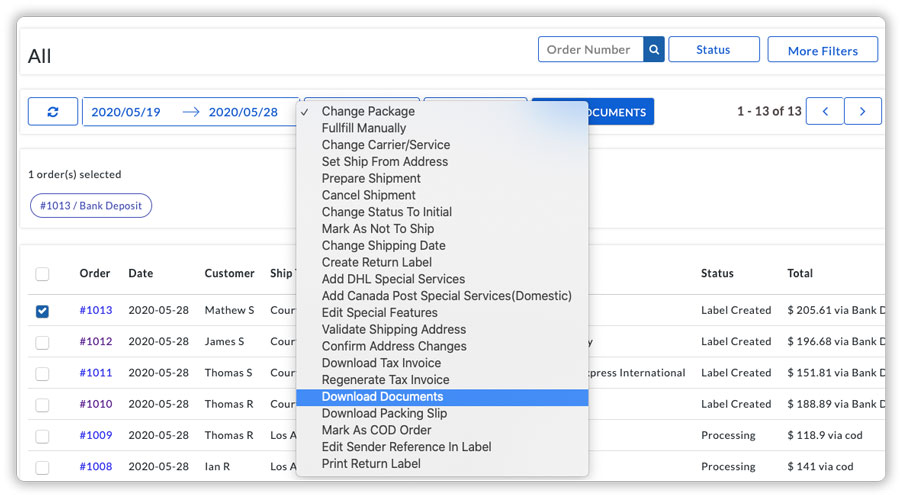
You can generate the shipping label for your order. When you generate the label, all other documents like Commercial invoice, tax invoice, packing slip, etc are generated. In order to download these documents, select the order and choose “Download Documents” under the Advanced tab.
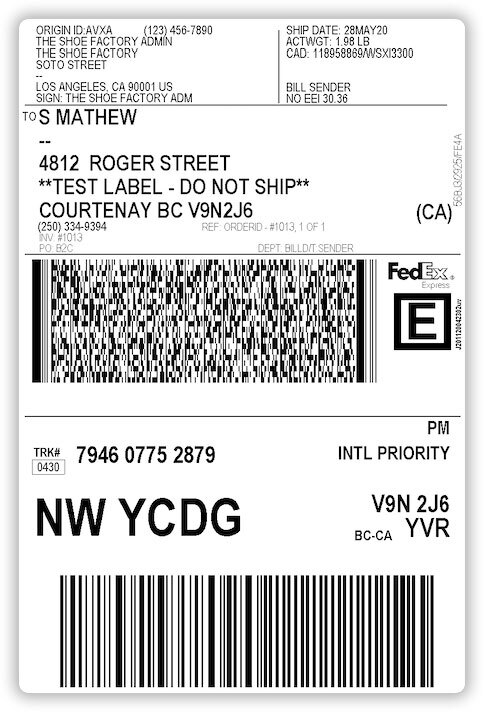
Here is a sample FedEx international label.
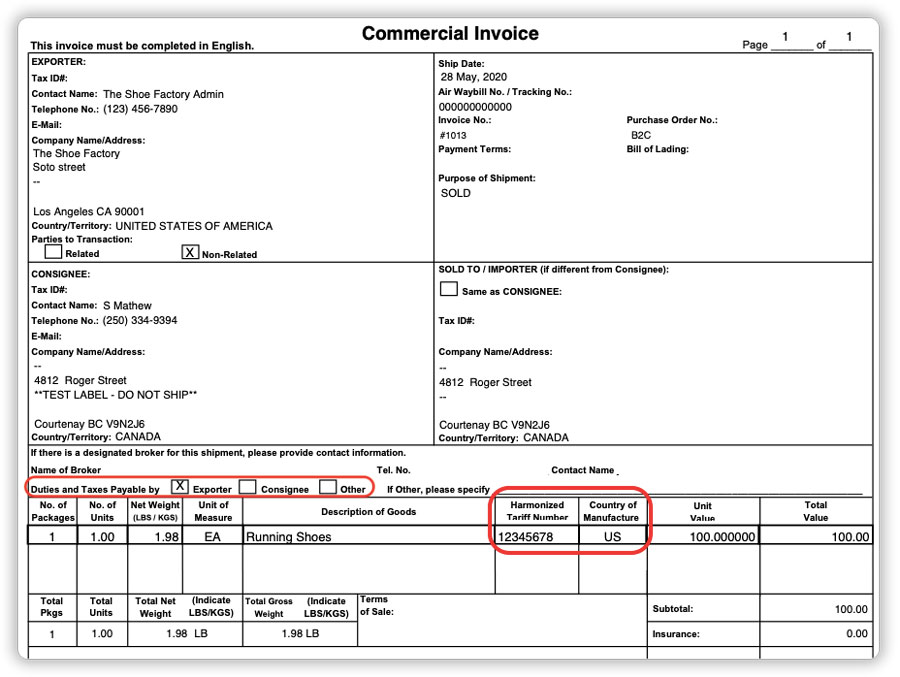
Below is a sample commercial invoice. You can see the Duties & Taxes payer, HS code, and the Country of Manufacture.
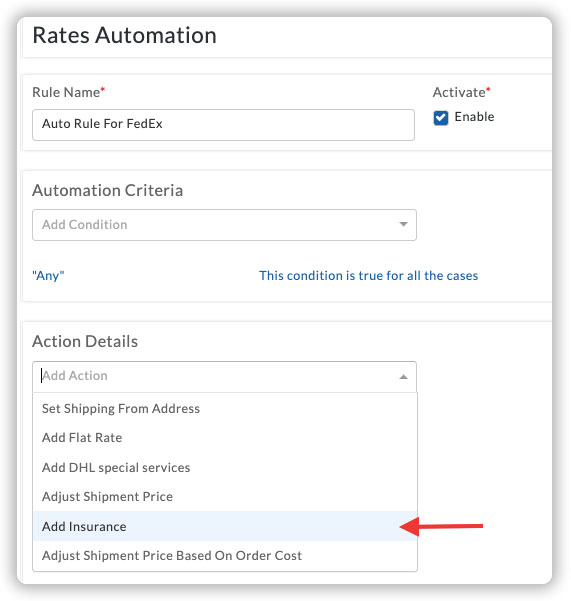
Add Insurance for your orders
If required, you can also add insurance for your orders based on different carriers. This is mainly important for International orders as there are chances of the package getting lost or stolen more than the domestic orders.
To add insurance, head to App settings --> Shipping Rates --> Rates automation. Select the required carrier and choose “Add Insurance” under action details.
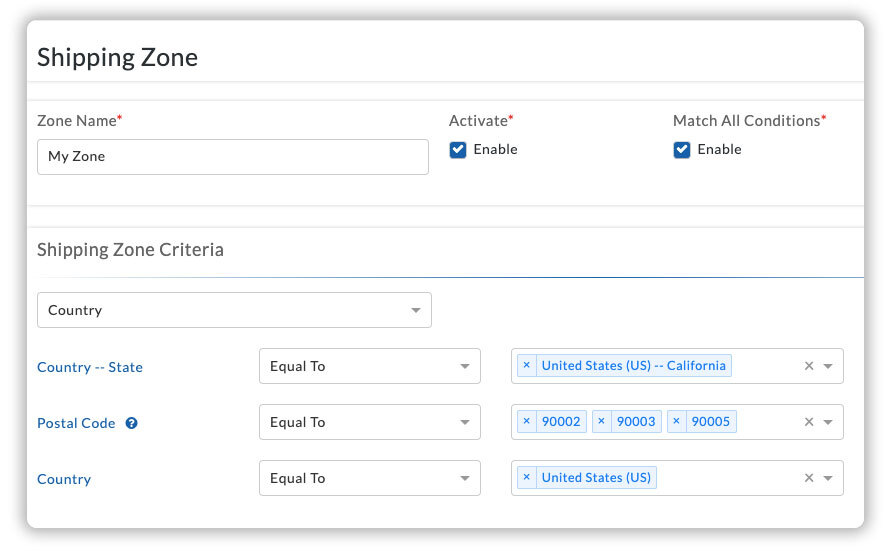
How to calculate the rates based on the shipping zones?
The app helps you display and calculate rates based on shipping zones. You can create shipping zones and calculate rates based on the Country-state, Country, and Postal codes. For example, you can create a zone for Country-state, United states-California, and add the rates for this zone.
To add shipping zones, head to App settings --> Shipping --> Shipping zones.
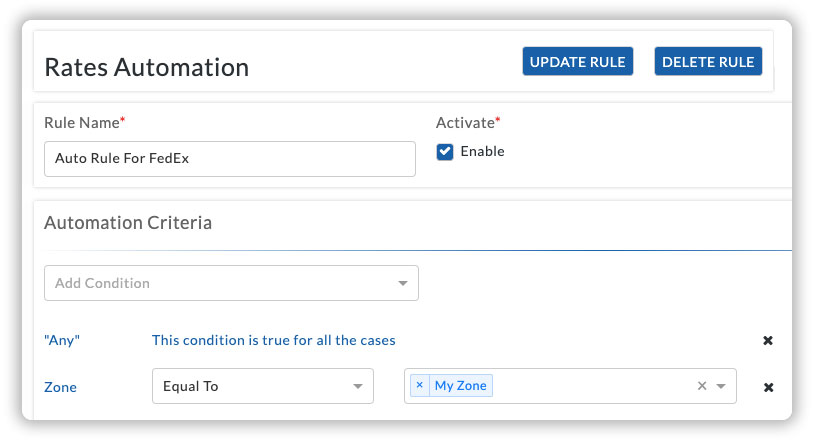
Once you have created the shipping zones, head to App settings --> Shipping rates --> Rate automation, from where you can choose the automation criteria as “Zones”, add the zone that you have created, and calculate the rates accordingly.
If you face any issues or have any queries on setting up the app, feel free to contact our support.